
Essential Sewing Notions: A Guide to Buttonholes & Button Loops
Buttonholes and button loops are essential components in garment construction, providing both functionality and aesthetic appeal. Buttonholes are reinforced openings that allow buttons to pass through, securing different parts of a garment. They come in various styles, including basic rectangular, keyhole, bound, and corded buttonholes, each suited for specific fabric types and garment designs. Button loops, such as rouleau loops and frog fasteners, offer alternative fastening methods, often adding decorative elements to clothing. Understanding the different types of buttonholes and loops, along with their appropriate applications, enhances both the durability and visual appeal of your sewing projects.
For a comprehensive guide on buttonholes and button loops, including detailed instructions and illustrations, continue reading-
What is a Buttonhole?
A buttonhole is a slit or opening in fabric, typically on a garment, designed to allow a button (read our detailed guide about buttons) to pass through and fasten securely.
Types of Buttonholes
There are several types of buttonholes used in garment construction:
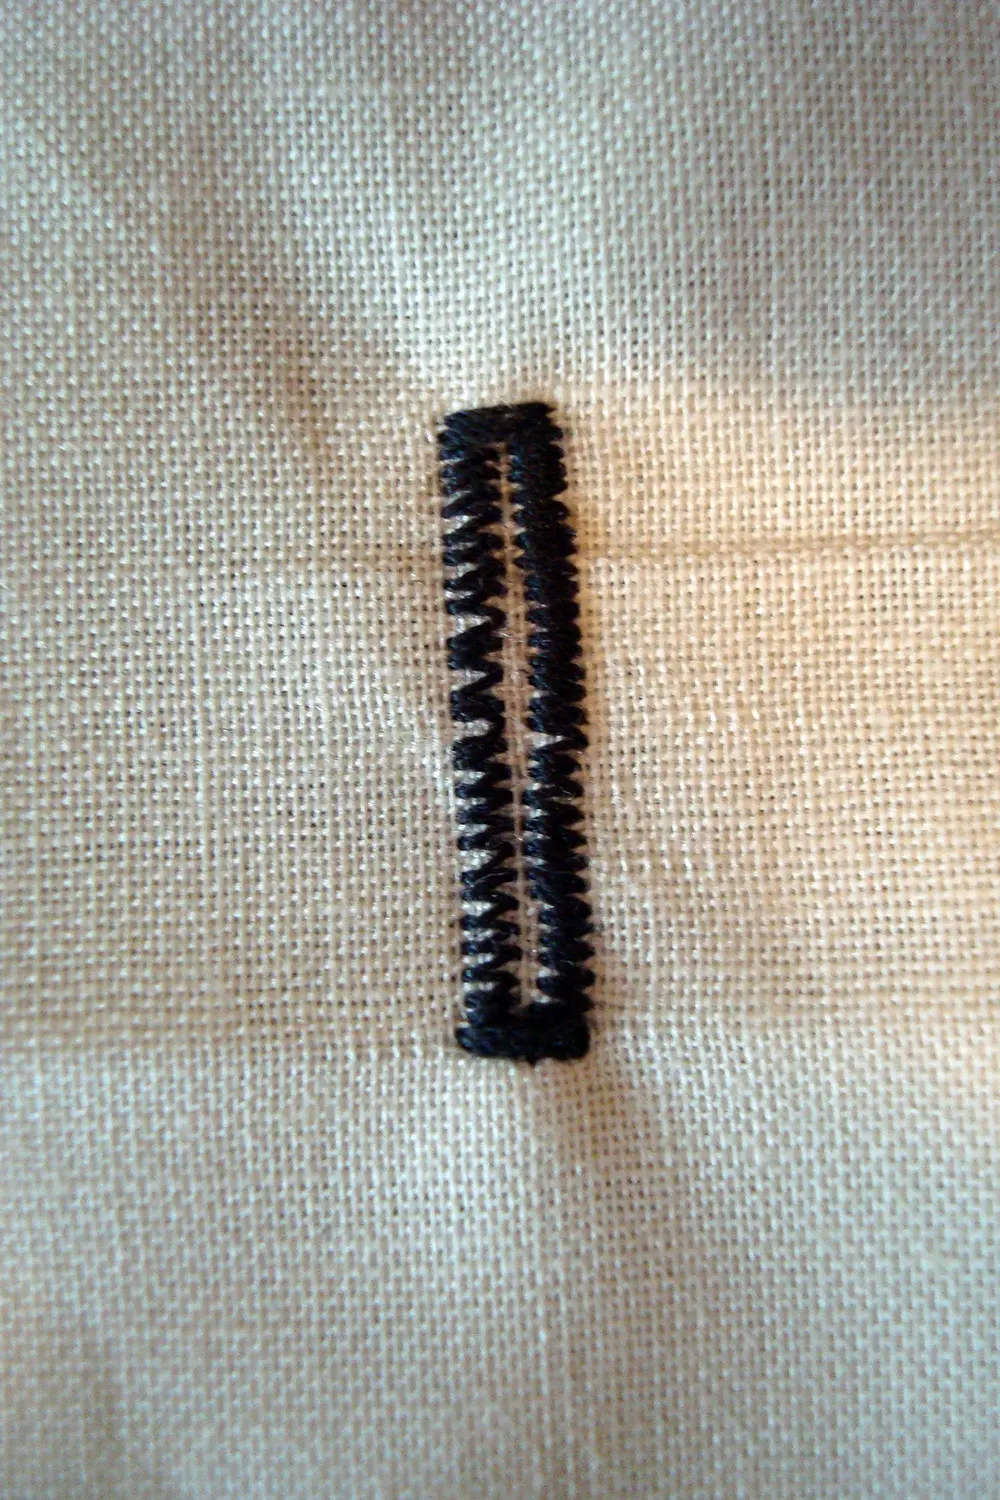
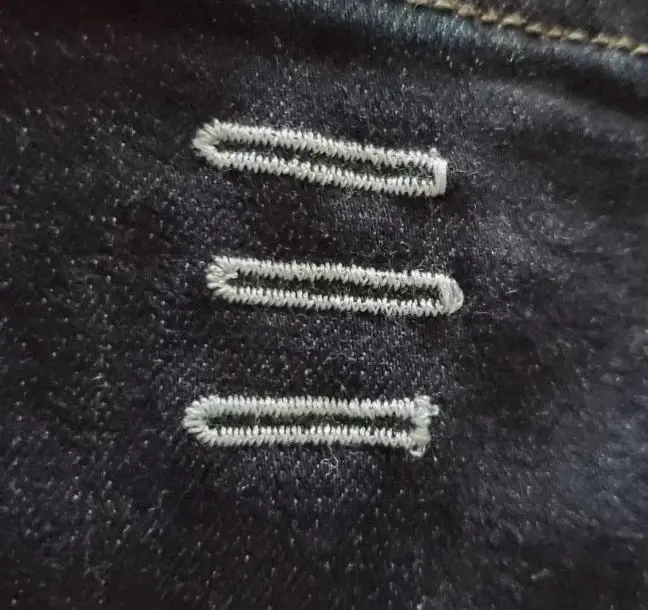
Basic Rectangular Buttonhole
This is a basic, straight-stitched buttonhole often used vertically in shirt plackets or blouses on lightweight or medium weight fabrics. It is one of the most commonly preferred shapes that has a square on both ends. The two longer sides have zigzag stitches, while the shorter ends each have bartack stitches.
Round-End Buttonhole
This buttonhole features one rounded end, while the other end can be squared, rounded, or tapered depending on the desired use and look. It is typically placed vertically on lightweight jackets, coats, or shirts and can also be used on heavier fabrics, where a vertical bartack stitch reinforces the squared end.
Keyhole/Tailor’s Buttonhole

This type of buttonhole usually has a square end and a keyhole end. It’s commonly used horizontally on tailored coats, jackets, and other heavyweight garments. The keyhole opening provides extra space, making it suitable for large, flat buttons or buttons with large shanks.
Bound Buttonhole

A bound buttonhole is made by stitching an extra piece of fabric to the buttonhole area, creating the appearance of two small pleats that meet at the center of the buttonhole. This type of buttonhole is typically used on coats and jackets.
Piped Buttonhole
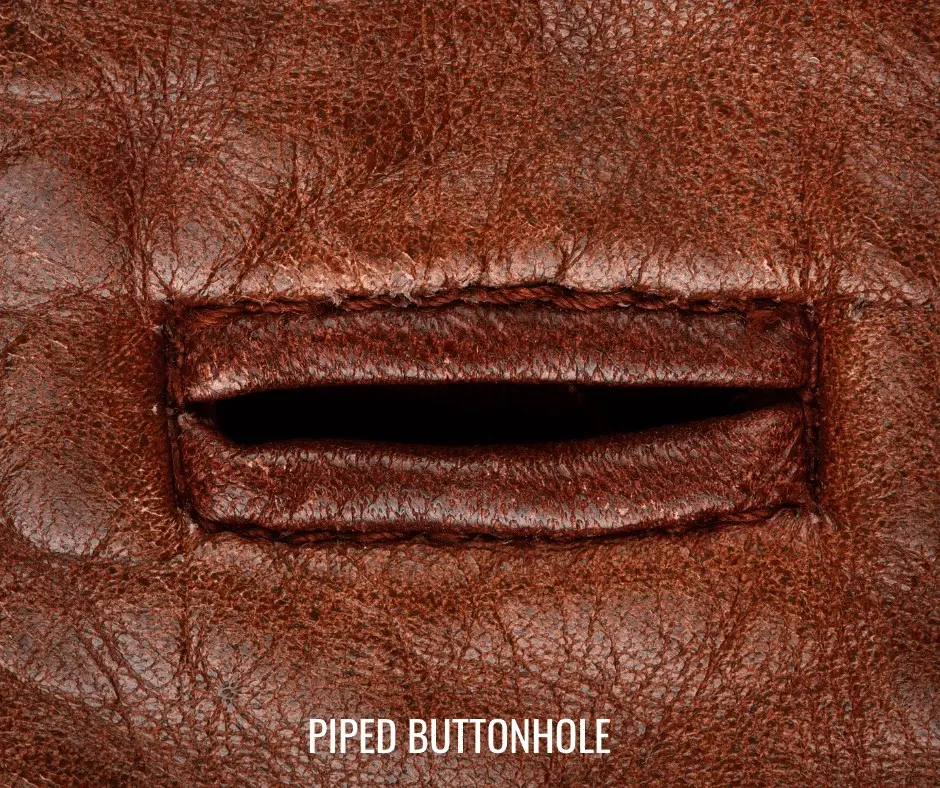
A piped buttonhole is a type of bound buttonhole that includes a thin piping cord along the long edges for added bulk and reinforcement.
Corded Buttonhole
To create a corded buttonhole, place a thin cord or thick thread beneath the zigzag side stitches as you sew. This technique produces elevated edges and helps prevent distortion on stretchy fabrics.
Eyelet Buttonhole
An eyelet buttonhole is made using a buttonhole stitch in a circular pattern instead of a straight line. Each stitch is placed into the same central hole to form a single large hole in the center. This technique is commonly used on delicate fabrics, such as silk or lace.
In-Seam Buttonhole
An in-seam buttonhole is ideal for a discrete buttonhole in a garment. To create it, apply fusible tape to the back of the fabric and then stitch up to the edges of the desired buttonhole location in the seam. Optionally, you can topstitch around the buttonhole for added detail.
Hand-Worked Buttonhole
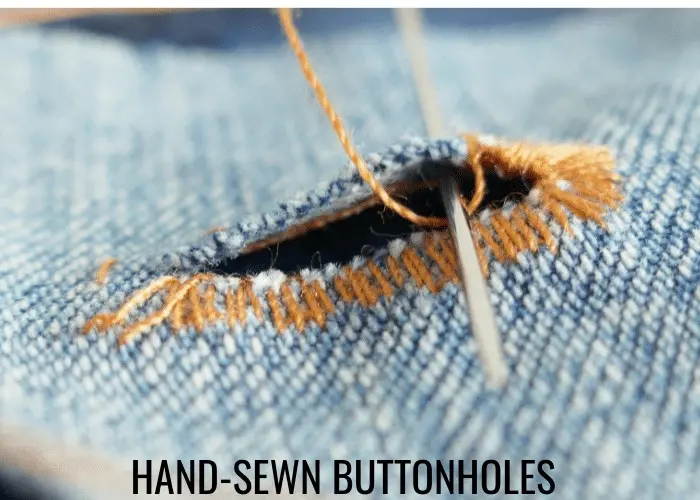
These buttonholes are stitched by hand, providing a traditional and often higher-quality finish compared to machine-made buttonholes.
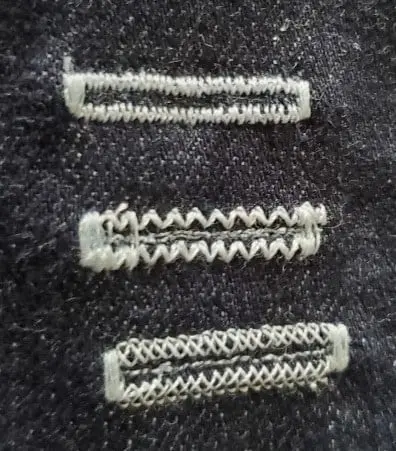
One-Step vs 4-Step Buttonhole
The one-step and four-step buttonhole features on your sewing machine are designed to give you better results with less effort. The one-step option creates buttonholes in a single step, while the 4-step option requires four steps and your input at each stage to complete the buttonhole.
One-Step Buttonhole
With this feature, the sewing machine creates the buttonhole in one continuous process, ensuring it looks good without stopping. This makes sewing buttonholes on shirts and dresses much easier.
4-Step Buttonhole
In the 4-step buttonhole feature, the sewing machine completes the buttonhole in four stages. The drawback of this feature is that the machine pauses between steps, requiring your input to proceed. For example, after sewing the first side, it waits for you to instruct it to sew the top. Then it pauses again until you signal it to sew the other side and stops once more before finishing the bottom of the buttonhole.
So, which is the best option for you?
The main drawback of the 4-step buttonhole feature is that it can result in inconsistent buttonholes. Your choice depends on your personal preference and how much time you need for sewing buttons on garments. If you’re a beginner, the one-step feature is likely preferable because the machine ensures a professional look without you taking any hassle.
An experienced sewer might favor the 4-step process for better control. Additionally, if you don’t frequently sew projects that require buttons, the one-step process might be more appealing due to its ease and speed.
Different Stages of Creating a Buttonhole
A buttonhole is stitched by a sewing machine in three steps. The stitch width and length can be adjusted to fit the garment or craft item, but it should be dense and tightly packed.
1. Sew the first side of the buttonhole with the machine.
2. Create a bar baste at one end.
3. Sew the second side with the machine and create another bar baste at the opposite end.
Buttonhole Placement and Orientation
When determining where to place your buttonholes, there are several factors to consider. Although your pattern probably includes buttonhole markings, it’s often more precise to figure out the placement yourself just before sewing. This way, any minor adjustments from pressing hems, plackets, or seam allowances are taken into account, ensuring your buttonholes appear correctly positioned.
1. Use a sewing gauge to measure the button’s diameter.
2. On the right side of the fabric, where the garment will be worn, create a row of basting stitches along the center front line.
3. Create a second row of basting stitches the diameter of the button away from the first row.
4. Place the buttons between the basting lines and stitch lines at right angles where the buttonholes will be located.
Another aspect to consider when positioning buttonholes is whether they should be placed horizontally or vertically. The placement of buttonholes is crucial depending on where the strain or pressure will be on the garment.
- For instance, on a skirt waistband or trouser or a shirt collar stand, the garment tends to pull open horizontally. In such cases, buttonholes should be horizontal so the button is pulled to one end of the buttonhole, keeping the garment secure. If the buttonhole were vertical, the strain would encourage it to open up, causing the button to potentially slip out. For horizontal buttonholes, they’re placed with the end stop aligned with the basted center line.
- Conversely, on garments with many buttons and a looser fit, like blouses or dresses, there is less strain on each buttonhole, so they are typically placed vertically. For vertical buttonholes, they’re positioned with the buttonhole centered on the basted center line.
How to Sew Different Types of Buttonholes
Machine-made Buttonholes
New-age sewing machines offer versatility in stitching different types of buttonholes, catering to various garment styles. Many machines feature a special foot where the button fits, and a sensor determines the appropriate size of the buttonhole. Stitch width and length can be adjusted to match the fabric type. After stitching the buttonhole, it’s important to cleanly cut through it with a buttonhole chisel for a neat finish. To create simple machine-made buttonholes, you’ll need your sewing machine equipped with a buttonhole foot.
1. Determine the perfect size for your buttonhole by placing a button in the back of the buttonhole foot and securing it tightly.
Tip: Always test on a fabric scrap first.
2. Attach the buttonhole foot to your machine as you would with any other foot. Lower the buttonhole lever all the way down.
3. Mark the placement of the buttonhole on your fabric. Choose your desired buttonhole style on your machine.
4. Slide your fabric under the foot, aligning the button end of your marking with the lines on the foot.
5. Maintain a consistent speed with your presser foot while sewing the buttonhole. Place a pin at the top of the buttonhole and then carefully cut upwards from the bottom using a seam ripper to open each hole. The pin prevents the blade from cutting into the top stitches.
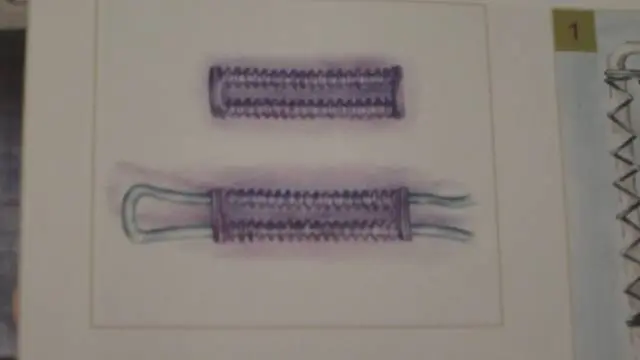
Corded Buttonholes
This type of buttonhole incorporates a heavier sewing thread cord running through it, creating a bold look on plain fabric. You may need to refer to your sewing machine manual for guidance on positioning the cord.
1. Follow your machine manual’s instructions to place the cord into the buttonhole foot.
2. Stitch the buttonhole on the machine, ensuring that the machine stitches over the cord.
3. Gently tug on the cord ends to remove any loops.
4. Thread the ends of the cord into a large needle, using a chenille needle size 18.
5. Bring the cord to the back of the fabric and secure it by hand with a back or whip stitch.
Piped Buttonholes
Another method for creating a buttonhole involves using a piping cord, which is typically done early in the garment construction process. It’s crucial to use size 1 piping cord to avoid excessive bulkiness.
1. Wrap size 1 piping cord with a bias strip, folding wrong side to wrong side.
2. Stitch close to the cord using a zipper foot.
3. Cut a length of cord equal to the buttonhole width plus 3⁄4 inch (2 cm). Position the cord against the buttonhole markings on the right side of the fabric, aligning the raw edges of the cord with the center of the markings.
4. Use the zipper foot to machine close to the cord, stopping stitching at the markings.
5. Cut the fabric between the two cords.
6. Slash into the corners.
7. Turn the cord through to the wrong side, pulling the ends of the cord through.
8. On the wrong side, stitch the end of the slash lines to the ends of the cord.
9. Trim any excess cord to 3⁄8 inch (1 cm).
10. Press the finished piped buttonhole on the right side of the fabric.
Bound Buttonholes
Another technique for creating buttonholes is using a patch of fabric stitched onto the main fabric, particularly suitable for jackets and coats, known as a bound buttonhole.
1. Use basting stitches to mark the buttonhole placement lines.
2. On a patch of interfaced fabric, draw a rectangle equal to the button’s diameter. The rectangle’s depth represents the buttonhole’s two sides, known as lips.
3. Position the patch with the buttonhole markings onto the fabric, aligning the buttonhole shape with the markings and pinning it in place.
4. Stitch around the rectangle, ensuring sharp corners.
5. Overlap the stitching on one of the long sides.
6. Cut through the center of the buttonhole and into the corners.
7. Pull the patch through to the wrong side, creating a rectangular hole in the fabric.
8. Press down one lip of the buttonhole, then press the patch back over it.
9. Repeat for the other side, folding the patch over the lips to meet in the center.
10. Press on the right side.
11. On the wrong side, stitch the end of the slash lines over the folded patch.
12. Whip stitch the folded edges of the buttonhole together.
13. Hand stitch along the long edges of the buttonhole.
14. Press the finished buttonhole and remove the whip stitches.
https://youtu.be/SVYpXod6ZJc?si=muTbZrz3Vmz-BJZ3
In-Seam Buttonholes
This type of buttonhole is created within a seam allowance, commonly seen along decorative center fronts with seam detailing, providing a discreet finish.
1. Strengthen the seam by applying a fusible tape, 3⁄4 inch (2 cm) wide, on the side closest to the back of the garment.
2. Baste the opening closed.
3. Press the seam open, revealing the basting stitches.
4. Remove the basting stitches to reveal the buttonhole.
Button Loops
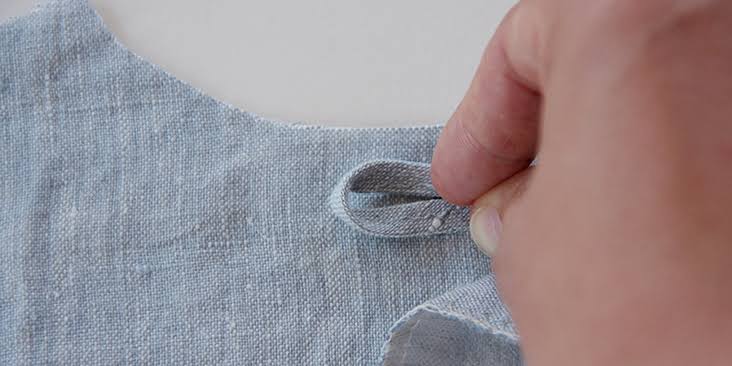
Button loops are fabric loops sewn onto garments to fasten buttons securely, often used alongside buttonholes for closures.
Types of Button Loops
There are several types of button loops used in garment construction:
Rouleau Loops
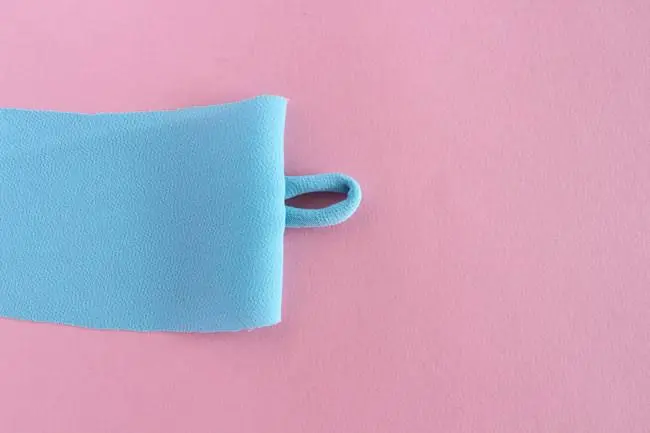
Rouleau loops are thin fabric strips sewn into loops, often used for button loops or decorative details in clothing.
Frog Fastener
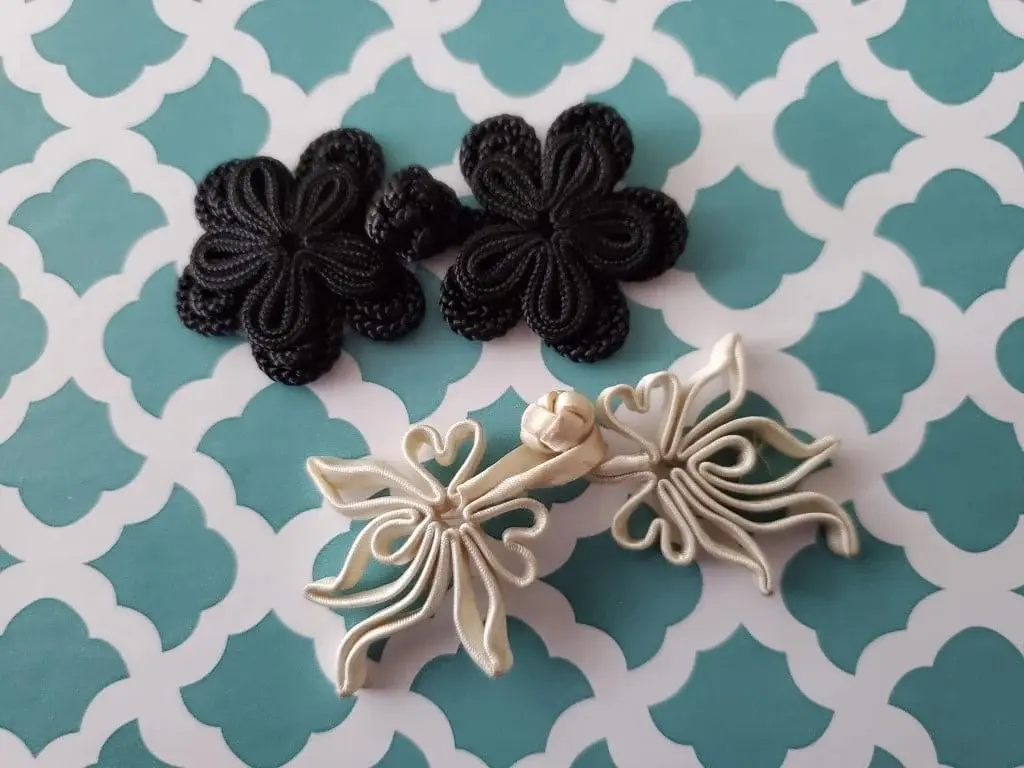
A frog fastener with a ball button is a closure featuring a looped braid (the frog) and a spherical button, commonly used in traditional Asian clothing for both decoration and fastening.
Spaced Rouleau Loops
Spaced rouleau loops are fabric strips sewn into individual loops with spaces between them. These loops are often used as decorative elements or as closures on garments.
Corded Loops
Corded loops typically refer to loops made from cord or string. They can be used for decorative purposes, functional closures, or as part of intricate designs.
How to Create Different Types of Button Loops
Rouleau Loops
This button loop is made from a bias strip, preferably in a smooth fabric for easier turning. It’s typically used with round ball-type buttons.
1. Cut a bias strip measuring 1 1⁄2 inches (4 cm) wide. Fold it lengthwise, right side to right side, and pin it together.
2. Stitch along the strip with a seam allowance of 5⁄8 inch (1.5 cm), keeping the edge of the machine foot against the folded edge.
3. Stitch another row 1⁄16 inch (2 mm) away from the first stitching for added strength.
4. Trim the excess bias fabric close to the stitching.
5. Use a loop turner to turn the bias strip to the right side.
6. Pin the prepared loop strip to the ironing board and steam iron it for a smooth finish.
Corded Loops
To create a fine button loop with a cord running through it, suitable for lightweight fabrics and used with a shanked button, follow these steps:
1. Cut a bias strip measuring 1 1⁄2 inches (4 cm) wide, and any desired length. Also, cut a piece of cord twice the length of the strip.
2. Wrap the cord with the bias strip, folding wrong side to wrong side. Pin in place, ensuring the bias strip is close to one end of the cord.
3. Stitch along the bias strip, next to but not too close to the cord.
4. Machine another row of stitching 1⁄16 inch (2 mm) away from the first stitching.
5. Trim away the excess bias strip close to the stitching.
6. Stitch through the cord and bias strip at the center of the cord and near the end of the bias strip.
7. At the center point, carefully ease the fabric over the cord to turn it to the right side.
8. Trim off the exposed ends of the cord from the fabric loop.
Sewing the Loops
Once you’ve created the loops, the next step involves attaching them to the garment. It’s crucial to ensure all loops are uniform in size and evenly spaced. To achieve this, use basting stitches to mark placement lines on the fabric. The loops should be affixed to the right-hand front or left-hand back of the work. Here’s a breakdown of the process:
1. Mark placement lines on the fabric using basting stitches, ensuring equal spacing.
2. Pin the loops to the fabric, aligning the folded end with the inner basting line and the cut ends with the raw edge. Center each loop over the baste line.
3. Machine stitch the loops just inside the seam allowance at the center line.
4. Stitch another row to reinforce the loops’ security.
5. Place the facing or lining over the loops for a polished finish.
6. The completed loops will extend from the fabric’s edge.
Summary: Buttonholes and Buttonloops
Mastering buttonholes and button loops can elevate your sewing projects by ensuring both functionality and style. Whether you’re adding classic machine-stitched buttonholes to a tailored blouse or crafting delicate rouleau loops for an elegant dress, understanding the right techniques will help you achieve a professional finish. With practice and the right tools, you can create secure, durable, and beautifully detailed fastenings that enhance your garments. Keep experimenting with different styles to find what works best for your projects, and soon, button closures will become one of your favorite sewing details!

If you are a sewist, have a look at our recommended sewing machines: beginner sewing machines, sewing tools and notions, coverstitch sergers and overlock machines, embroidery machines and quilting sewing machines, sewing practice sheets and sewing project planner.
If you are looking for sewing patterns, here are some great options: Activewear Sewing Patterns, Plus Size Sewing Patterns, Outerwear Sewing Patterns, Jumpsuit Sewing Patterns, Coord Set Sewing Patterns, Pants Sewing Patterns, Shorts Sewing Patterns, Skirts Sewing Patterns, Dress Sewing Patterns, Top Sewing Patterns, Bodycon Sewing Patterns, Evening Dresses Sewing Patterns, Loungewear Sewing Patterns, Cottagecore Sewing Patterns, Free Sewing Pattern.
Happy Stitching.