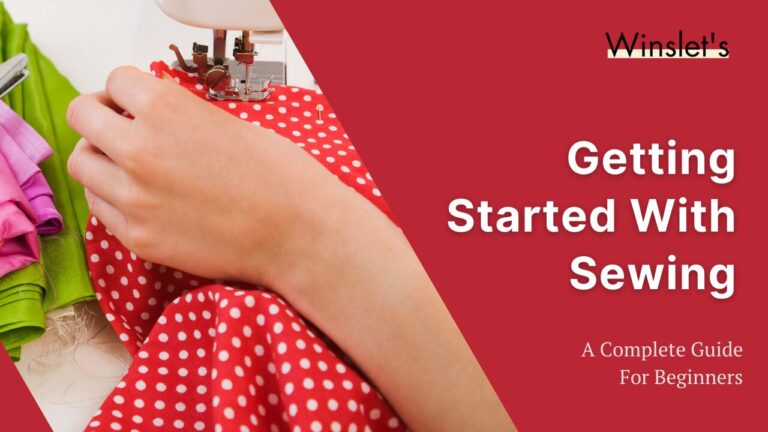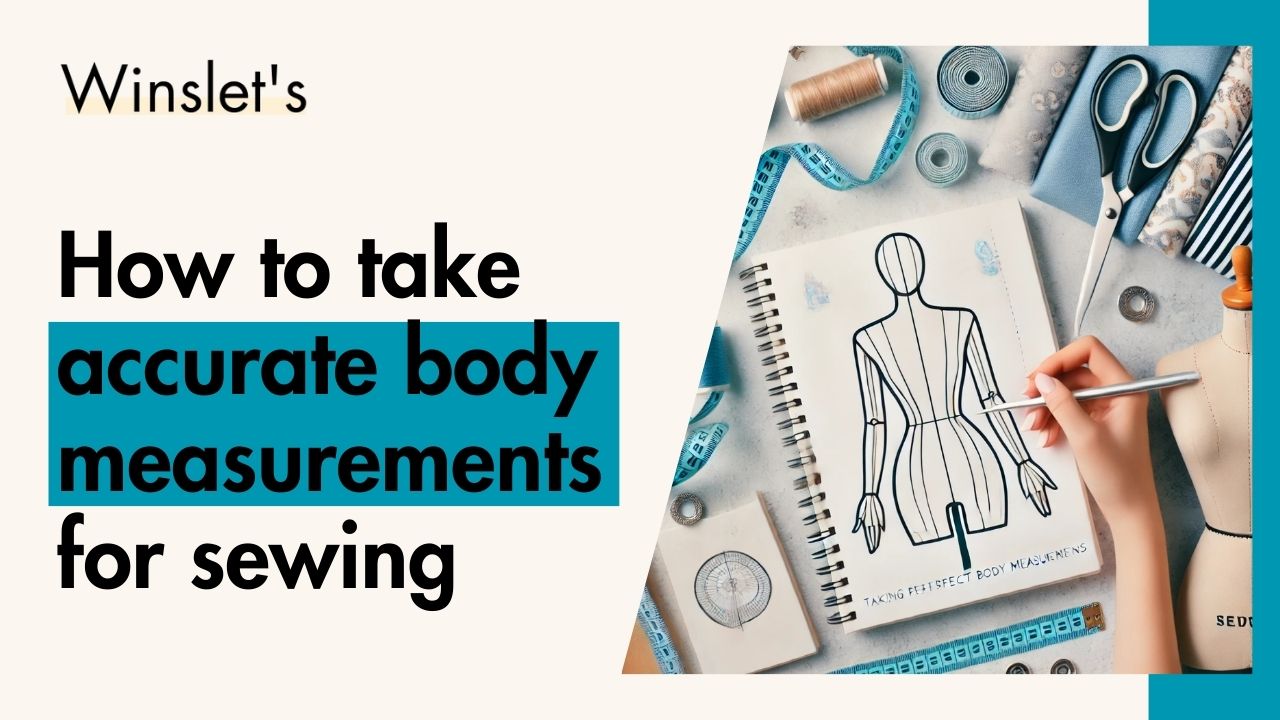
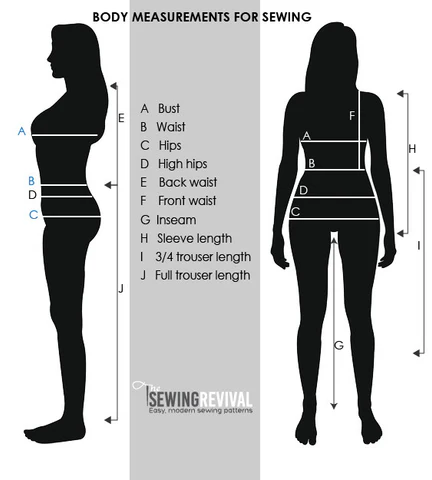
The Ultimate Guide to Taking Perfect Body Measurements for Sewing
Getting the perfect fit is one of the biggest challenges in sewing, but it all starts with accurate body measurements. Whether you’re sewing for yourself or someone else, knowing the right way to measure ensures that your handmade garments look and feel amazing.
Taking measurements may seem simple, but small errors can lead to ill-fitting clothes. In this guide, we’ll walk you through step-by-step instructions, pro tips, and troubleshooting advice to help you measure correctly every time. With the right tools and techniques, you’ll never have to deal with a too-tight bodice or sagging waistline again!

General Tips for Accurate Measurements
Source: https://images.app.goo.gl/n3ykonmT8mkPPbYd6
Before diving into specific measurements, keep these general tips in mind:
- Posture Matters: Ensure the person you’re measuring is standing straight, in a natural position. Encourage them to turn around instead of you moving around them. This helps them maintain a more natural posture, resulting in more accurate measurements.
- Tape Placement: Always keep the measuring tape parallel to the floor when measuring circumferences. This ensures that the measurement is consistent and accurate.
- Tape Tension: Don’t tighten the measuring tape or leave any gaps. The tape should lay flat against the skin without compressing it, and there should be no fingers between the tape and the body.
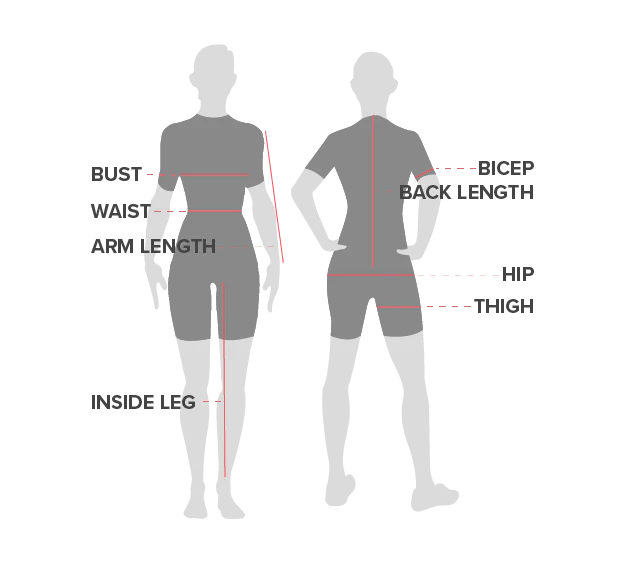
How To Measure?
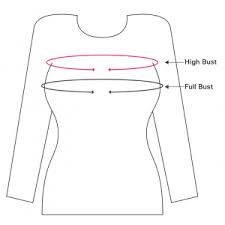
1. Upper Bust Circumference

Source: https://images.app.goo.gl/f9XzWf44xnYdKPW56
Place the measuring tape around the chest, above the bust, wrapping it under the armpits and across the back. This measurement is crucial for creating garments that fit well in the shoulders and upper chest.
2. Bust Circumference
Source: https://images.app.goo.gl/JpafnBE3pTMwXwSy6
Measure around the fullest part of the bust, ensuring the tape is parallel to the floor. This is a key measurement for ensuring that the garment fits properly across the chest.
3. Underbust Circumference
Wrap the measuring tape around the body just under the bust. This measurement is particularly important for garments that are fitted at the bodice or require support, like dresses and bras.
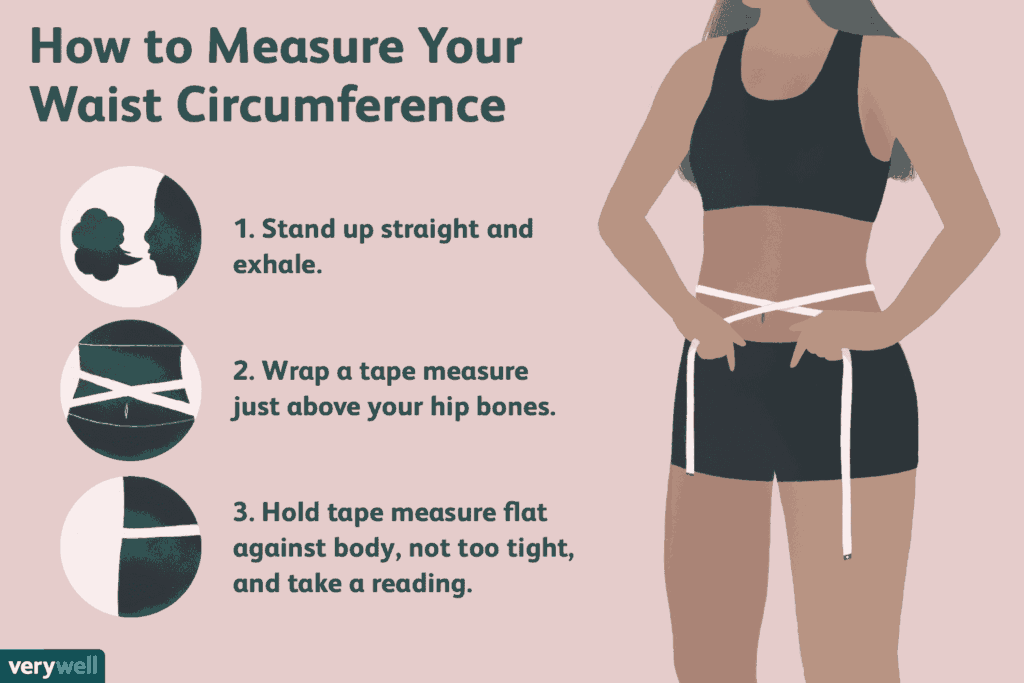
4. Waist Circumference
Source: https://images.app.goo.gl/yb9BQWMjVKhJFMBXA
Find the natural waistline, which is typically the narrowest part of the torso, just above the belly button. Measure around this area to determine the waist circumference. This is a critical measurement for skirts, pants, and fitted dresses.
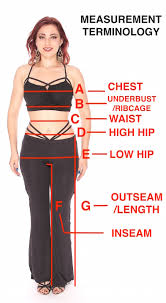
5. High Hip Circumference
Source: https://images.app.goo.gl/MjSiWET5fpbGpJYC8
Measure around the upper hip area, about 3-4 inches below the waist. This is important for ensuring that skirts, pants, and dresses fit smoothly around the top of the hips.
6. Low Hip Circumference
Measure around the fullest part of the hips and buttocks, typically 7-9 inches below the waist. This measurement is essential for ensuring a comfortable and flattering fit in skirts, pants, and form-fitting dresses.
7. Thigh Circumference
Source: https://images.app.goo.gl/MJPg4qbrj6ECTJZB9
Measure around the fullest part of the thigh, usually about an inch below the crotch. This measurement is necessary for creating fitted pants, shorts, or skirts.
8. Arm Circumference
Wrap the measuring tape around the fullest part of the upper arm, usually halfway between the shoulder and the elbow. This ensures that sleeves fit comfortably.
9. Wrist Circumference
Measure around the narrowest part of the wrist. This is especially important for fitted sleeve cuffs.
10. Back Shoulder Width
Measure from the edge of one shoulder to the other across the back, where the shoulder seam of a garment would sit. This helps ensure the garment fits well across the back and shoulders.
11. Shoulder Width
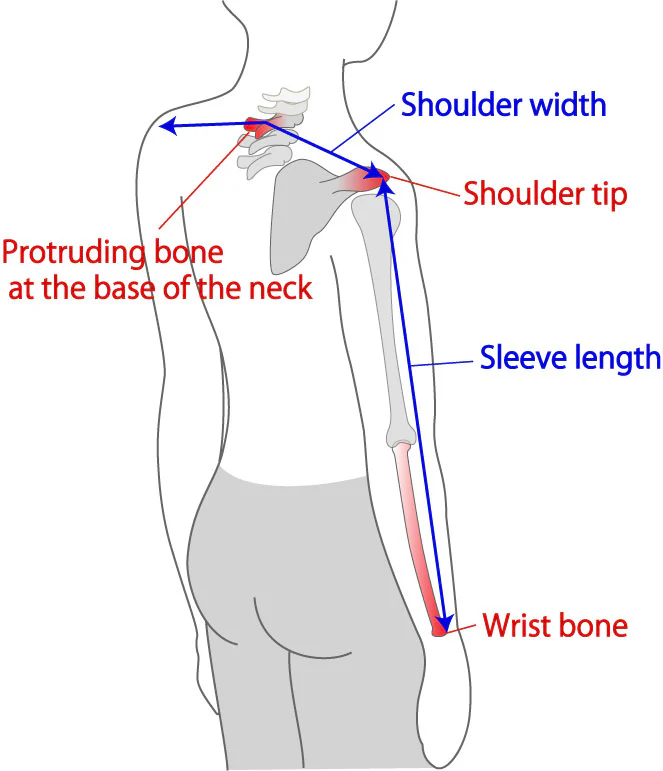
Source: https://images.app.goo.gl/tppdZu46ViSGAfm78
Measure from the base of the neck to the point where the arm starts to slope down, across the top of the shoulder. This is key for creating garments that fit properly in the shoulder area.
12. Arm Length
With the arm slightly bent, measure from the shoulder point down to the wrist. This measurement is essential for creating sleeves that are the correct length.
13. Waist to Hip
Measure the vertical distance from the waist to the fullest part of the hips. This measurement helps ensure that skirts and pants sit correctly on the body.
14. Waist to Knee
Measure the vertical distance from the waist to the knee. This is important for determining the length of skirts, dresses, and shorts.
15. Waist to Floor
Measure from the waist to the floor while standing straight and in a natural position. This measurement is crucial for full-length dresses, skirts, and pants.
Troubleshooting Common Measuring Mistakes
❌ The tape is too tight or too loose: Always measure with the tape comfortably snug, not digging into the skin or hanging loose.
❌ Not measuring at the right level: Ensure the tape is parallel to the floor, especially for bust, waist, and hip measurements.
❌ Wearing bulky clothing: Take measurements in fitted undergarments to avoid extra fabric distorting the numbers.
❌ Not double-checking measurements: Always measure twice to confirm accuracy.
❌ Using a stiff measuring tape: A flexible sewing measuring tape is a must for body measurements.
Real-Life Examples: Why Accurate Measurements Matter
👗 Making a Fitted Dress – If the bust measurement is off by even an inch, the dress could be too tight or too loose.
👖 Sewing Pants – An incorrect inseam measurement can result in pants that are either too short or dragging on the floor.
👚 Crafting a Custom Jacket – Shoulder width and sleeve length measurements must be precise to ensure a structured and well-fitted look.
Taking the time to measure accurately can save fabric, reduce alterations, and ensure a perfect fit the first time!
Updated Blog Post: How to Take Accurate Body Measurements for Sewing
New Title Suggestion:
The Ultimate Guide to Taking Perfect Body Measurements for Sewing
Rewritten Introduction
Getting the perfect fit is one of the biggest challenges in sewing, but it all starts with accurate body measurements. Whether you’re sewing for yourself or someone else, knowing the right way to measure ensures that your handmade garments look and feel amazing.
Taking measurements may seem simple, but small errors can lead to ill-fitting clothes. In this guide, we’ll walk you through step-by-step instructions, pro tips, and troubleshooting advice to help you measure correctly every time. With the right tools and techniques, you’ll never have to deal with a too-tight bodice or sagging waistline again!
Summary of the Blog Post
1. Essential Tools for Measuring
Before you start, gather these tools:
✔ A flexible measuring tape
✔ A full-length mirror
✔ A notepad or measurement chart
✔ A fitted undergarment for accuracy
✔ A helper (if possible) for hard-to-reach areas
2. Step-by-Step Guide to Taking Body Measurements
✅ Bust/Chest: Measure around the fullest part, keeping the tape parallel to the floor.
✅ Waist: Find the natural waist (the narrowest part) and measure snugly but not tightly.
✅ Hips: Wrap the tape around the widest part of the hips, including the fullest point of your buttocks.
✅ Shoulder Width: Measure from the edge of one shoulder to the other across the back.
✅ Sleeve Length: Start from the shoulder and measure down to the wrist.
✅ Back Length: Measure from the base of the neck to the waistline.
✅ Inseam: Measure from the crotch down to the desired pant length.
Troubleshooting Common Measuring Mistakes
❌ The tape is too tight or too loose: Always measure with the tape comfortably snug, not digging into the skin or hanging loose.
❌ Not measuring at the right level: Ensure the tape is parallel to the floor, especially for bust, waist, and hip measurements.
❌ Wearing bulky clothing: Take measurements in fitted undergarments to avoid extra fabric distorting the numbers.
❌ Not double-checking measurements: Always measure twice to confirm accuracy.
❌ Using a stiff measuring tape: A flexible sewing measuring tape is a must for body measurements.
Real-Life Examples: Why Accurate Measurements Matter
👗 Making a Fitted Dress – If the bust measurement is off by even an inch, the dress could be too tight or too loose.
👖 Sewing Pants – An incorrect inseam measurement can result in pants that are either too short or dragging on the floor.
👚 Crafting a Custom Jacket – Shoulder width and sleeve length measurements must be precise to ensure a structured and well-fitted look.
Taking the time to measure accurately can save fabric, reduce alterations, and ensure a perfect fit the first time!
Final Tips for Success
✨ Measure at the same time of day (your body can expand slightly by evening).
✨ Keep your posture natural—don’t suck in your stomach or stand too stiffly.
✨ Record your measurements in a dedicated notebook or app for future sewing projects.
✨ Update your measurements every 3-6 months, especially if your body shape changes.
Summary: How to take accurate body measurements
1. Essential Tools for Measuring
Before you start, gather these tools:
✔ A flexible measuring tape
✔ A full-length mirror
✔ A notepad or measurement chart
✔ A fitted undergarment for accuracy
✔ A helper (if possible) for hard-to-reach areas
2. Step-by-Step Guide to Taking Body Measurements
✅ Bust/Chest: Measure around the fullest part, keeping the tape parallel to the floor.
✅ Waist: Find the natural waist (the narrowest part) and measure snugly but not tightly.
✅ Hips: Wrap the tape around the widest part of the hips, including the fullest point of your buttocks.
✅ Shoulder Width: Measure from the edge of one shoulder to the other across the back.
✅ Sleeve Length: Start from the shoulder and measure down to the wrist.
✅ Back Length: Measure from the base of the neck to the waistline.
✅ Inseam: Measure from the crotch down to the desired pant length.
If you are a sewist, have a look at our recommended sewing machines: beginner sewing machines, sewing tools and notions, coverstitch sergers and overlock machines, embroidery machines and quilting sewing machines, sewing practice sheets and sewing project planner.
If you are looking for sewing patterns, here are some great options: Activewear Sewing Patterns, Plus Size Sewing Patterns, Outerwear Sewing Patterns, Jumpsuit Sewing Patterns, Coord Set Sewing Patterns, Pants Sewing Patterns, Shorts Sewing Patterns, Skirts Sewing Patterns, Dress Sewing Patterns, Top Sewing Patterns, Bodycon Sewing Patterns, Evening Dresses Sewing Patterns, Loungewear Sewing Patterns, Cottagecore Sewing Patterns, Free Sewing Pattern.
Happy Stitching.