How to Sew a Strappy Jumpsuit?
Hey friends! I woke up this morning excited to show you how to make a DIY strappy jumpsuit! Jumpsuits, tracing back decades, have seen evolving popularity, notably surging in the late 1960s and early 1970s, influenced by hippie and disco styles.
This DIY jumpsuit I’ll show you today is comfortable to wear and super simple to make yourself. I’ve used Winslet’s Lola Sleeveless Strappy Jumpsuit Pattern, but you’re free to use any pattern you like.
The pattern I used is a sleeveless, loose-fitting jumpsuit. With its strappy design over the shoulders, this jumpsuit offers a relaxed and comfortable fit. Ideal for casual wear, the sleeveless feature allows for easy movement, while the loose fit ensures comfort throughout the day. So, let’s get started right away.
What supplies do you need to sew a strappy jumpsuit?
The basic supplies that you’ll need to sew a strappy jumpsuit are a Sewing Pattern (I used Winslet’s Lola Sleeveless Strappy Jumpsuit Pattern for this project), Sewing Machine, Tape Measure, Chalk, Shears, Pins, Iron, Needles, Thread (preferably 3-ply polyester), Thread Cutter, and an Invisible Zipper (10 inches).
Fabric Recommendation
Confused about the right fabric for your jumpsuit? I prefer to use light weight fabric, such as cotton blend, modal satin, and viscose fabric when it comes to sewing jumpsuits. Lightweight fabrics are preferred for jumpsuits because they offer comfort, ease of movement, and a flattering drape.
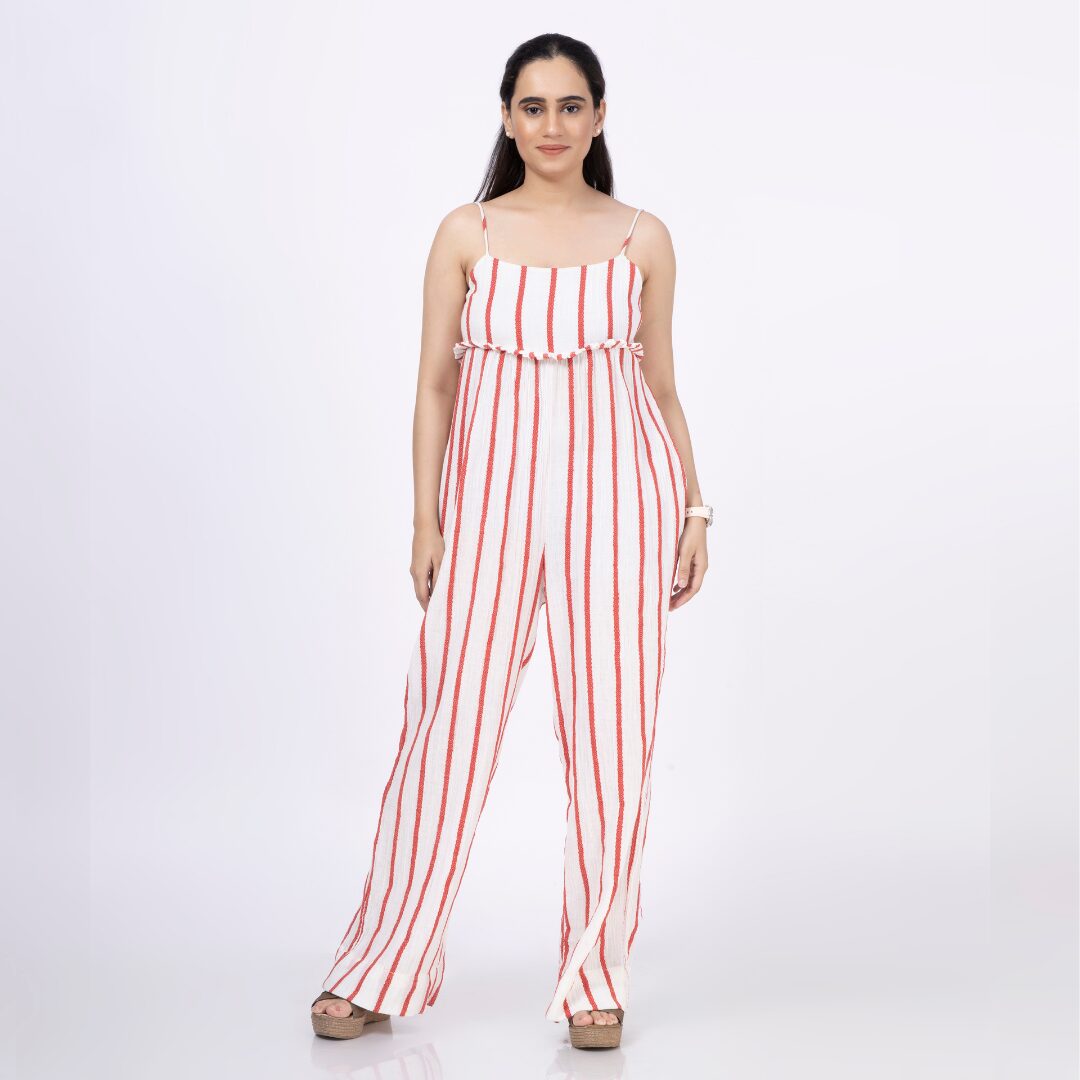
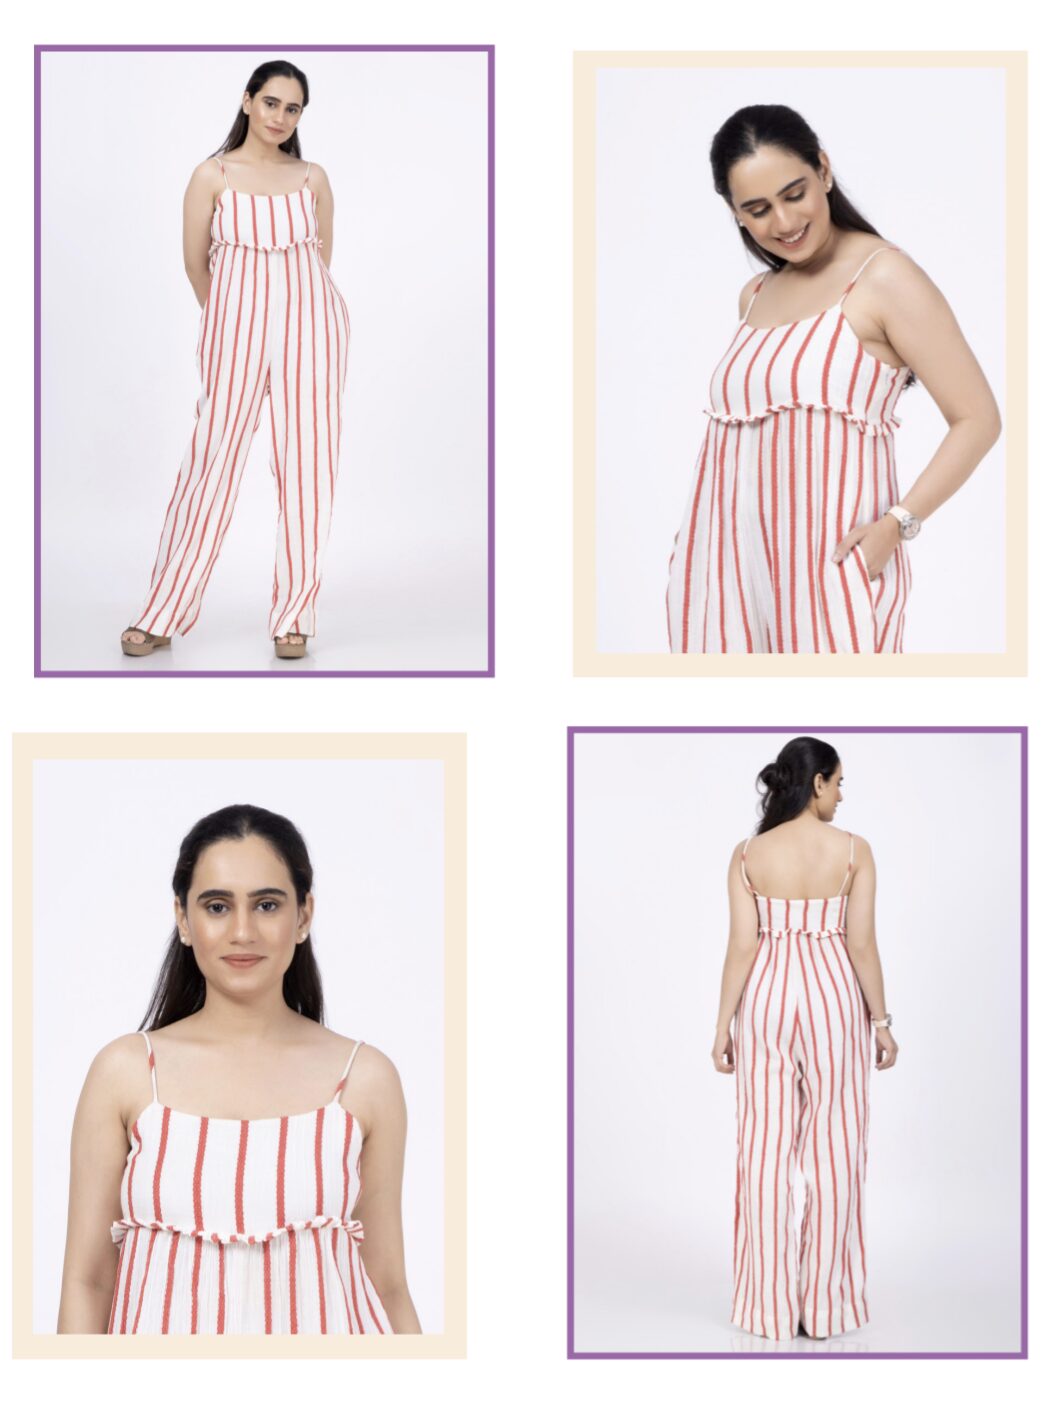
The model above is wearing a strappy jumpsuit made from Winslet’s Lola Sleeveless Strappy Jumpsuit Pattern. The jumpsuit is made from cotton crepe fabric, ideal for its crisp look, breathability in summer, and suitability for loose-fitting attire.
Size Charts
The strappy jumpsuit sewing pattern measurements for sizes (XS, S, M, L, XL, 2XL, or 3XL) are detailed below. Choose a size that corresponds most closely to your body measurements.
It’s worth noting that if your exact measurements are not listed in the table, you may want to consider ordering a size larger.
The size chart includes measurements in both inches and centimeters for your reference.
Body Measurements
| XS (inches) | XS (cm) | S (inches) | S (cm) | M (inches) | M (cm) | L (inches) | L (cm) | XL (inches) | XL (cm) | 2XL (inches) | 2XL (cm) | 3XL (inches) | 3XL (cm) | |
| Bust | 32 | 81.3 | 34 | 86.4 | 36 | 91.4 | 38 | 96.5 | 40 | 101.6 | 42 | 106.7 | 44 | 111.8 |
| Waist | 26 | 66.0 | 28 | 71.1 | 30 | 76.2 | 32 | 81.3 | 34 | 86.4 | 36 | 91.4 | 38 | 96.5 |
| Hip | 34 | 86.4 | 36 | 91.4 | 38 | 96.5 | 40 | 101.6 | 42 | 106.7 | 44 | 111.8 | 46 | 116.8 |
Final Garment Measurements
| XS (inches) | XS (cm) | S (inches) | S (cm) | M (inches) | M (cm) | L (inches) | L (cm) | XL (inches) | XL (cm) | 2XL (inches) | 2XL (cm) | 3XL (inches) | 3XL (cm) | |
| Waist Round | 30 | 76 | 31 | 78.7 | 32 | 81.2 | 33 | 83 | 34 | 86.3 | 35 | 88.9 | 36 | 91.4 |
| Pant Length (Waist to Hem) | 46.25 | 117.4 | 46.5 | 118.1 | 47 | 119.3 | 47.35 | 120.2 | 47.75 | 121.2 | 48.15 | 122.3 | 48.5 | 123.1 |
| Chest Round | 32 | 81.2 | 34 | 86.3 | 36 | 91.4 | 38 | 96.5 | 40 | 101.6 | 42 | 106.6 | 44 | 111.7 |
Yardage Chart
| Width of the Fabric | XS (yards) | XS (meters) | S (yards) | S (meters) | M (yards) | M (meters) | L (yards) | L (meters) | XL (yards) | XL (meters) | 2XL (yards) | 2XL (meters) | 3XL (yards) | 3XL (meters) |
| 45” | 2.20 | 2.01 | 2.59 | 2.37 | 3.05 | 2.79 | 3.50 | 3.20 | 4.03 | 3.68 | 4.63 | 4.24 | 5.33 | 4.87 |
| 60” | 1.83 | 1.67 | 2.15 | 1.97 | 2.53 | 2.31 | 2.91 | 2.66 | 3.35 | 3.06 | 3.85 | 3.52 | 4.42 | 4.05 |
Steps To Follow For Sewing a Strappy Jumpsuit
The Winslet’s Lola Sleeveless Strappy Jumpsuit Pattern is suitable for printing on both A4 and A0 size paper:
- Print at home: A4 Pattern
- Print at a copy shop: A0 Pattern
Let’s dive into the steps for sewing your very own unique strappy jumpsuit:
Pattern Marking and Inventory
The fabric needs to be cut into following pieces:
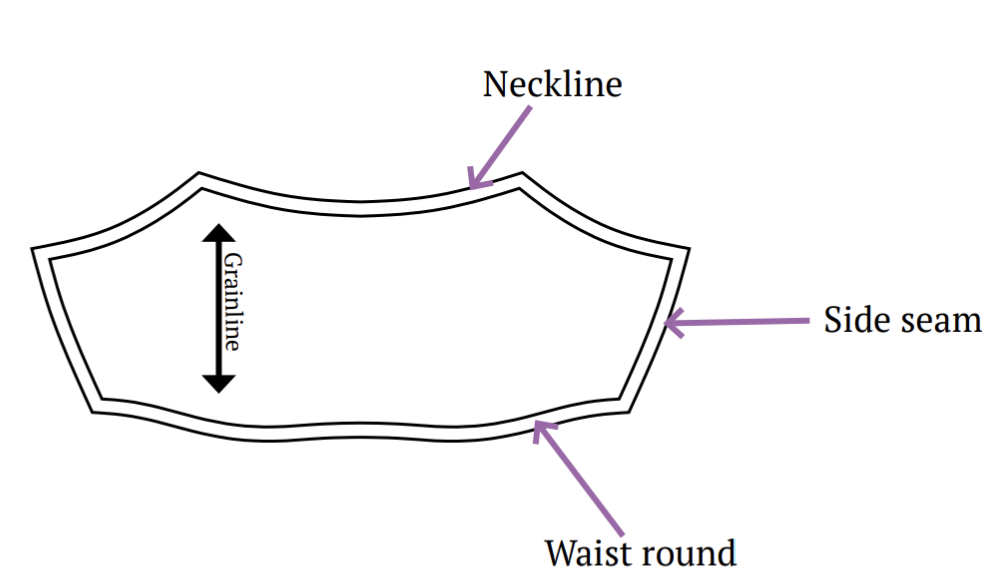
A. Front Bodice – cut x1 fabric
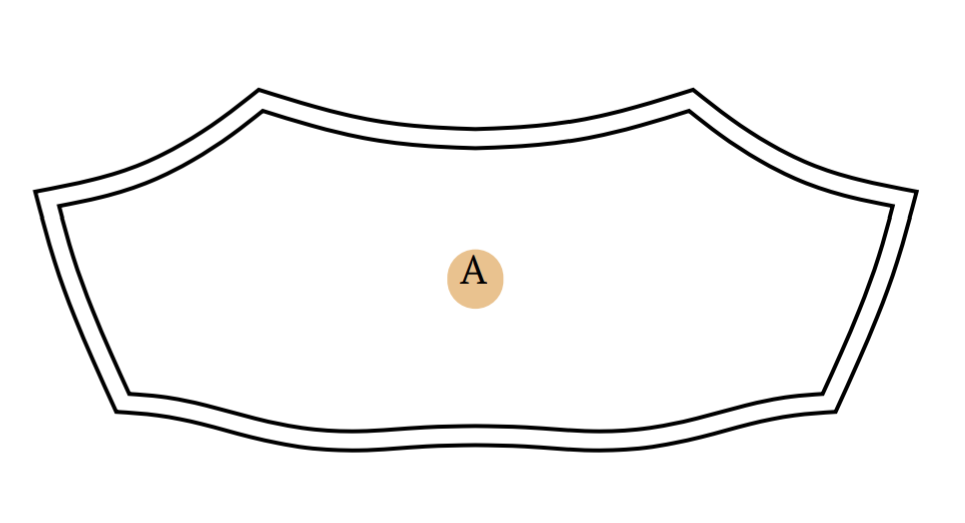
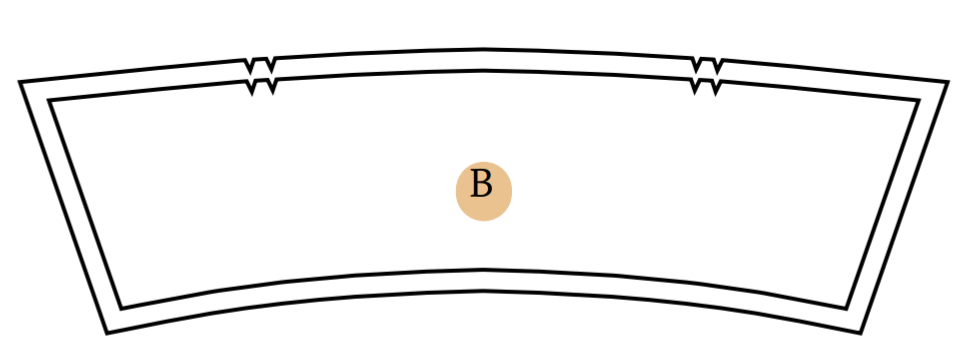
B. Back Bodice – cut x1 fabric
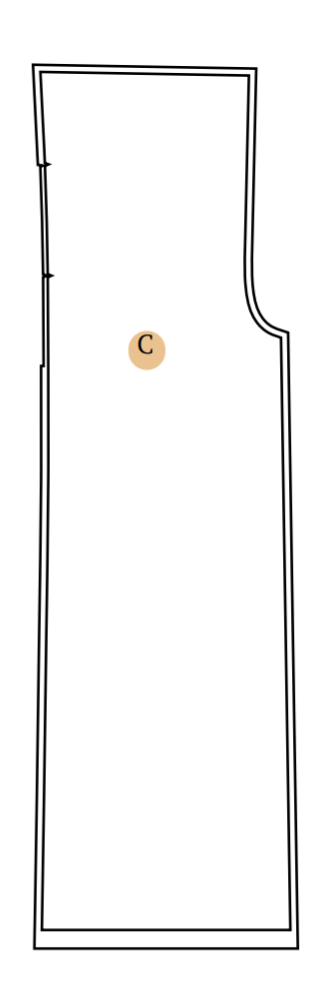
C. Front Leg – cut x2 fabric
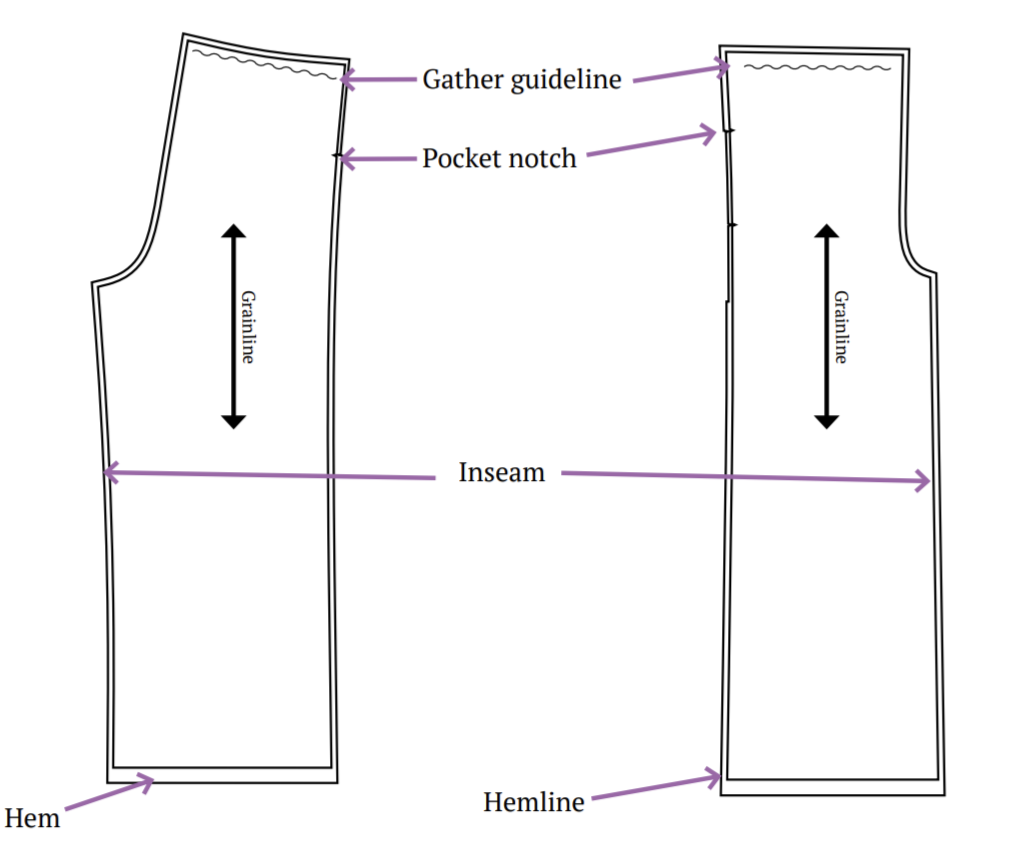
Note: An inseam refers to the measurement from your crotch down to your ankle bone, essentially representing the length of your inner leg.
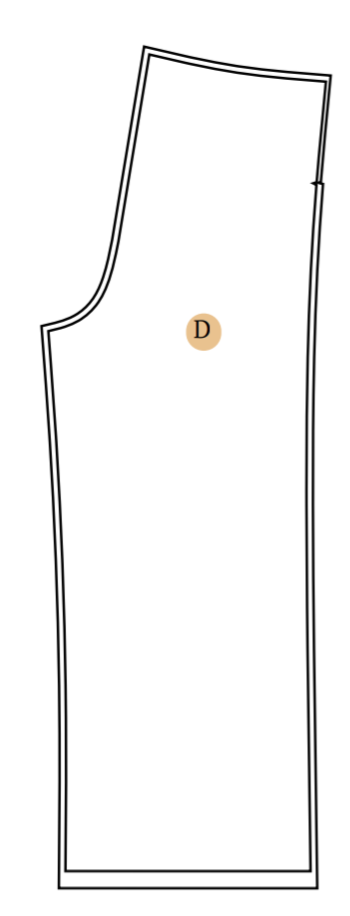
D. Back Leg – cut x2 fabric
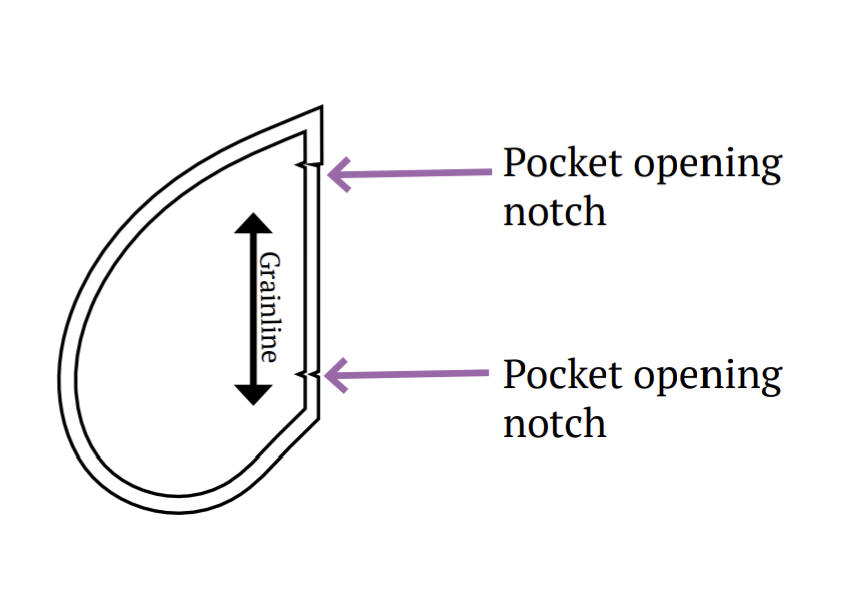
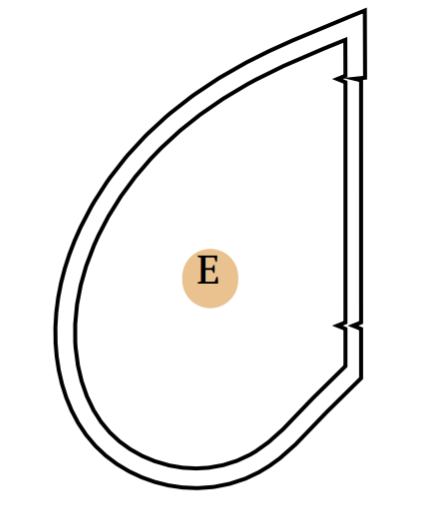
E. Pocket – cut x2 fabric
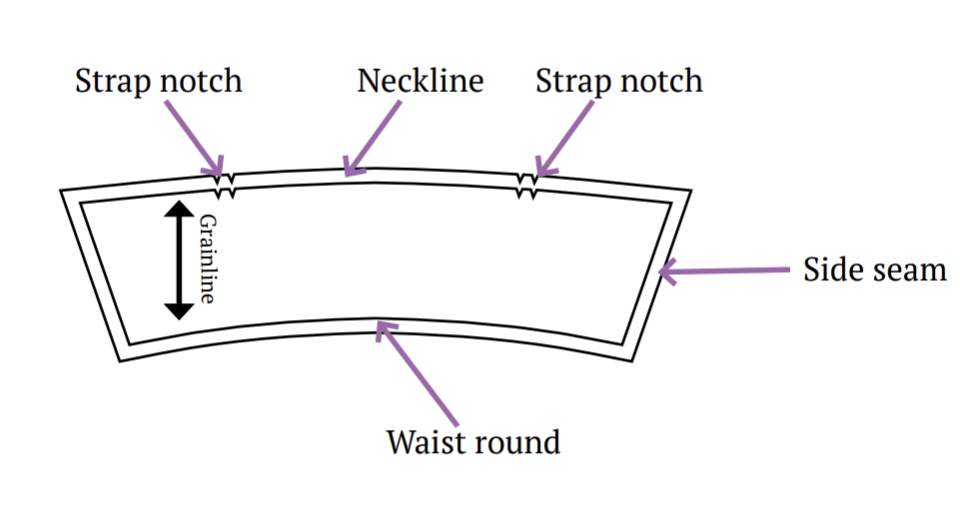
F. Waist Frill – cut x1 fabric


G. Strap – cut x2 fabric

Note:
- The length of the jumpsuit pants can vary, being either long or short, and can be adjusted according to your preference. Before cutting the front and back legs and finishing the hem, please measure the length you desire and make adjustments accordingly.
- Before cutting the strap, please measure the length you need and adjust accordingly to ensure the best fit.
Cutting Layout
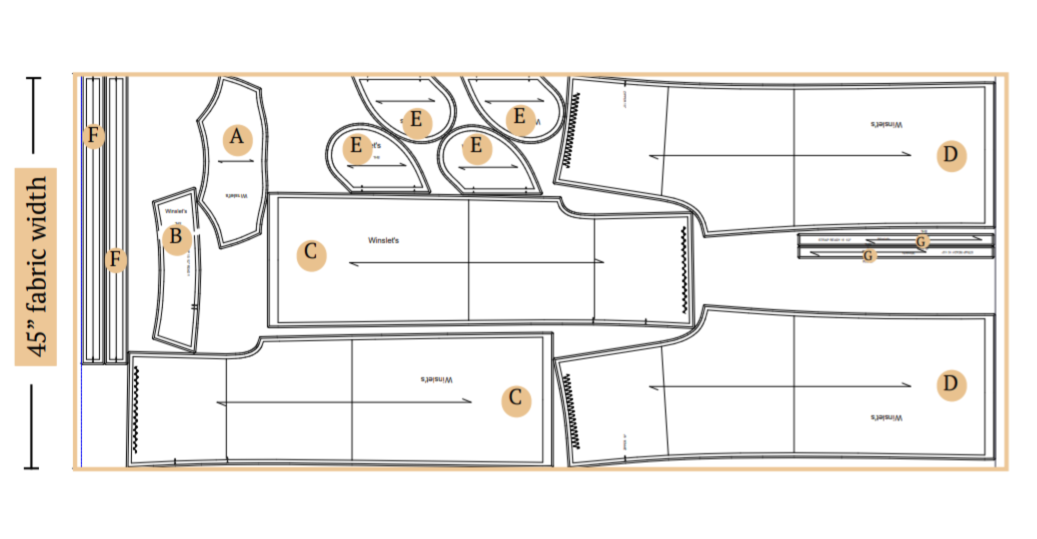
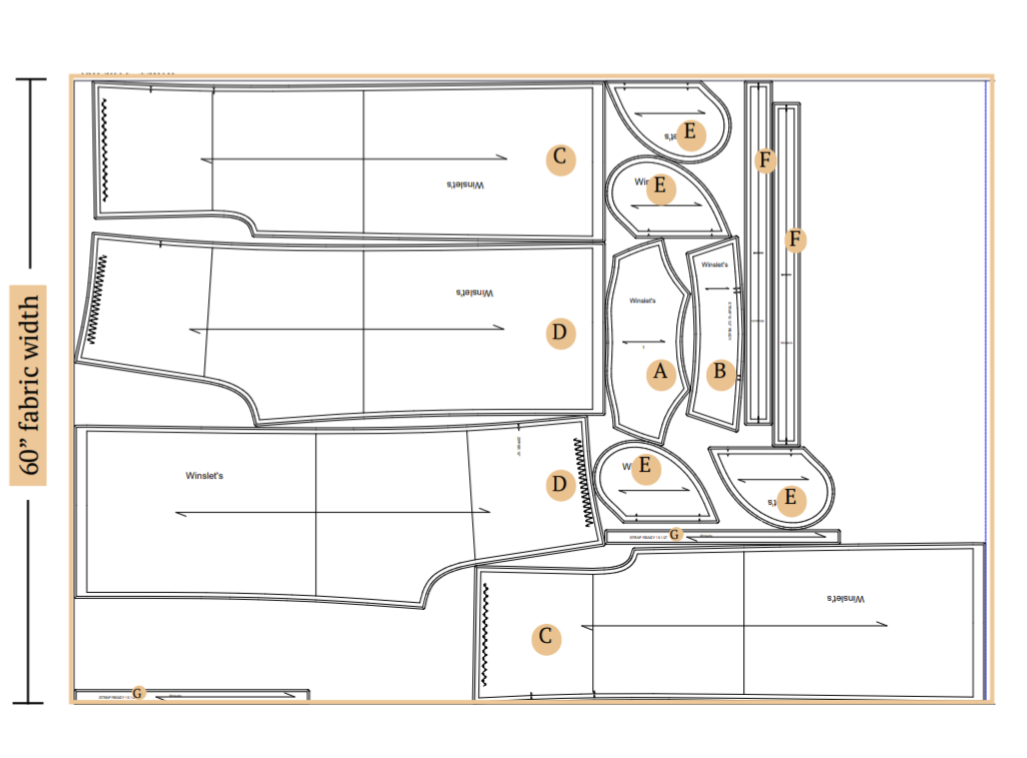
- Medium size has been used for representation of this cutting layout.
- Ensure the pattern layout is on-grain for fabric alignment.
- Use pins to secure fabric, aiding accurate cutting.
- These pattern layouts are non-directional.
- If using fabric with nap or prints, purchase additional length.
Fabric Preparation and Cutting
- Arrange pattern pieces as shown in the above cutting diagram, ensuring the grainline arrow aligns with the selvage.
- Trace and cut fabric pieces using fabric shears, removing any markings.
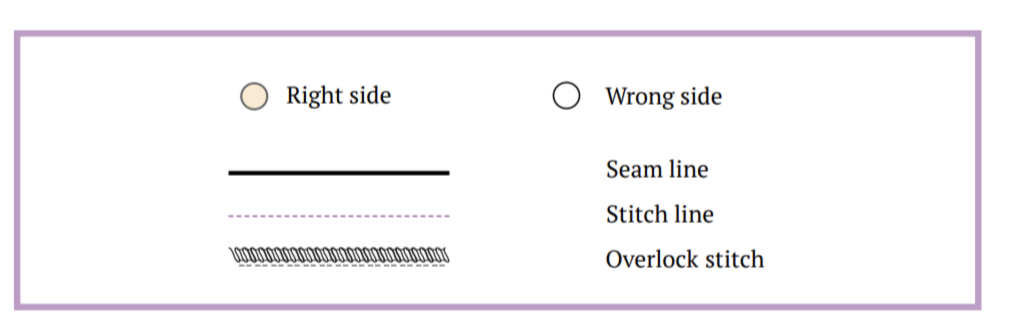
- Transfer pattern markings to the wrong side of the fabric, including circles, buttonholes, and fold lines, using a marking pen or chalk.
- Mark the center front for fold pieces to aid in accurate alignment.
Sewing Steps
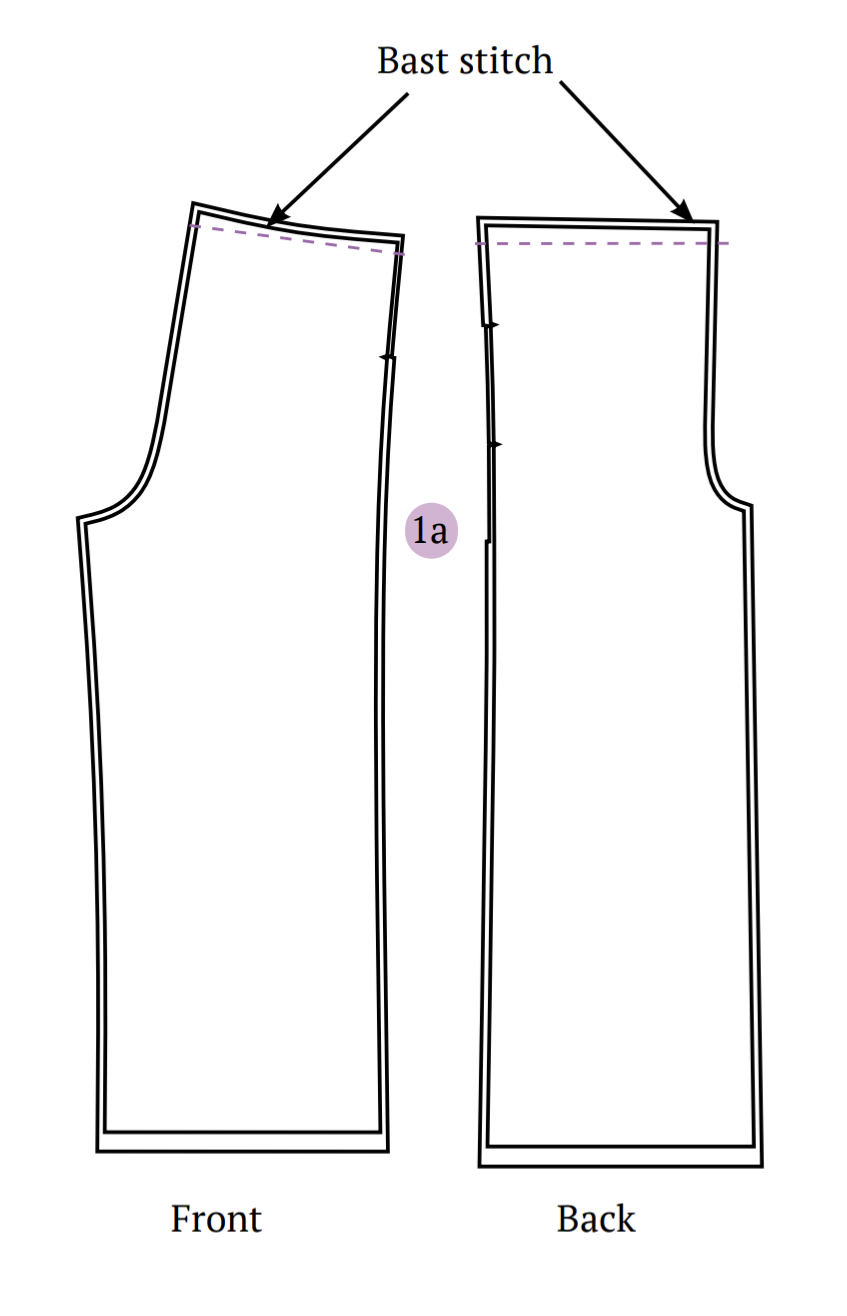
Step 1: Creating Gathers on Leg Pieces
To form gathers on both the front and back leg pieces:
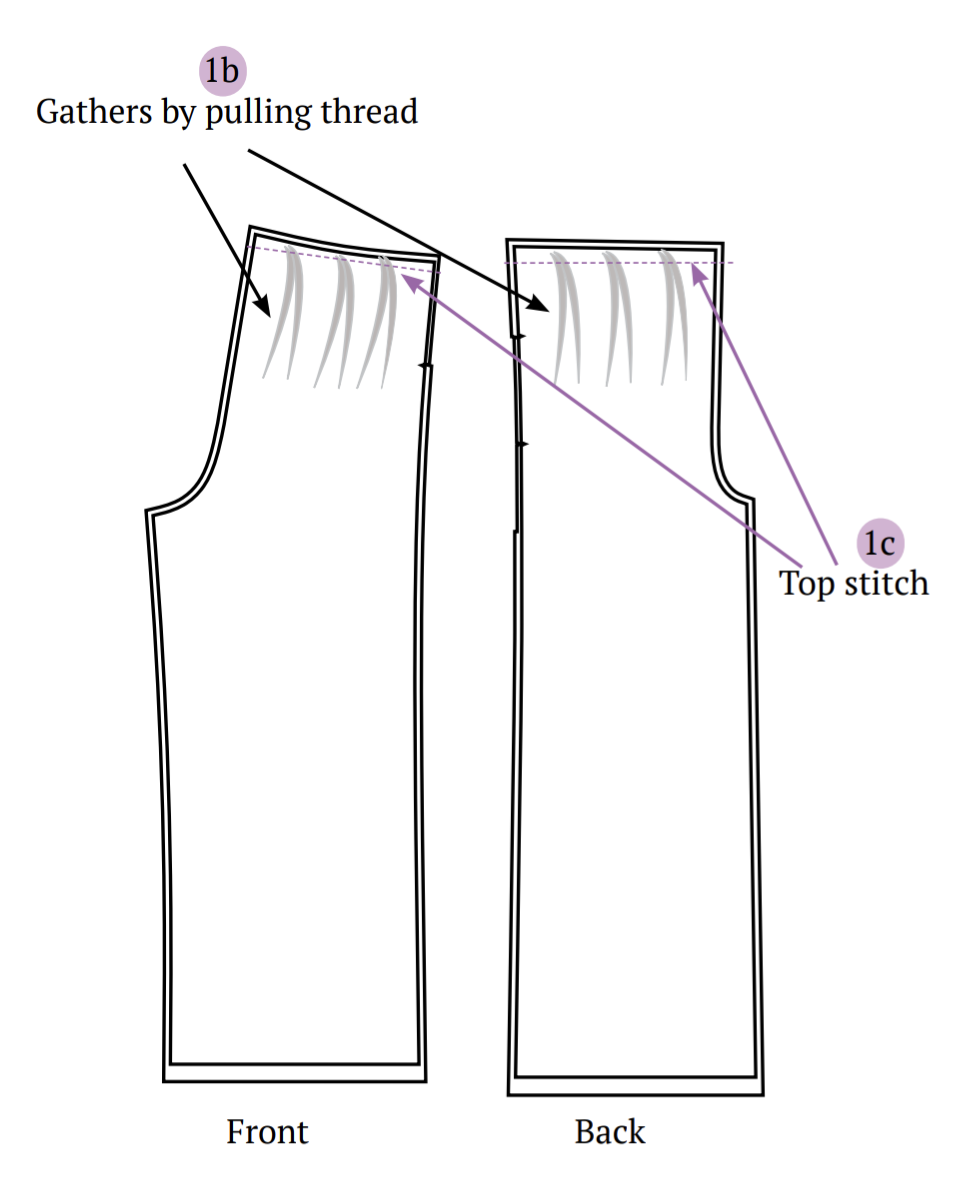
Employ basting stitches along the upper edge of the leg segments, adhering to the indicated gather guidelines.
Gently tug the thread to gather the material, ensuring an even distribution of gathers to meet the specified waist measurement. Affix the gathers securely by sewing over the basting region.
Step 2: Joining Leg Pieces and Stitching Inseam
Align the front leg atop the back leg, ensuring that the right sides are facing each other, and sew the inseam using an overlock stitch. Repeat this process for the other leg.
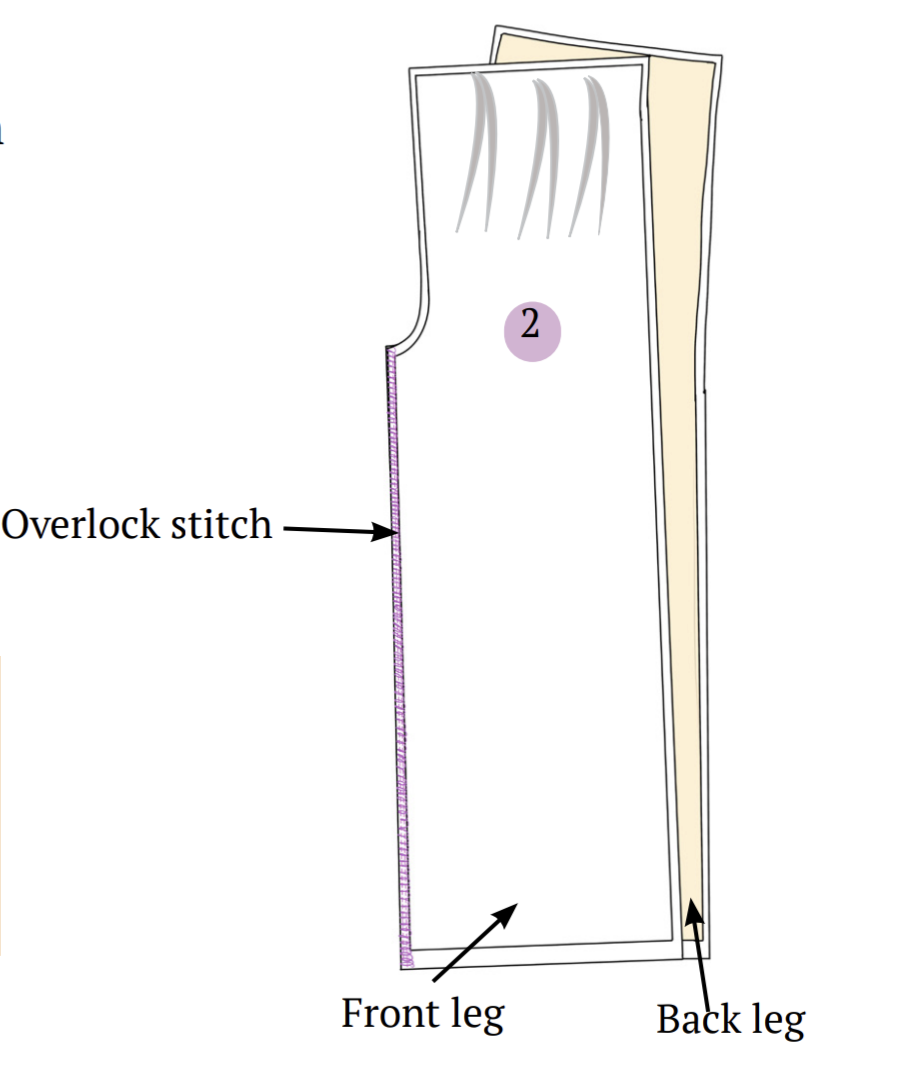
Note: An overlock stitch is recommended for sewing, although a zigzag stitch is also suitable. For a polished hem, utilize a flatlock stitch.
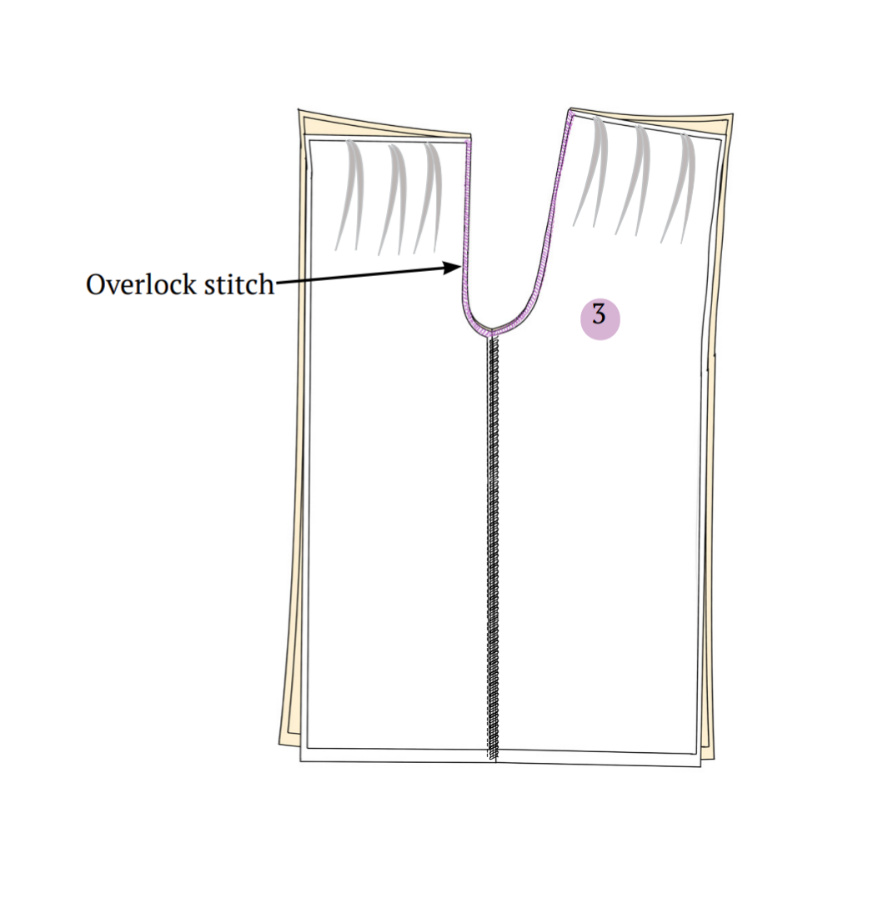
Step 3: Aligning and Overlocking the Crotch Seam
Position the crotch of both legs together with the right sides facing each other, then overlock along the crotch seamline.
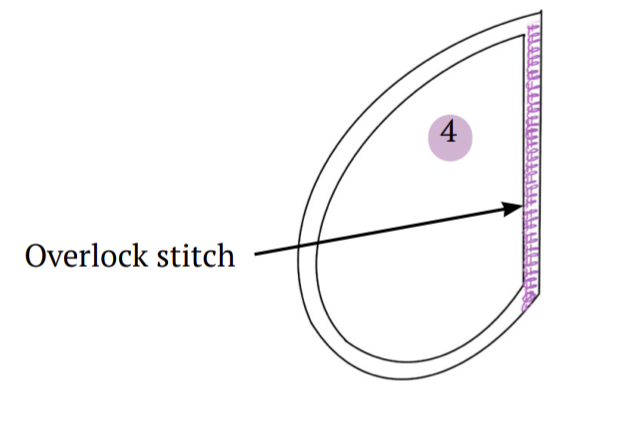
Step 4: Preparation of the Pocket
Overlock along the pocket opening to reinforce the edges, preventing fraying and ensuring durability and a tidy finish for your pockets.
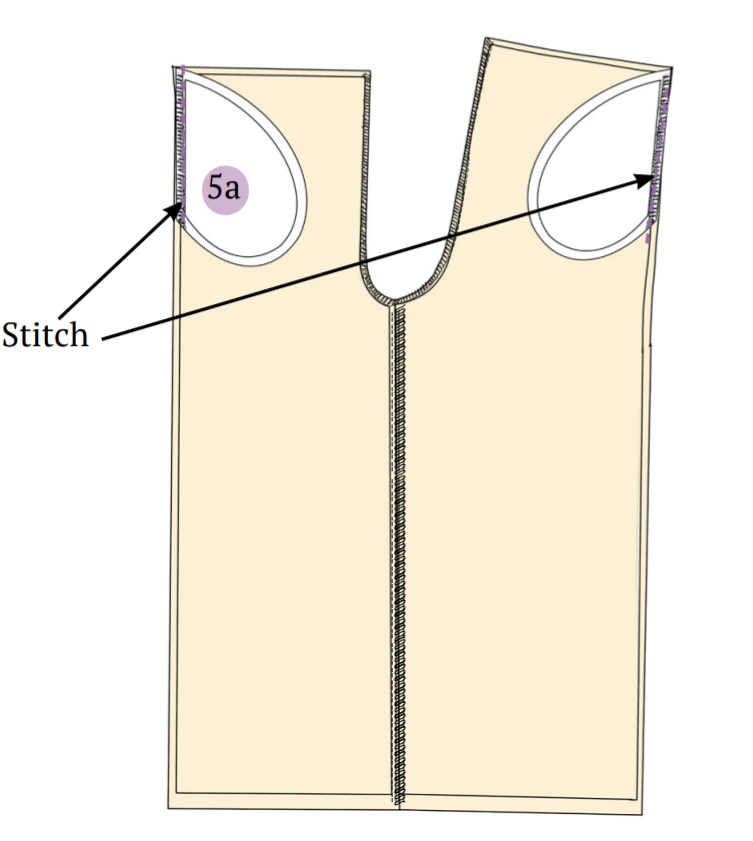
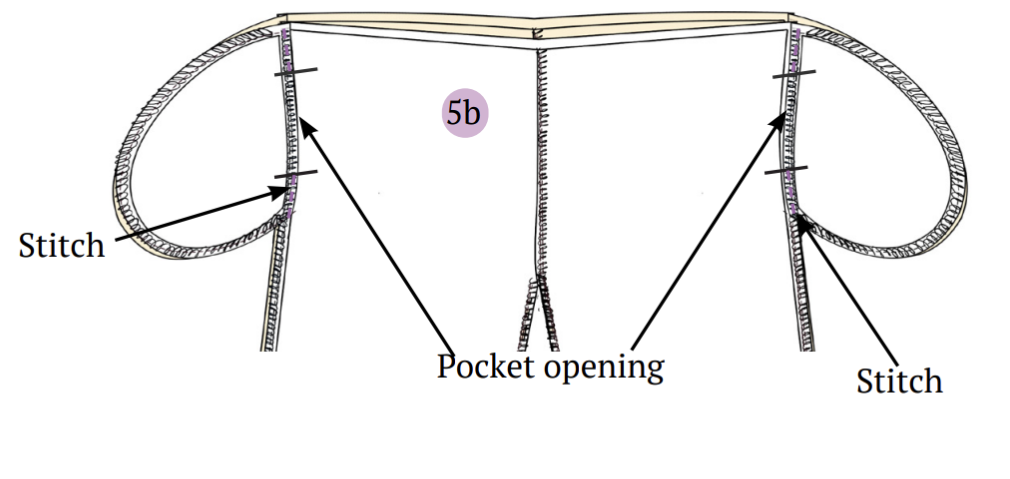
Step 5: Attaching the Pocket to the Pants
Position the pocket piece onto the pant leg, aligning the pocket opening notches with those on the side seam of the pants. Secure the pocket with pins and stitch along the pocket opening.
Press open the pocket along the pocket opening seam. Then, align the front and back pant pieces with the right sides together. Pin and overlock the side seams.
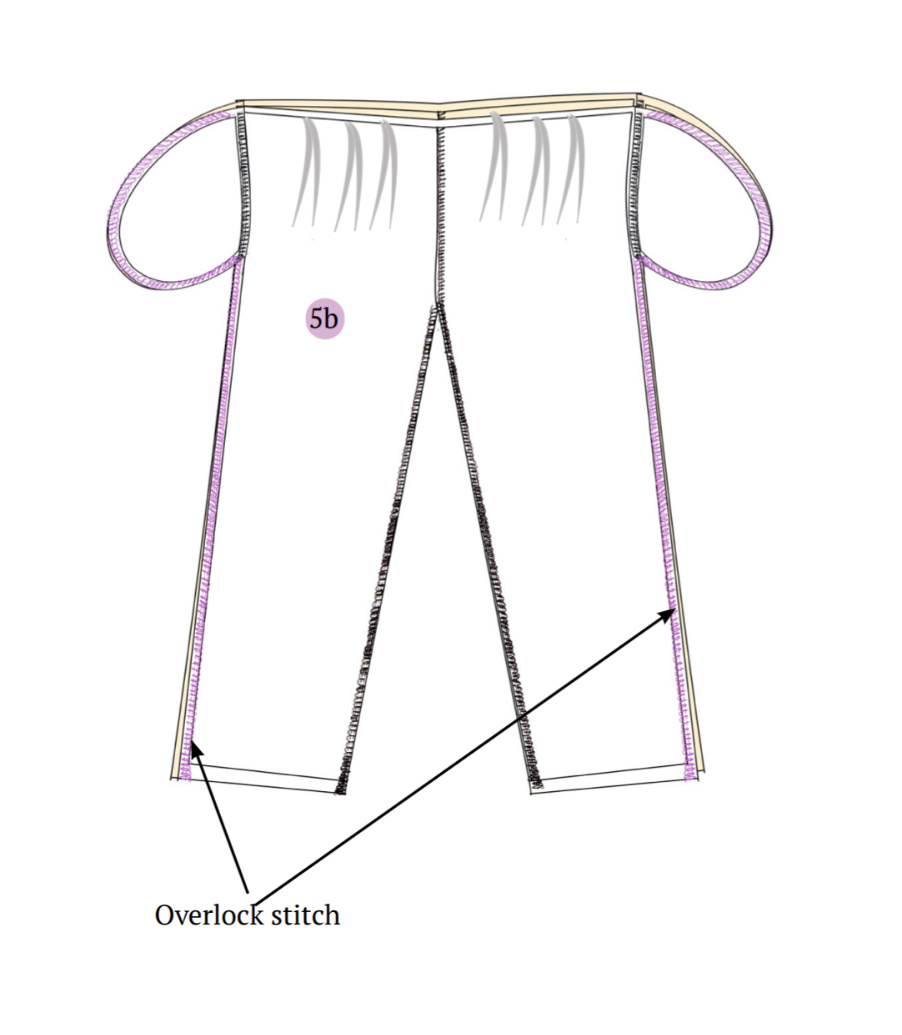
Lock stitch along the side seam, leaving the pocket opening unsewn.
Step 6: Neckline Finishing for Front and Back Bodice
Fold the fabric twice from the neckline, making sure to encase the raw edges within. Then, top stitch across the neckline edge for a clean finish.

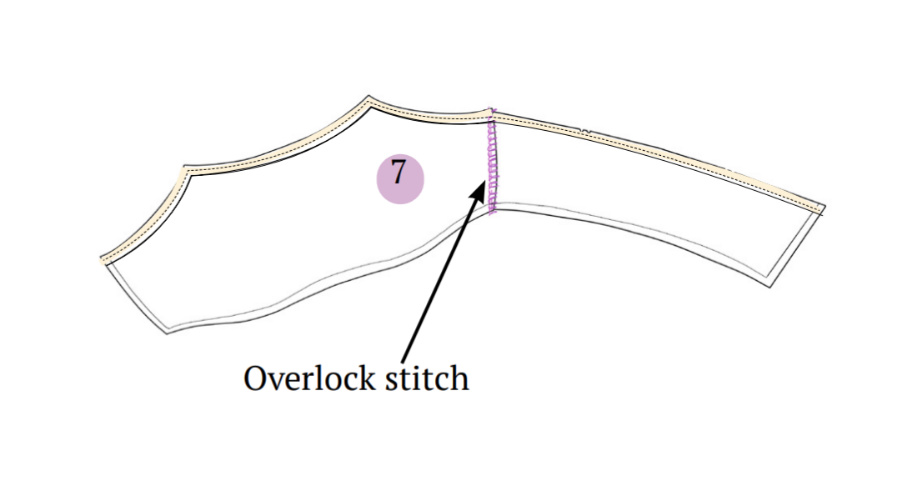
Step 7: Securing Front and Back Bodice Pieces
Stitch along the side seams using an overlock stitch on the wrong side of the fabric. Then, press open along the stitch.
Step 8: Preparing and Attaching the Waist Frill
Begin by folding the cut fabric in half and baste stitching along the upper seam. Pull the threads to form gathers.
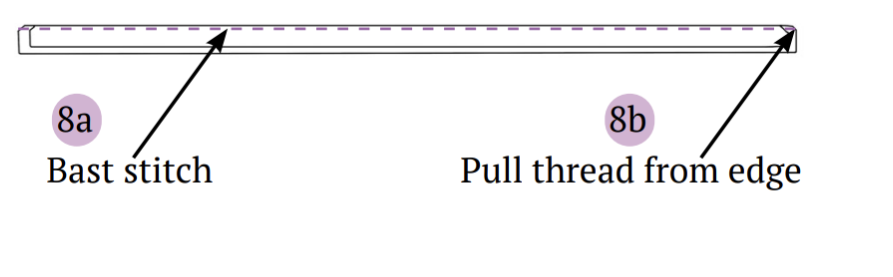
Adjust the gathers to ensure they match the waist round measurement, and top stitch them.

Stitch the waist frill to the bodice waist, aligning the waist frill seam with the bodice seam, with right sides facing together.

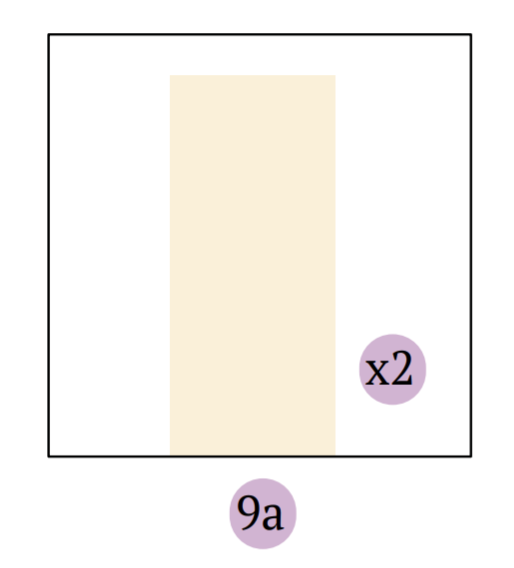
Step 9: Crafting 14-Inch Straps
Cut two fabric strips, each 1.8 inches wide and 18 inches long, following the grain line.
Fold each strip lengthwise with the right sides together, then press them flat using an iron.
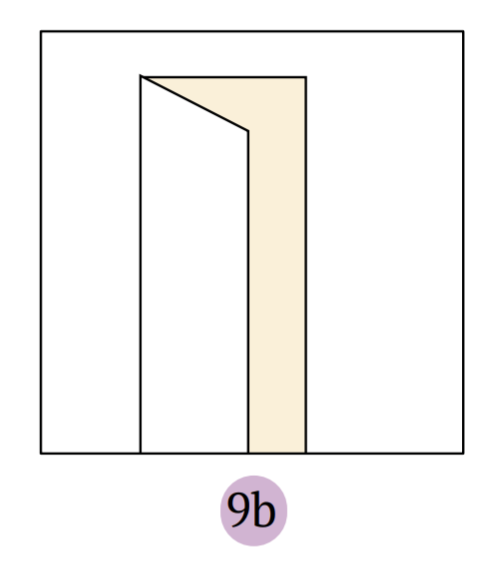
Sew along the open side, maintaining a 0.4-inch seam allowance.
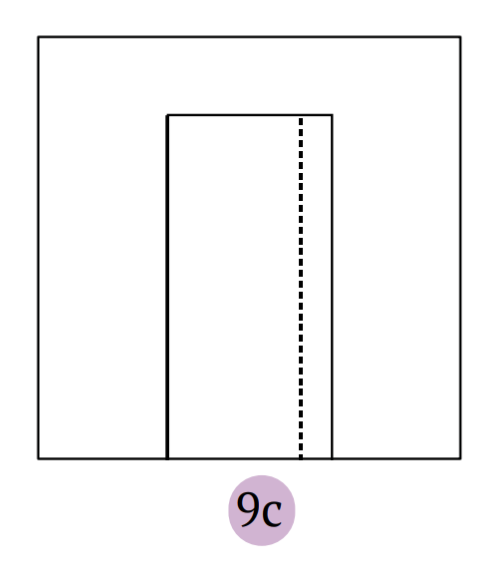
Turn the fabric tubes right side out using a darning needle.
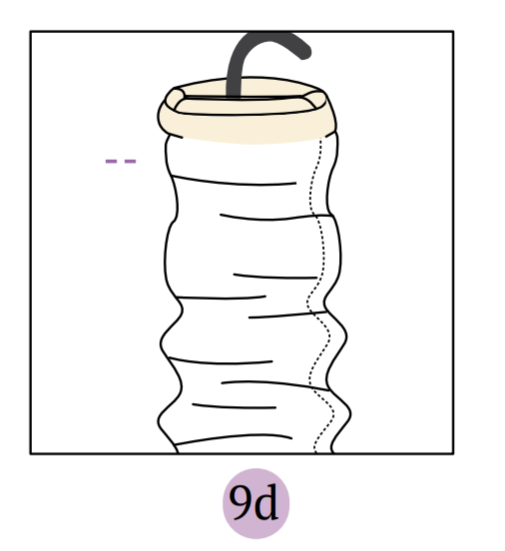
Divide each tube into two pieces: one at 11 inches and the other at 5 inches. Discard any excess fabric.

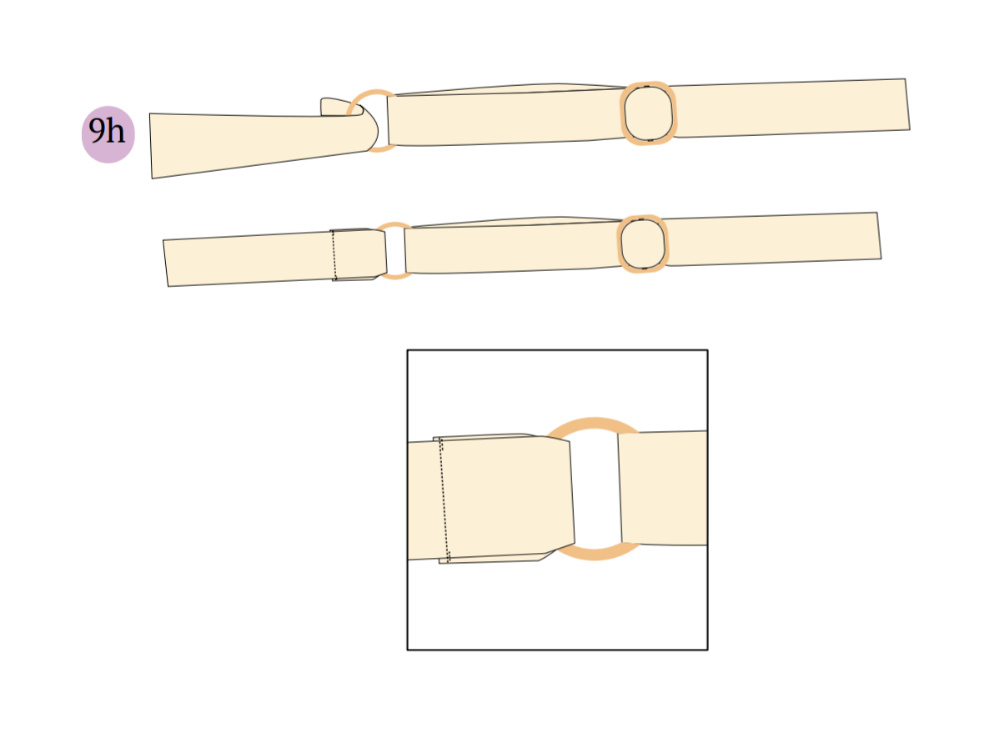
Slide one of the 11-inch straps through an adjustable slide buckle, folding about an inch of the strap’s end back onto itself. Secure this fold with robust lock and back stitches to affix the buckle.
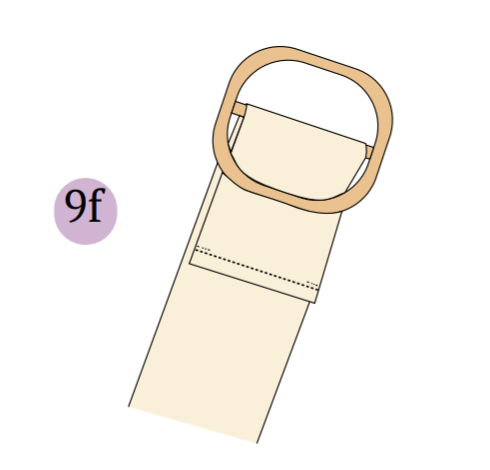
Thread the free end of the same 11-inch strap through a strap loop ring, then weave it through the slide buckle, entering from one side and exiting the other.
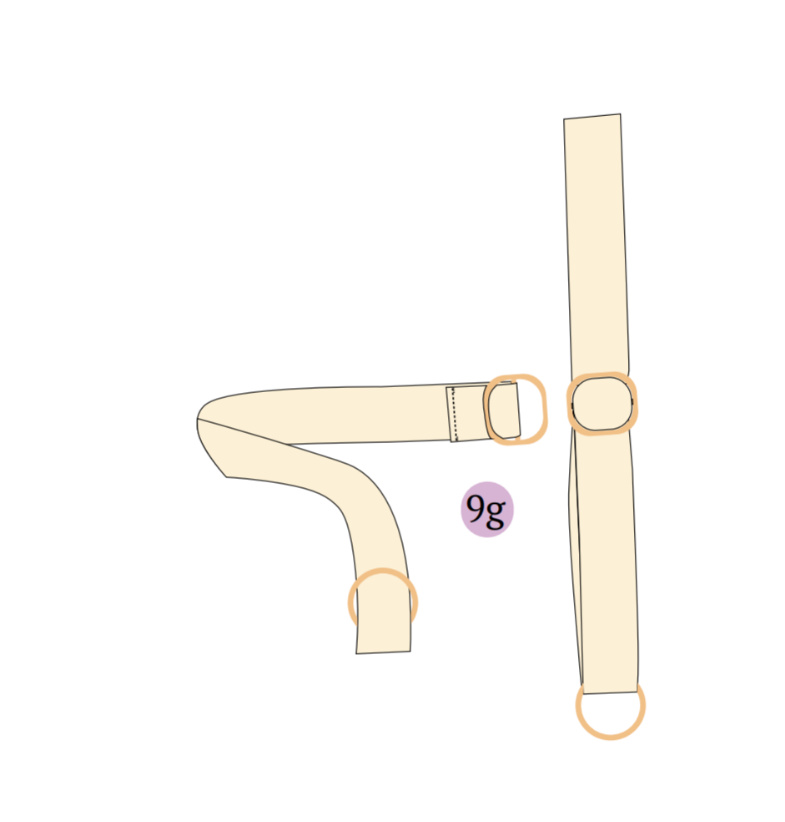
Take a 5-inch strap and loop one end through the ring. Secure this end with a series of lock and back stitches for a sturdy finish.
Repeat the steps with the remaining 11-inch and 5-inch strap pieces to complete the second strap for your dress.
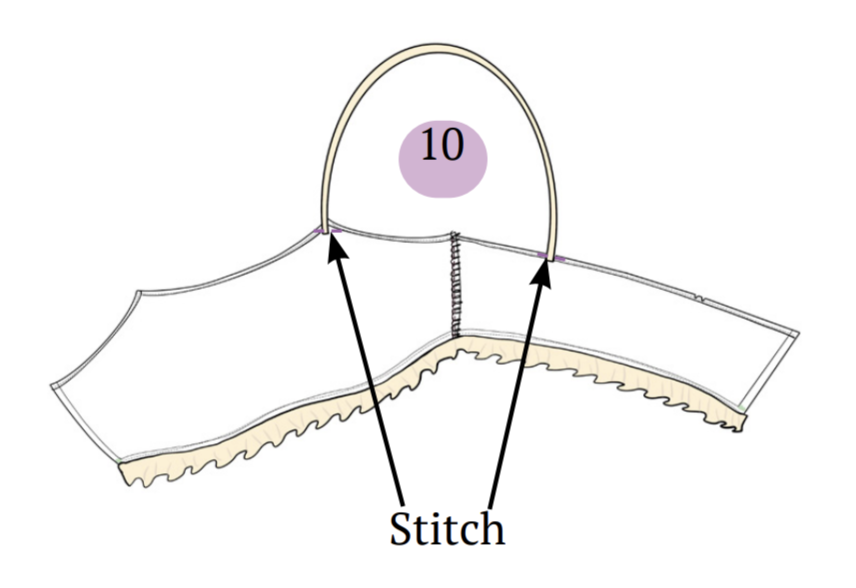
Step 10: Attaching Straps to the Bodice
Secure the straps to the bodice by positioning them on the designated notches on the bodice neckline. Stitch the straps with a lock stitch on the wrong side of the bodice.
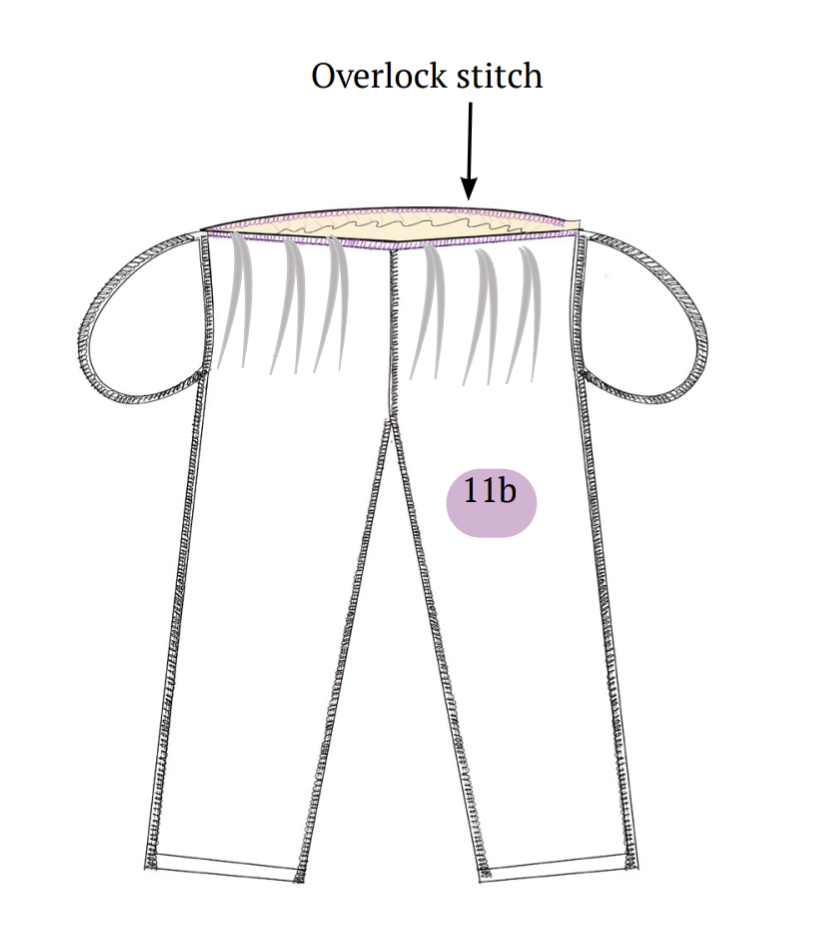
Step 11: Aligning Bodice and Pant Waist
Align the bodice waist and pant waist with right sides together by inserting the bodice into the pant.
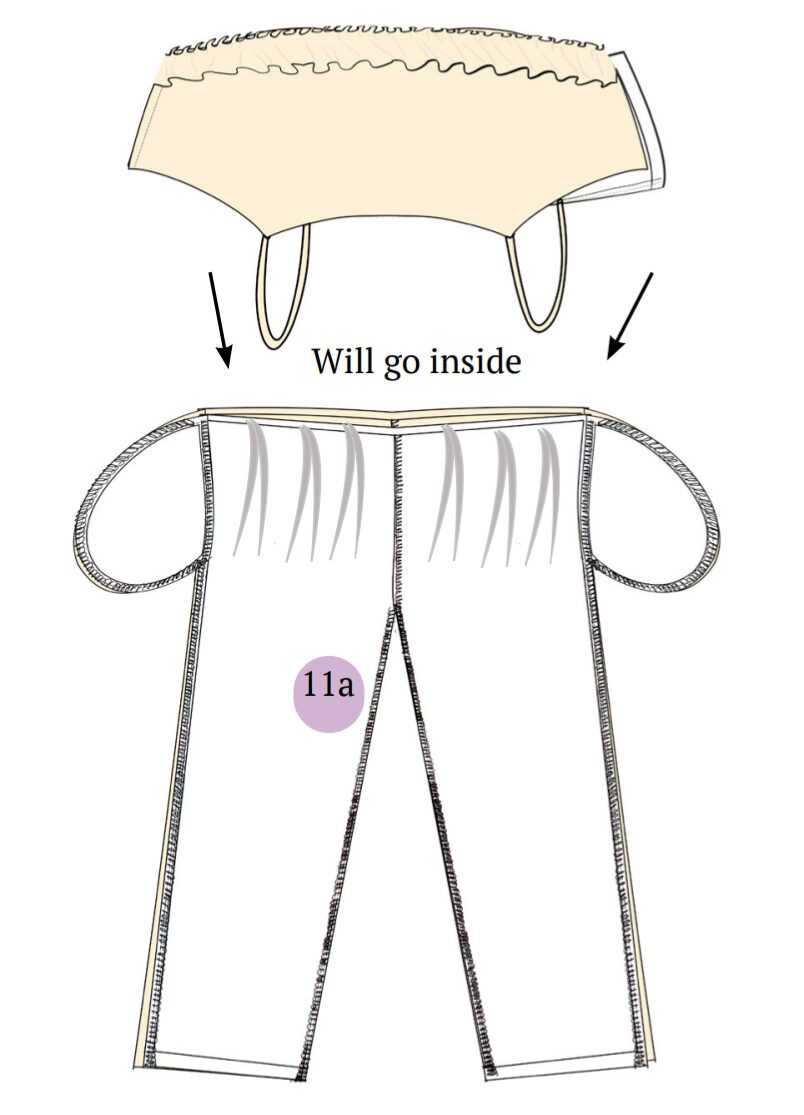
Next, overlock around the waist round.
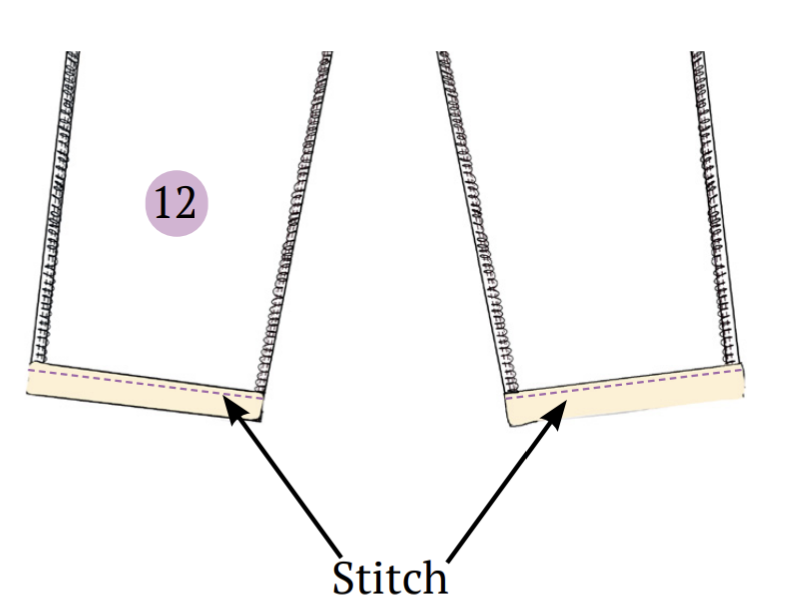
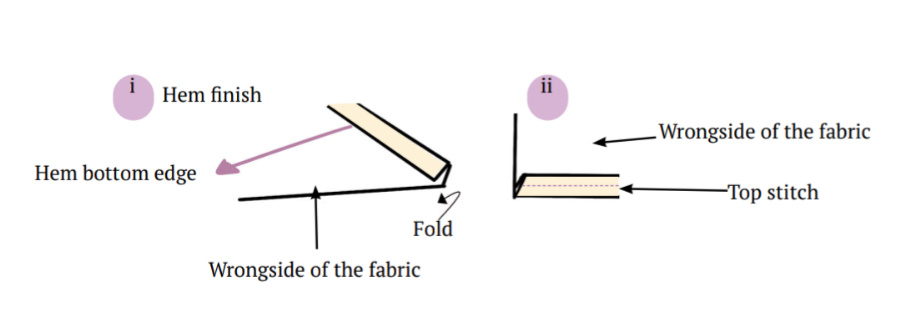
Step 12: Completing the Pant Hem
Finish the hem of the pants by folding them once at 0.5 inches, followed by another fold along the hemline. Then, stitch along the edge of the folded hem to secure it in place.
Step 13: Attaching the Invisible Zipper on the Side Seam
Position the open zipper on the side seam with the right sides together, and sew the zipper to the bodice using a zipper foot.
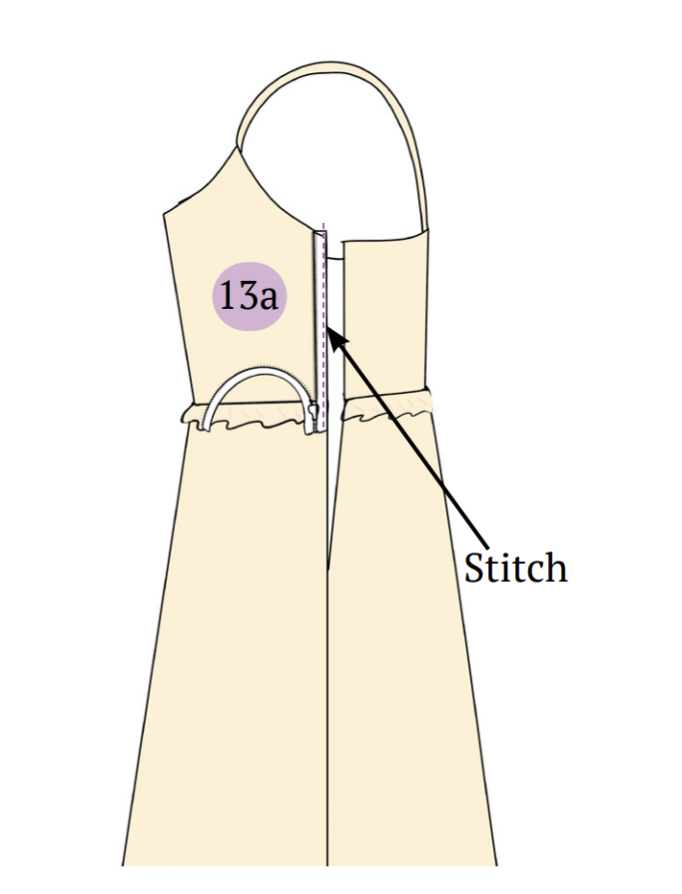
Turn the jumpsuit inside out and stitch the other side of the zipper to the side seam.
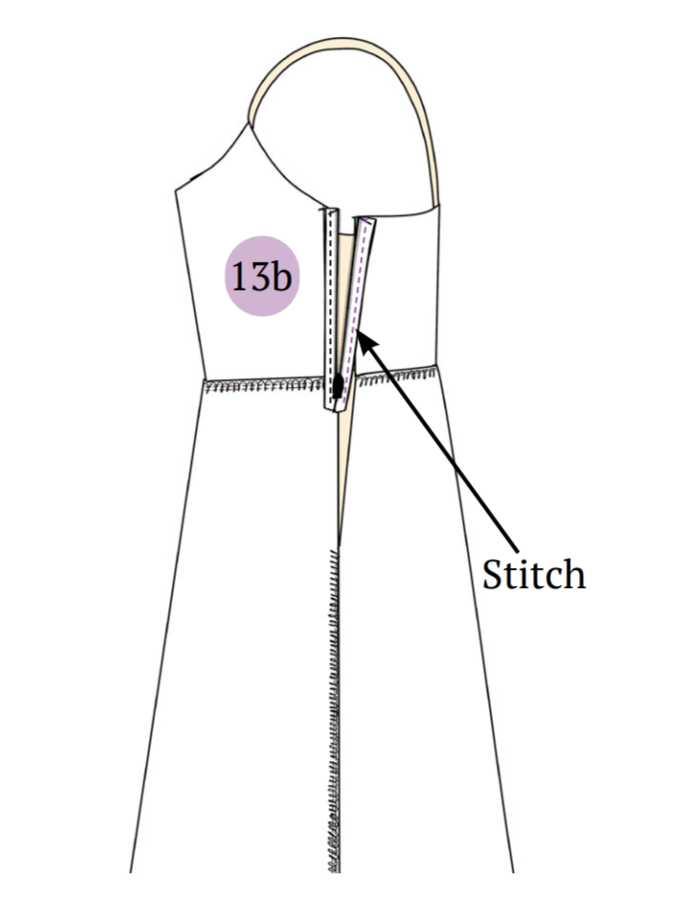
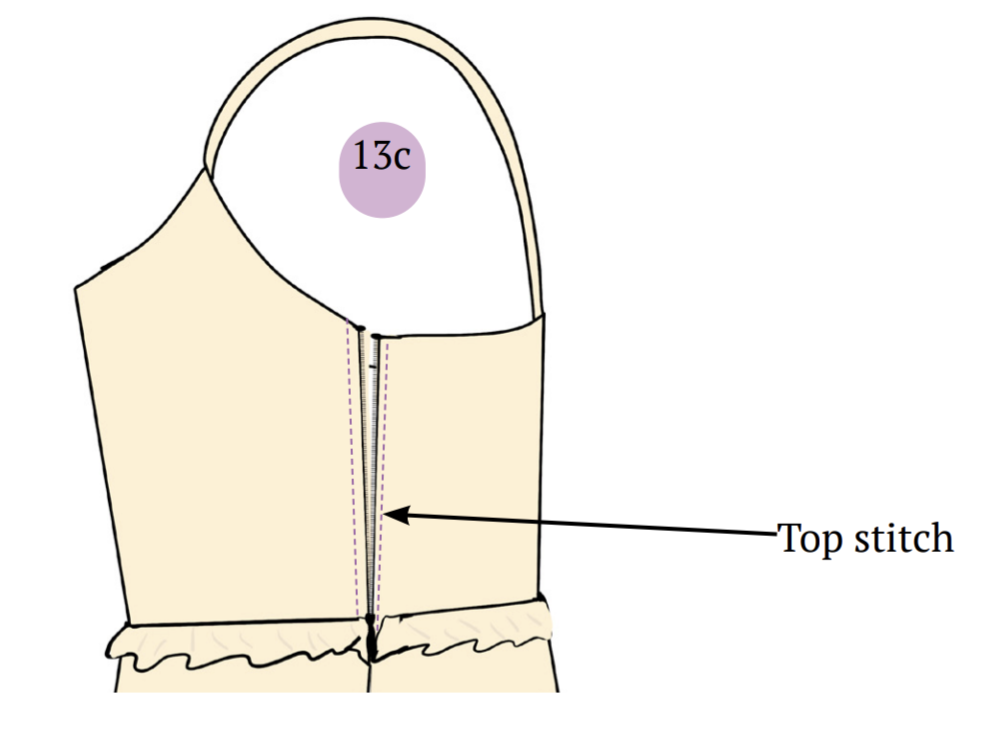
Turn the jumpsuit right side out and topstitch along the edge of the zipper to conceal the zipper seam. Additionally, reinforce the seam by sewing the bottom edge with a lock stitch on the wrong side of the jumpsuit.
Summary
Great job! Putting together this jumpsuit is going to be a breeze, trust me. Simply grab the Winslet’s Lola Sleeveless Strappy Jumpsuit Pattern or pick any other pattern you prefer, then choose a fabric that speaks to you and makes you feel amazing. If you’re feeling adventurous and want to rock some animal print, go ahead and embrace it!
Check out some final images of this adorable strappy jumpsuit created with the Winslet’s Lola Sleeveless Strappy Jumpsuit Pattern:
How do you feel about jumpsuits? Will you be making this jumpsuit for yourself? Let me know in the comments below!
Checkout more sewing projects and jumpsuit patterns. Join the Winslet sewing community by sharing your masterpiece with the hashtag #madewithwinslets!
If you are a sewist, have a look at our recommended sewing machines: beginner sewing machines, sewing tools and notions, coverstitch sergers and overlock machines, embroidery machines and quilting sewing machines, sewing practice sheets and sewing project planner.
If you are looking for sewing patterns, here are some great options: Activewear Sewing Patterns, Plus Size Sewing Patterns, Outerwear Sewing Patterns, Jumpsuit Sewing Patterns, Coord Set Sewing Patterns, Pants Sewing Patterns, Shorts Sewing Patterns, Skirts Sewing Patterns, Dress Sewing Patterns, Top Sewing Patterns, Bodycon Sewing Patterns, Evening Dresses Sewing Patterns, Loungewear Sewing Patterns, Cottagecore Sewing Patterns, Free Sewing Pattern.
Happy Stitching.


