How to Sew a Halter Neck Top?
Have you wondered how to sew a halter neck top?
A halter neck top is a timeless piece of garment that never goes out of style. Flowy and flirtatious, halter neck tops tie behind the neck and have an open back. So, I bring to you this tutorial where we delve into the art of crafting a body fitted halter neck top using the Winslet’s WINX Halter Neck Top Pattern. This stylish garment is designed to accentuate your figure while providing a trendy and sophisticated look.
Although I have categorized this project as suitable for those with an intermediate skill level, even enthusiastic beginners ready to take on a new challenge can try out this step-by-step guide to create a fashionable halter neck top.
So, gather your materials, set up your sewing space, and let’s bring this chic design to life together!
What sewing supplies do you need to sew a halter neck crop top?
Here’s a comprehensive list to help you prepare for creating your halter neck top:
Sewing Pattern: Halter neck top pattern. I used the Winslet’s WINX Halter Neck Top Pattern since it’s simple to follow and it has careful instructions for on-grain cutting, binding, and topstitching. Moreover, it is available in A4, US Letter and A0 sizes for convenient printing at home or at a copy shop.
- Sewing Machine: Ensure your sewing machine is in good working condition, threaded, and equipped with the appropriate needle for knit fabrics. If you’re looking to buy a new machine or upgrade your current one, read this post about the 20 Best Sewing Machines.
- Tape Measure: Essential for accurate measurements, ensuring your halter neck top fits perfectly.
- Chalk: A handy tool for marking fabric, especially on darker materials. It allows you to make precise and easily removable markings.
- Pins: Opt for fine, sharp pins to minimize damage to delicate fabrics like Poly Knit Elastane.
- Shears: A pair of sharp fabric shears is a must-have for cutting your Poly Knit Elastane Fabric accurately. If you are looking to buy a new pair of scissors, read this post on the Best Sewing Scissors and Shears.
- Iron: A steam iron will be your best friend throughout this project. If you are looking to buy a sewing iron, read this post on the Best Cordless Iron for Sewing.
- Needles: Choose appropriate needles for knit fabrics. Ballpoint or stretch needles work well with Poly Knit Elastane.
- Thread: Select a durable 3-ply polyester thread that complements the color of your fabric. This thread type provides strength and flexibility, essential for a knit garment.
- Thread Cutter: Keep a thread cutter handy for trimming excess threads.
- Binder Attachment: If your sewing machine supports it, a binder attachment can be useful for creating clean and professional-looking edges on the neckline and armholes.
- Metal Ring: The metal ring serves as a functional element for the halter neck closure. Ensure it is of appropriate size and complements the fabric color.
Fabric Recommendation
Since you’re creating a trendy halter neck top, go for fabrics that will make your project pop! Think light to medium weight wonders like cotton knits, jersey knits, lycra, swimwear fabrics, spandex, stretch velour, and stretch velvet.

Check out Katie, our fab model above rocking a poly knit elastane fabric made with the Winslet’s WINX Halter Neck Top Pattern. It’s not just about looks – this fabric’s got wrinkle resistance, moisture absorption magic, and a feather-light feel that says no to clinginess. Plus, it’s got that dreamy combo of silk-like elegance and cottony comfort.
Size Charts
Choose the size (XS, S, M, L, XL, 2XL, or 3XL) that most closely matches your body measurements using the size charts below.
For the breast and hips, measure at the largest region of the body; for the waist, measure at the narrowest part of the body, which is just above the belly button.
It is important to note that you might wish to order a size higher if the table below does not contain your exact measurements.
Both inches and centimeters are used to measure the sizes in the table below.
Body Measurements
| XS (inches) | XS (cm) | S (inches) | S (cm) | M (inches) | M (cm) | L (inches) | L (cm) | XL (inches) | XL (cm) | 2XL (inches) | 2XL (cm) | 3XL (inches) | 3XL (cm) | |
| Bust | 32 | 81.3 | 34 | 86.4 | 36 | 91.4 | 38 | 96.5 | 40 | 101.6 | 42 | 106.7 | 44 | 111.8 |
| Waist | 26 | 66.0 | 28 | 71.1 | 30 | 76.2 | 32 | 81.3 | 34 | 86.4 | 36 | 91.4 | 38 | 96.5 |
Final Garment Measurements
| XS (inches) | XS (cm) | S (inches) | S (cm) | M (inches) | M (cm) | L (inches) | L (cm) | XL (inches) | XL (cm) | 2XL (inches) | 2XL (cm) | 3XL (inches) | 3XL (cm) | |
| Chest | 29.25 | 74.2 | 31.25 | 79.3 | 32.25 | 81.9 | 33.25 | 84.4 | 34.25 | 86.9 | 35.25 | 89.5 | 36.25 | 92.0 |
| Full Length | 15.7 | 39.8 | 16 | 40.64 | 16.3 | 41.4 | 16.7 | 42.4 | 17 | 43.1 | 17.3 | 43.9 | 17.75 | 44.9 |
Yardage Chart
| Width of the Fabric | XS (yards) | XS (meters) | S (yards) | S (meters) | M (yards) | M (meters) | L (yards) | L (meters) | XL (yards) | XL (meters) | 2XL (yards) | 2XL (meters) | 3XL (yards) | 3XL (meters) |
| 45” | 0.45 | 0.41 | 0.53 | 0.49 | 0.63 | 0.57 | 0.72 | 0.66 | 0.83 | 0.76 | 0.95 | 0.87 | 1.10 | 1.00 |
| 60” | 0.45 | 0.41 | 0.53 | 0.49 | 0.63 | 0.57 | 0.72 | 0.66 | 0.83 | 0.76 | 0.95 | 0.87 | 1.10 | 1.00 |
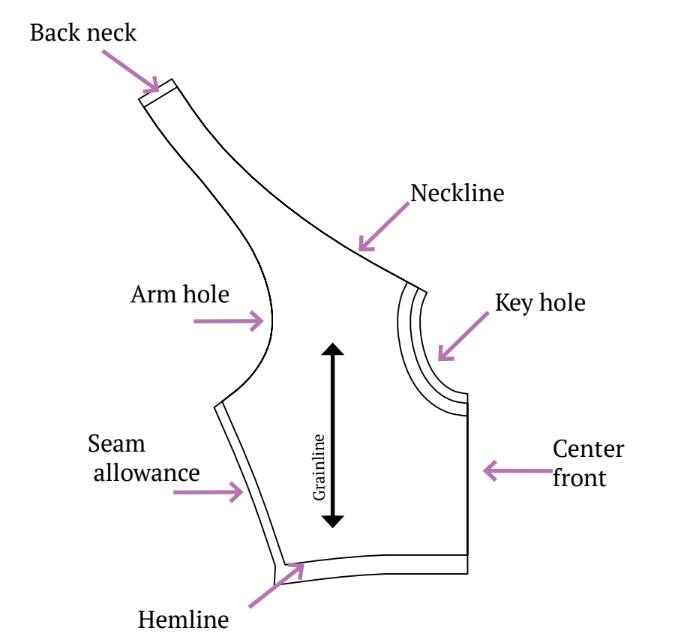
Recognizing Your Patterns: Halter Neck Top Pattern Marking and Assembly
As you embark on the creation of your halter neck top, recognizing your pattern is a pivotal step to continue with your sewing process. Assemble your chosen fabric and plunge into the pattern-marking phase. This step is key, so pay attention!
Take note of the following pattern pieces that outline the specific number of fabric pieces you need to cut for each corresponding pattern piece:
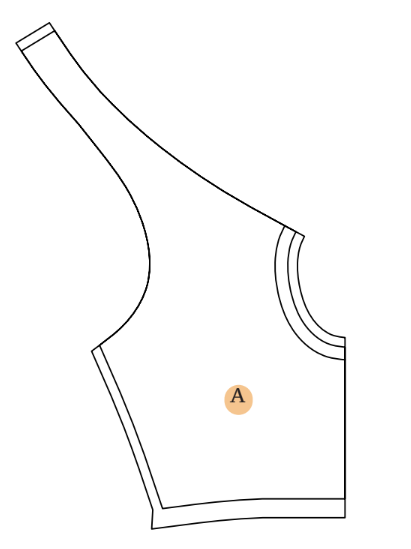
A. Front Bodice – Cut x2 Fabric
Cut two identical pieces of fabric using the pattern for the front bodice. These pieces will form the front of your halter neck top.
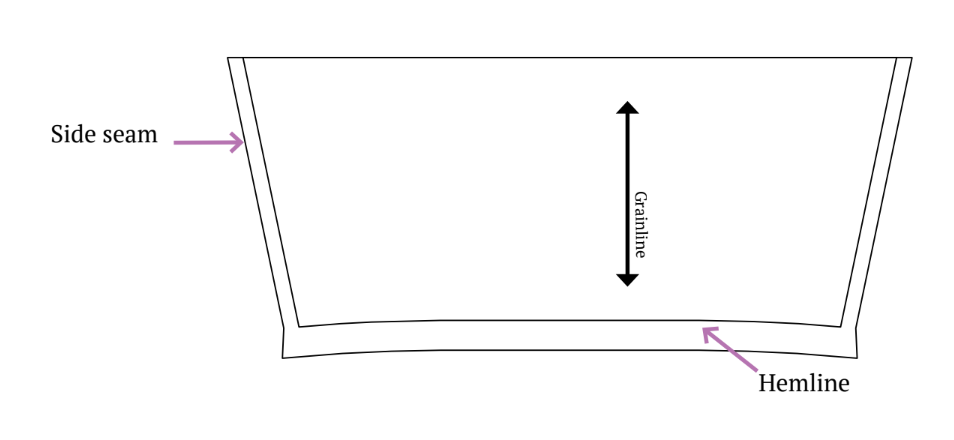
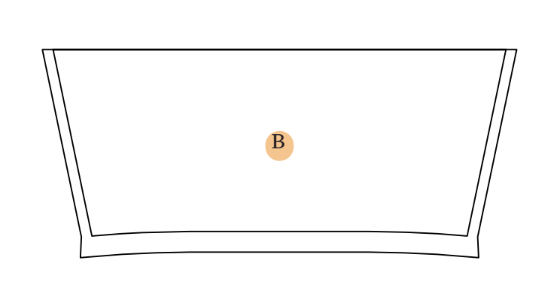
B. Back Bodice – Cut x1 Fabric
For the back bodice, you only need to cut one piece of fabric using the pattern. This single piece will serve as the back portion of your halter neck top.
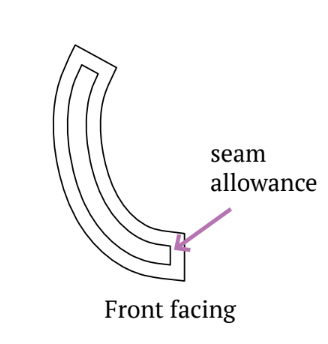
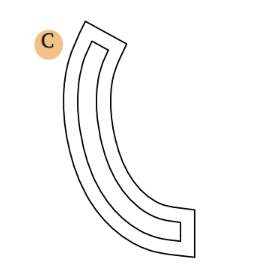
C. Front Facing – Cut x2 Fabric
Similar to the front bodice, you’ll need to cut two identical fabric pieces for the front facing. The front facing is a component that helps finish the neckline and provides a clean edge to the front of the garment.
D. Binding Strip – Cut x1 Fabric
For the binding strip, you are required to cut a single piece of fabric. This strip will be used to bind the edges of your halter neck top, providing a neat and finished look to the garment.

To minimize fabric wastage, consult the cutting layout provided in the next section before cutting.
If printing at home, utilize the A4 Pattern, and for print at a copy shop, opt for the A0 Pattern for convenience.
Steps To Follow For Sewing a Halter Neck Top
Below is a detailed guide of the steps involved in making a halter neck top:
Step 1: Preparation
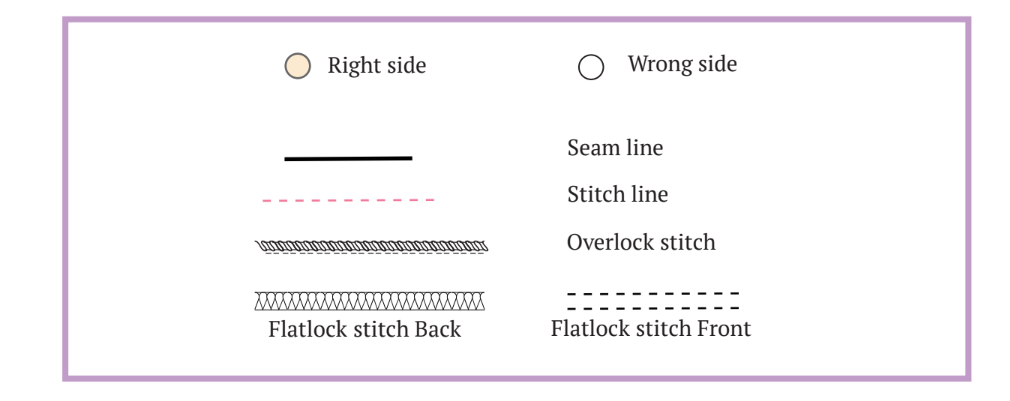
Before you start, note that an overlock stitch is preferred for sewing, but a zigzag stitch can also be used. For a finished hem, a flatlock stitch is recommended. If your machine allows, reduce the presser foot pressure, especially when working with stretchy fabric. I also always advise practising your stitching on a scrap fabric piece before proceeding to the final garment.
Step 2: Cutting Layout
Ensure your fabric is on-grain by following the correct pattern layout. Pinning helps maintain accuracy during cutting. Non-directional pattern layouts are advisable. If your fabric has a nap or prints, purchase extra length.
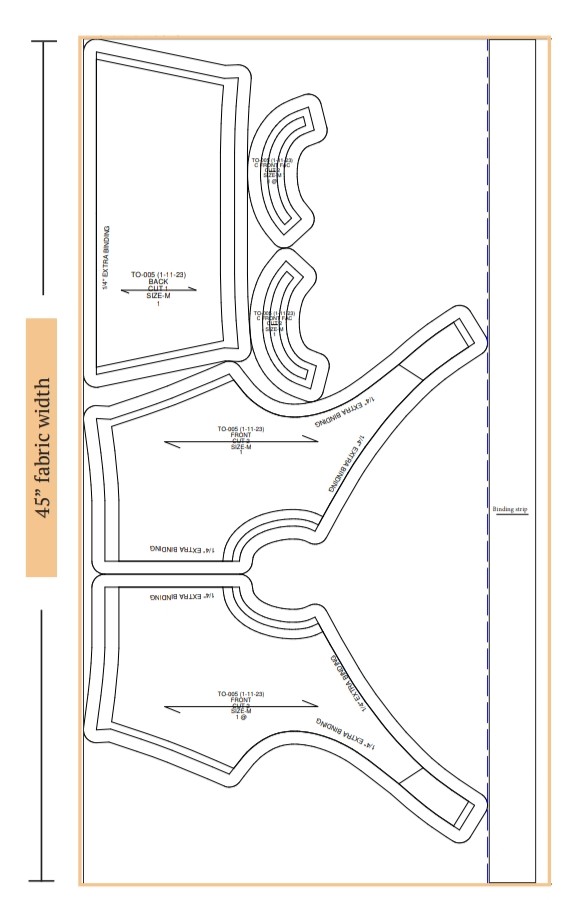
Step 3: Lay Out Your Pattern Pieces
Position your pattern pieces on the fabric according to the cutting layout diagram shown above. Align the grainline arrow parallel to the selvage.
Step 4: Cut Your Fabric
Trace pattern pieces with fabric shears and cut them out. Remove any pen, pencil, or chalk lines, and cut notches on the edges to aid assembly.
Step 5: Transfer Pattern Markings
Use a marking pen, pencil, or chalk to transfer important markings to the wrong side of the fabric. Mark the center front for pieces cut on the fold.
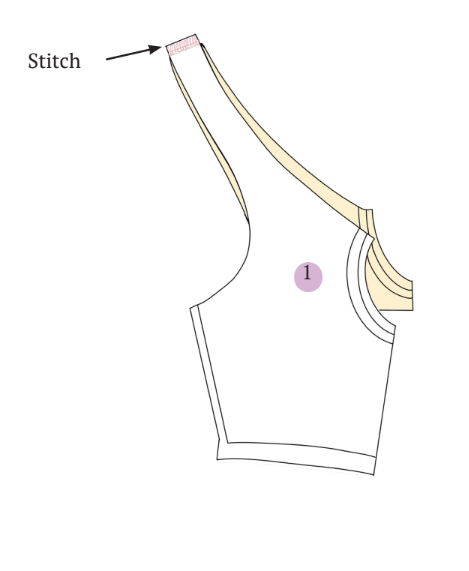
Step 6: Match Back Neck Pieces
- Place the back neck portions of both front pieces together with right sides facing each other.
- Stitch along the back neck seamline using an overlock stitch.
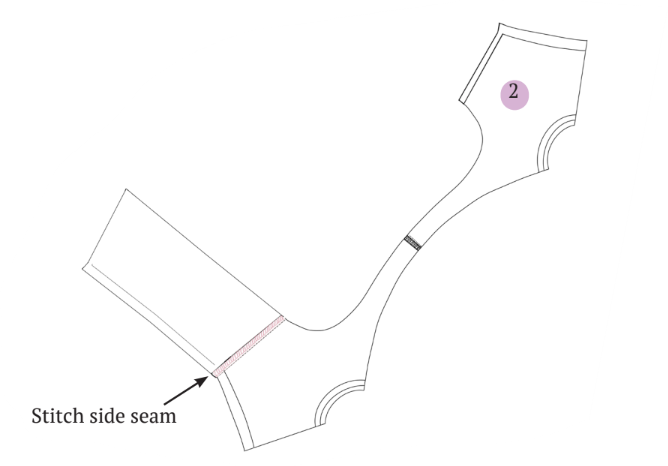
Step 7: Join Front and Back Bodice
- Align the right sides of the front and back bodice.
- Stitch one side seam using an overlock stitch.
- Insert the binding strip into the binder, stitching approximately 1 inch.
- Tuck the neck seam allowance inside the binding and start sewing the neckline.
- Trim any excess strip.
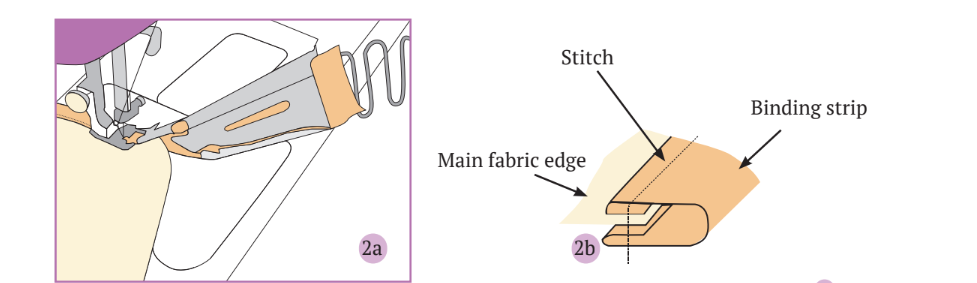
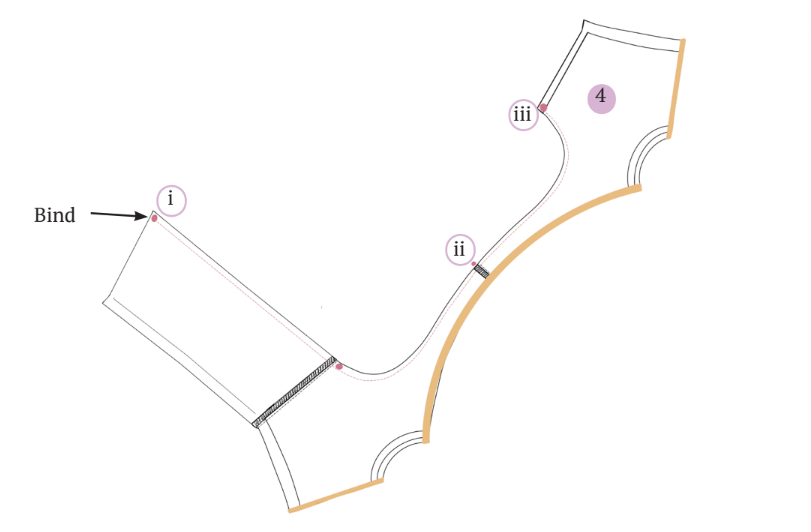
Step 8: Bind the Neckline
- Use the binding strip to bind the neckline, following indicated points for guidance.
- Complete both center fronts individually with binding.
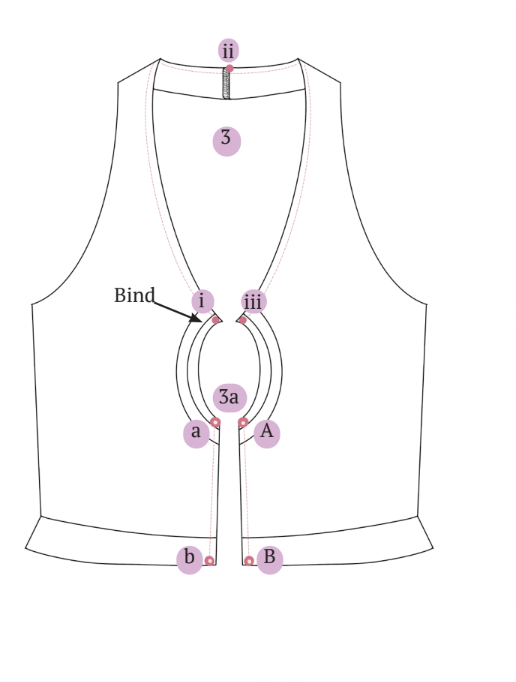
Step 9: Bind Armhole and Back
- Start from the open back side seam, move towards the armhole, then to the back, and finish at the front side seam.
- Refer to the points illustrated in the provided picture.
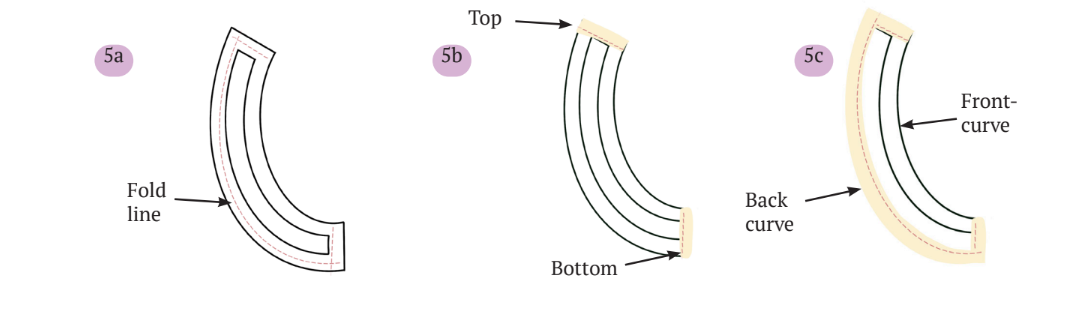
Step 10: Topstitch Seam Edges
- Fold half of the seam edges towards the wrong side of the fabric.
- Topstitch over them in the following order: 1 – top, 2 – bottom, 3 – back curve.
- Use the below pictures for visual guidance.
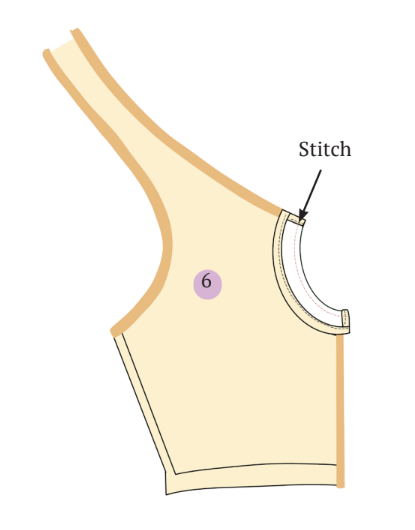
Step 11: Attach Front Facing
- Align the front curve of the front facing with the front bodice, ensuring right sides are together.
- Sew along the keyhole seamline as depicted in the picture.
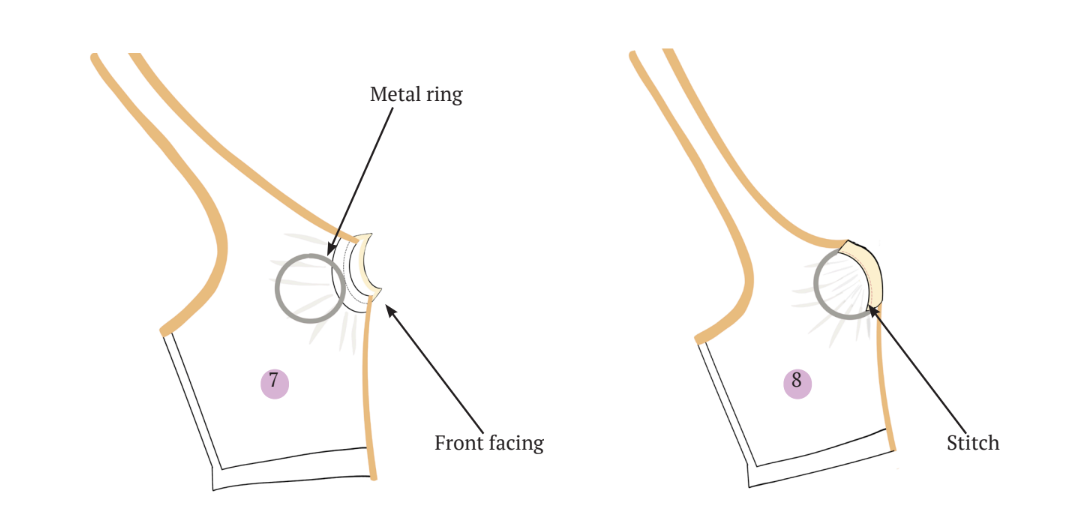
Step 12: Add Metal Ring and Gathers
- Flip the facing to the wrong side of the front bodice.
- Position the metal ring between the front bodice and facing.
- Create even gathers until reaching the required length.
- Stitch along the edge of the front facing curve.
- Repeat for the opposite side.
Step 12: Sew Remaining Side Seam
Use an overlock stitch to sew together the remaining side seam.

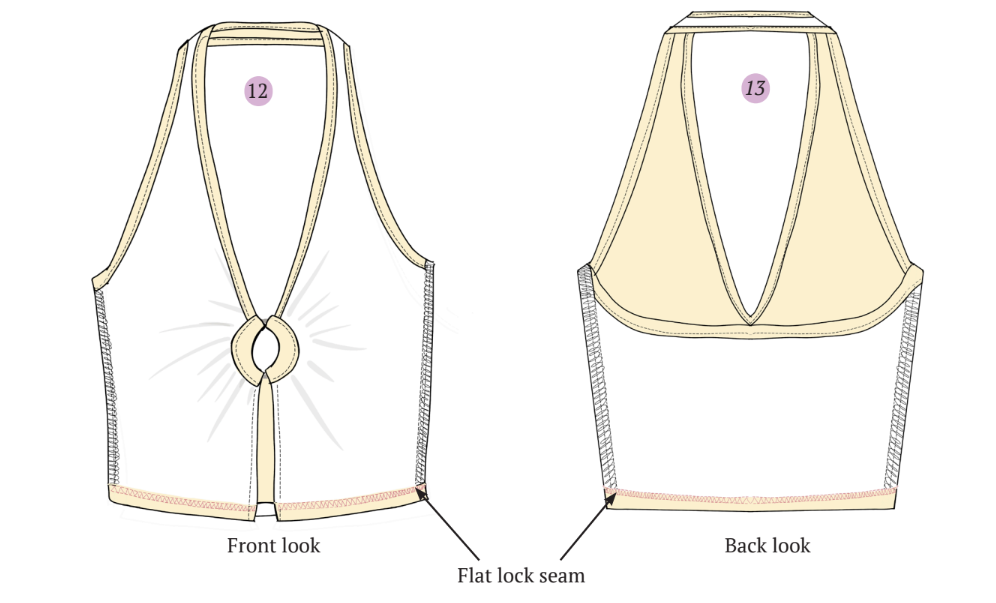
Step 13: Hem the Bottom
- Fold the hem by 0.7 inches on the wrong side (seam allowance is 0.7 inches).
- Adjust the measurement if needed.
- Flatten with an iron and secure with pins.
- Sew a straight stitch along the top edge of the fold, starting from one side seam and continuing until the entire hem is sewn.
There you have it! Your fashionable halter neck top will be ready to wear and show off to your loved ones if you carefully follow these instructions.
Summary: How to Sew a Halter Neck Top
There it is! Sewing a halter neck top is a simple DIY project that even beginners can enjoy.
To get started, choose a pattern that suits your style – whether it’s a classic design or the Winslet’s WINX Halter Neck Top Pattern for a trendy look. Begin by gathering the necessary materials and make sure to take accurate body measurements to ensure a perfect fit. Follow the step-by-step instructions provided in this post or if you’re feeling creative, customize the design to make it uniquely yours. Lastly, don’t be afraid to experiment with colors and textures to make your halter neck top truly one-of-a-kind.
Check out some final images of this adorable top created with the Winslet’s WINX Halter Neck Top Pattern:

Key Points To Keep In Mind:
- Lay out your pattern pieces
- Cut your fabric
- Transfer pattern markings
- Stitch back neck seam
- Assemble front and back bodice
- Bind the neckline
- Bind armhole and back
- Topstitch seam edges
- Attach front facing
- Add metal ring and gathers
- Sew remaining side seam
- Hem the bottom
With this tutorial, I hope you had fun making your first halter neck top. Try it out and enjoy the delights of handcrafted clothing! Share your photos with us and let us know how they turned out.
Join the Winslet sewing community by sharing your masterpiece with the hashtag #madewithwinslets!