How to Sew a Front Knot Top?
Have you wondered how to sew a front knot top?
Crafting a front knot top is a fantastic way to enhance your wardrobe with a trendy and versatile garment. This step-by-step guide will walk you through the process of sewing your own front knot top, using the Winslet’s Willow Front Knot Top Pattern. Let’s dive into the details!
What sewing supplies do you need to sew a front knot top?
Before delving into the actual sewing process, assemble your arsenal of sewing supplies. Equip yourself with shears, pins, and a sewing machine, among other essentials, as you prepare to bring the front knot top to life.
Sewing Pattern: I used the Winslet’s Willow Front Knot Top Pattern as it is an easy-to-sew pattern with great sewing instructions and patterns in A4, US Letter and A0 sizes that can easily be printed at home or a copyshop.
- Sewing Machine: Make sure it’s in good condition. If you’re looking to buy a new machine or upgrade your current one, read this post about the 20 Best Sewing Machines.
- Tape Measure: For accurate measurements.
- Fabric: Choose from cotton blends, satin, silk, or modal satin.
- Shears: For clean and precise fabric cutting. If you are looking to buy a new pair of scissors, read this post on the Best Sewing Scissors and Shears.
- Iron: A must have for sewers. If you are looking to buy a sewing iron, read this post on the Best Cordless Iron for Sewing.
- Other accessories might include: Chalk, Pins, Needles, Thread, Thread Cutter, Binder Attachment, Buttons, and Buttonhole Attachment.
Fabric Recommendation
For sewing a front knot top, you can opt for light to medium-weight fabrics like cotton blends, satin, silk, or modal satin.

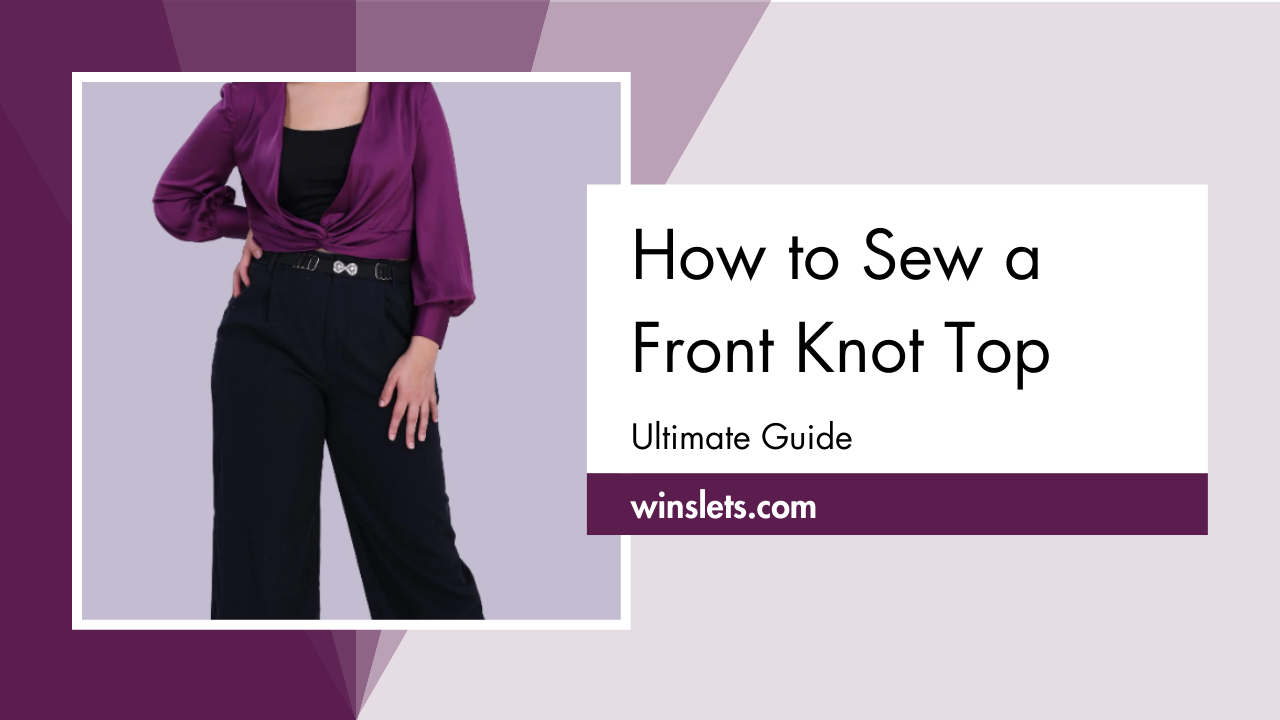
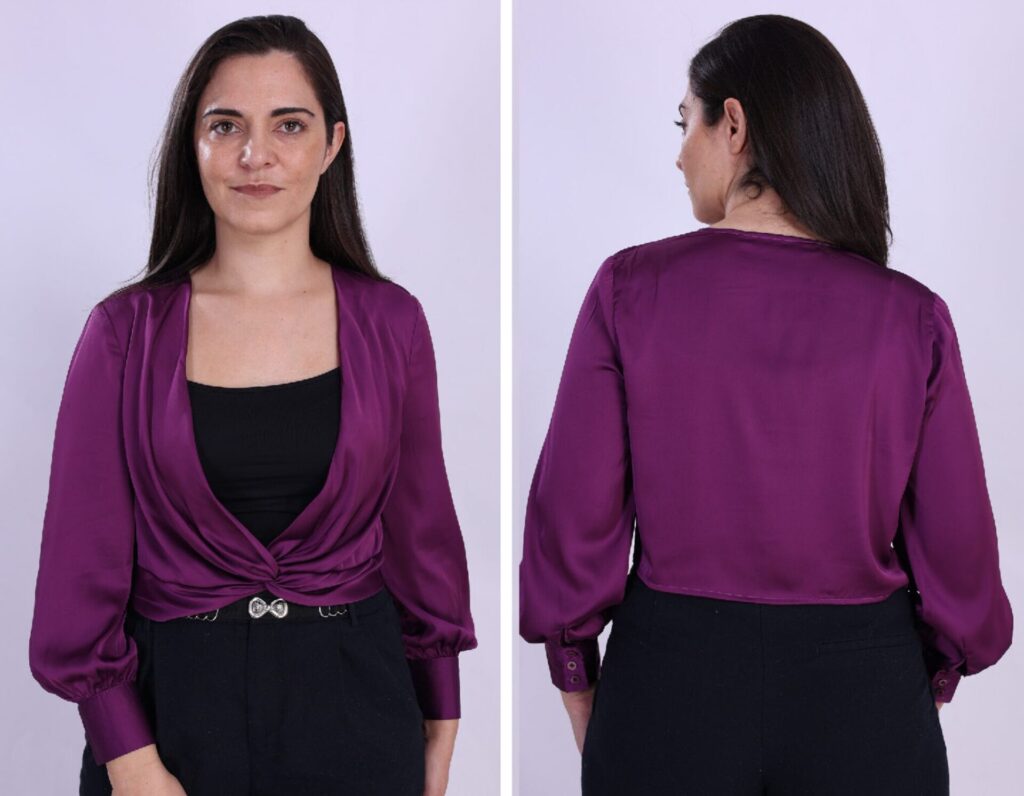
The chosen poly satin fabric for the front knot top (in the above pic) made with the Winslet’s Willow Front Knot Top Pattern offers a soft texture, minimal shrinkage, wrinkle resistance, quick drying, and excellent shape retention.
Size Charts: Tailoring to Perfection
Use the sizing charts below to ensure that the front knot top fits like a second skin.
One thing to keep in mind is that if you don’t find your exact measurements in the chart below, you may want to go a size up. Since this is a top style, you would want to get closest to your bust size.
The below table provides sizes measured in both inches and centimeters.
Body Measurements
| XS (inches) | XS (cm) | S (inches) | S (cm) | M (inches) | M (cm) | L (inches) | L (cm) | XL (inches) | XL (cm) | 2XL (inches) | 2XL (cm) | 3XL (inches) | 3XL (cm) | |
| Bust | 32 | 81.3 | 34 | 86.4 | 36 | 91.4 | 38 | 96.5 | 40 | 101.6 | 42 | 106.7 | 44 | 111.8 |
| Waist | 26 | 66.0 | 28 | 71.1 | 30 | 76.2 | 32 | 81.3 | 34 | 86.4 | 36 | 91.4 | 38 | 96.5 |
Final Garment Measurements
| XS (inches) | XS (cm) | S (inches) | S (cm) | M (inches) | M (cm) | L (inches) | L (cm) | XL (inches) | XL (cm) | 2XL (inches) | 2XL (cm) | 3XL (inches) | 3XL (cm) | |
| Sleeve Length | 18.75 | 47.6 | 19.13 | 48.5 | 19.51 | 49.5 | 19.89 | 50.5 | 20.27 | 51.4 | 20.65 | 52.4 | 21.03 | 53.4 |
| Full Length (from Back Neck) | 17.5 | 44.4 | 17.75 | 45 | 18 | 45.7 | 18.25 | 46.35 | 18.5 | 46.9 | 18.75 | 47.6 | 19 | 48.2 |
Yardage Chart
| Width of the Fabric | XS (yards) | XS (meters) | S (yards) | S (meters) | M (yards) | M (meters) | L (yards) | L (meters) | XL (yards) | XL (meters) | 2XL (yards) | 2XL (meters) | 3XL (yards) | 3XL (meters) |
| 45” | 1.16 | 1.06 | 1.37 | 1.25 | 1.61 | 1.47 | 1.85 | 1.69 | 2.13 | 1.95 | 2.45 | 2.24 | 2.82 | 2.58 |
| 60” | 0.88 | 0.80 | 1.03 | 0.94 | 1.21 | 1.11 | 1.39 | 1.27 | 1.60 | 1.46 | 1.84 | 1.68 | 2.12 | 1.94 |
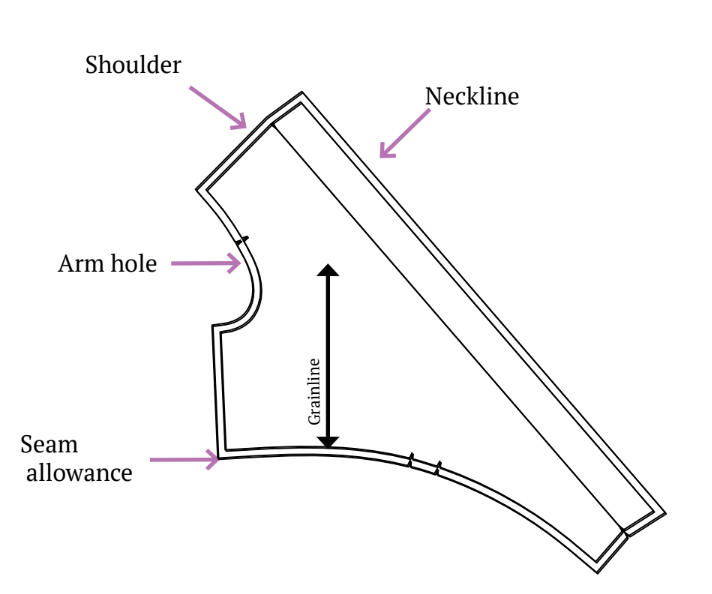
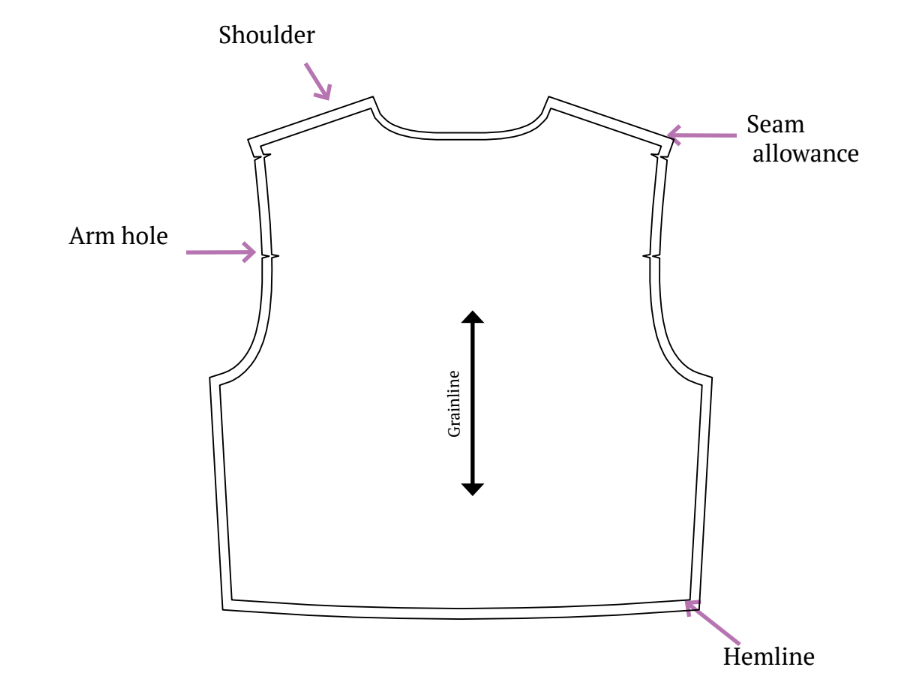
Understanding your Patterns: Pattern Marking and Assembly for Front Knot Top
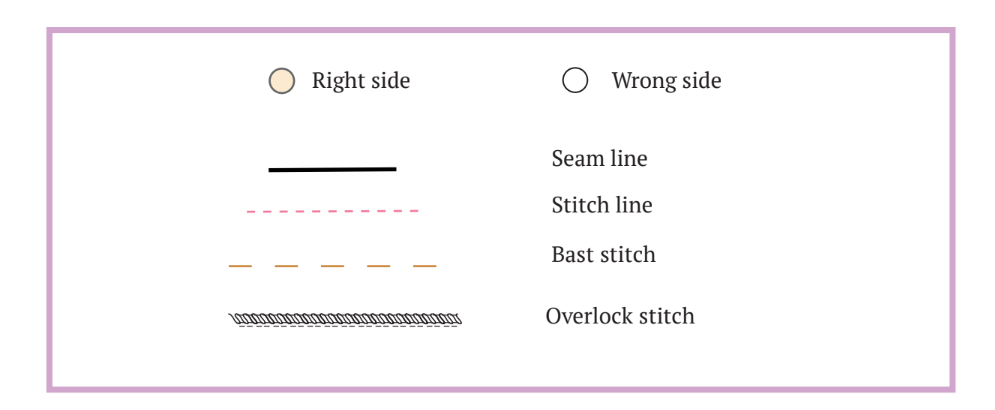
Assemble your fabric and embark on the pattern-marking phase, a crucial step in ensuring accuracy and alignment. Transfer the essential markings to the fabric’s wrong side, setting the stage for a seamless assembly process.
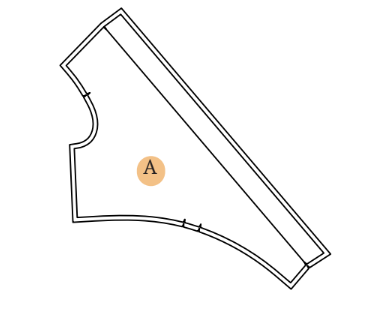
A. Front Bodice – Cut x2 Fabric
This indicates that you need to cut two identical pieces of fabric using the pattern for the front bodice. These pieces will eventually form the front part of the front knot top.
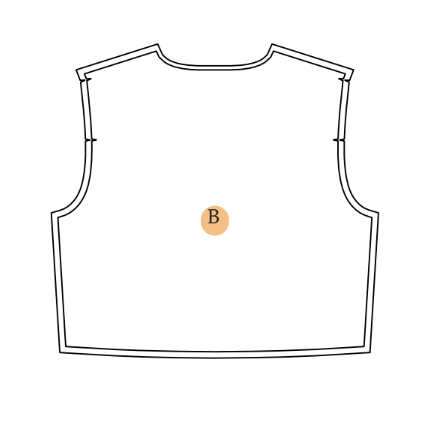
B. Back Bodice – Cut x1 Fabric
For the back bodice, only one piece of fabric needs to be cut using the pattern. This piece will constitute the back section of the garment.
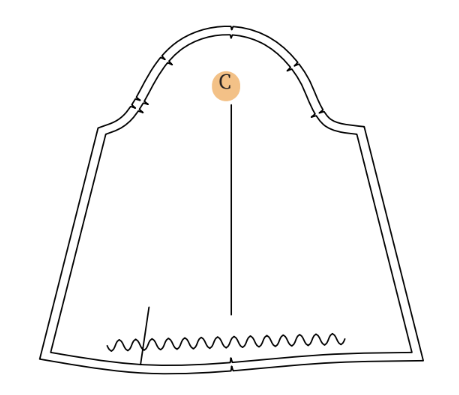
C. Sleeve – Cut x2 Fabric
The sleeves require two fabric pieces, both cut using the pattern. These pieces will be responsible for shaping and forming the sleeves of the top.

D. Cuff – Cut x2 Fabric
Similarly, for the cuffs, two identical fabric pieces are needed, cut using the pattern. These pieces will be attached to the sleeves, adding a finishing touch to the garment.


In order to minimize fabric wastage, please refer the cutting layout in the next section before you start cutting your fabric.
Print the patterns in A4 or A0 format, depending on whether you’re printing at home or using a copy shop.
Steps To Follow For Sewing a Front Knot Top
Sewing a front knot top involves several steps to create a stylish and comfortable garment. The process includes overlocking edges, attaching front pieces, creating a unique twist, binding the neckline, joining the front and back bodice, and finishing with cuffs, buttons, and hems.
The following steps provide a detailed guide to achieve the desired result:
Step 1: Cutting Layout
Lay out your fabric with care, following the cutting layout diagrams to guarantee a garment cut perfectly on grain. Notably, the provided pattern layouts are non-directional, indicating that the fabric can be oriented in any direction without affecting the garment’s design.

Step 2: Overlock and Fold Front Pieces
To initiate the sewing process, carefully overlock the edges of both front pieces, mirroring the technique depicted in Picture 1. This ensures durability and a polished appearance.

Subsequently, fold the front pieces towards the wrong side along the designated fold line.
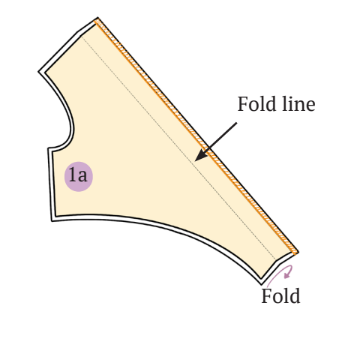
Execute precise stitches to secure the fold on the back side of the fabric, emphasizing a robust backstitch to firmly lock the stitch in place. Repeat the same for the other front piece.

Tip: Opt for an overlock stitch for enhanced durability or utilize a zigzag stitch as a viable alternative, providing flexibility based on your preferences and available equipment.
Step 3: Attach Front Pieces
With the fabric draped, leave the required neck drop measured from the inner shoulder. Begin attaching the front pieces by stitching them together approximately 1 inch from the edge, ensuring the stitching is done on the wrong side of the fabric for a seamless appearance.

Step 4: Create Overlapping ‘X’
Turning attention to the front bodice, position it facing upward. Implement a twist in the overlap, taking the right over-lap to the left overlap, thereby forming an ‘X’ shape.

Cross the overlap, ensuring that the right and left overlaps align with their respective sides of the front bodice.
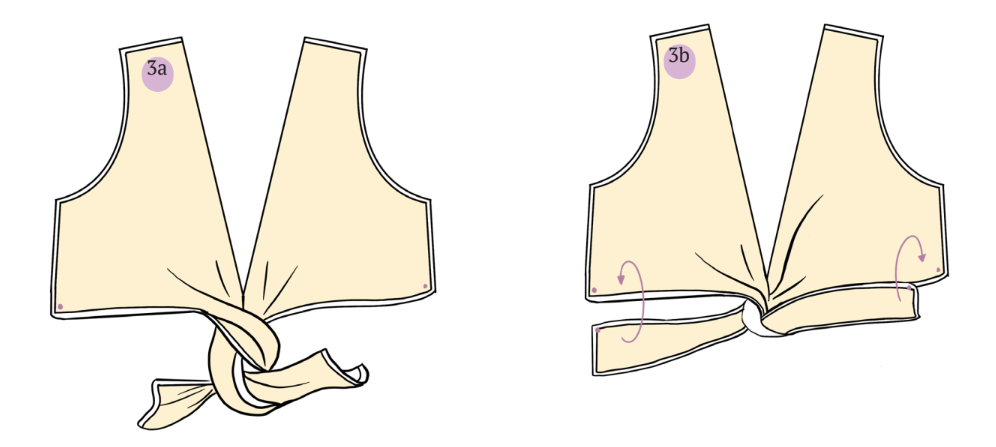
Step 5: Stitch Overlapping Sections
Flip the overlap to face right on the front side of the fabric and proceed to stitch it with the bodice front. Repeat the same process for the left side.

During this step, make sure to stitch on the wrong side of the fabric and secure the knots, ensuring no gaps exist between stitches.

Step 6: Bind Back Neck
Bind the back neck using the binding strip.

Fold the binding strip with the fabric’s end facing inward and iron it thoroughly.
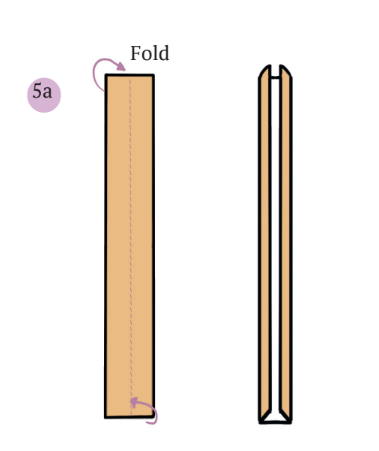
Bind the back neck by enclosing the main fabric within the folded binding strip.

Tip: Cut a binding strip from the same fabric, with a width of approximately 2” to 2.5” and a length 1” longer than the back neck. The grainline should be on the bias.
Step 7: Join Front and Back Bodice
Bring the front and back bodice together, aligning their right sides. Stitch both shoulders of the bodice, establishing a solid connection between the front and back sections.

Step 8: Bind Sleeve Slits
Create a basting stitch at the sleeve’s bottom, then gather the thread from the edge to adjust to the required wrist round length.
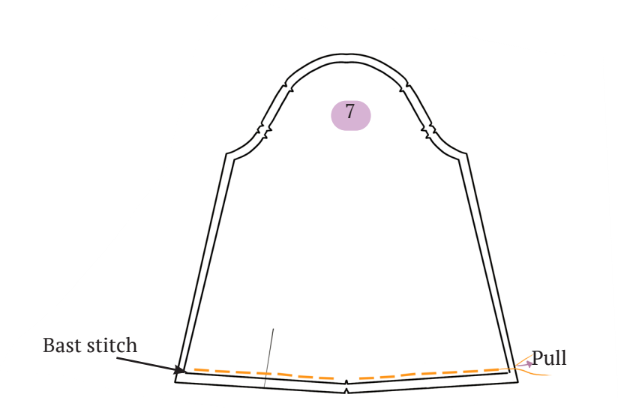
Follow the pattern’s slit guideline and cut along it to create the slit.

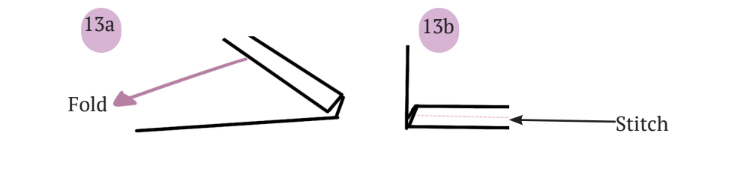
Bind the slit using a binding strip. Fold the edges of the binding strip towards the center, iron them properly, and stitch the strip while encasing the sleeve fabric within it (refer to pictures .a and .b).


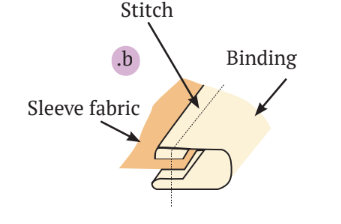
Tip: Cut binding strips from the same fabric, approximately 2” to 2.5” wide, and 1” longer than the entire slit length (x2 binding strips). The grainline should be on the bias.
Step 9: Align and Sew Armholes
Align the seam allowances of the bodice and sleeve armholes, ensuring that the front and back notches are matched with right sides facing together.

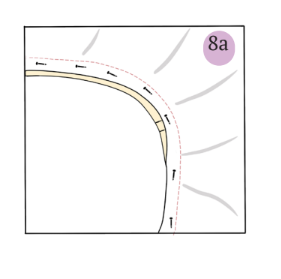
Pin and sew the armholes, repeating the process for both sides to maintain symmetry and balance in the garment.
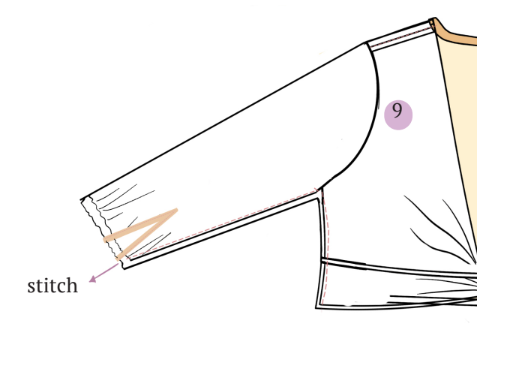
Step 10: Sew Side Seams
With the front and back bodice placed together and right sides facing, proceed to sew both side seams and sleeve sides. This step marks the convergence of the different components, creating a cohesive and well-fitted structure for the front knot top.
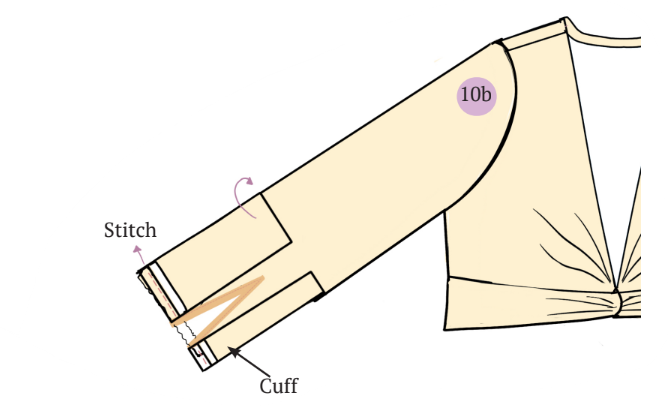
Step 11: Attach Cuffs
Fold the cuff in half facing right sides together and stitch its sides on the seam line, working on the wrong side of the fabric.

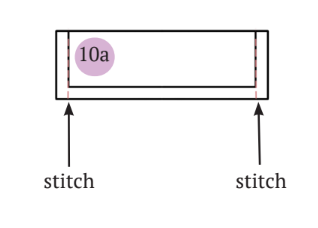
Repeat the same for the other cuff.
Turn the cuff right-side out and place it on the sleeve, aligning right sides together. Sew the inner edge of the cuff with the sleeve along the seam line.
Step 12: Finish Cuffs
Fold the cuff down and sew the other edge of the cuff with the sleeve on the wrong side of the fabric.
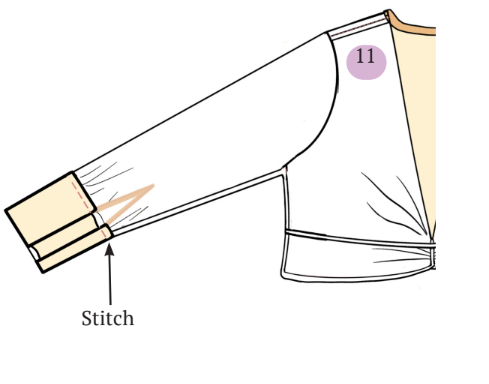
Stitch the fabric’s edge by folding the cuff along the seam line and stitching on top of the cuff.

Repeat the same for other sleeve.
Step 13: Add Buttons and Buttonholes
Enhance the functionality and visual appeal of the cuffs by attaching buttons at regular intervals, approximately 1 inch apart.

Create corresponding buttonholes using a zigzag stitch in a rectangular shape. Trim the middle portion of the fabric within the buttonhole using a thread cutter for a neat and professional look.

Step 14: Stitch Hem
Concluding the sewing process involves stitching the hem. Fold the fabric’s bottom edge twice on the wrong side, sewing along the folded hem.

Secure the stitch with a backstitch to prevent any unraveling. Emphasize folding the fabric’s edge inside during hemming to minimize fraying and contribute to the top’s overall durability.
Summary: How to sew a front knot top
There it is! Explore the creative world of sewing by trying the front knot top craft. To sew a front knot top, first gather your sewing supplies, choose an appropriate pattern, and cut the fabric according to your size.
Here’s a summary of each step:
- Select the right pattern:
Choose any appropriate pattern you like, or you can go for the Winslet’s Willow Front Knot Top Pattern which I’ve used in this post. - Overlock and fold the front pieces:
Finish the edges of the front fabric pieces and fold them as per the pattern instructions. - Attach the front pieces:
Join the front pieces together according to the pattern guidelines. - Create a twist in the fabric:
Incorporate a twist in the front of the garment for the knot design. - Bind the back neck:
Finish the neckline at the back of the garment with a binding. - Join the bodice:
Connect the front and back sections of the garment to form the bodice. - Bind sleeve slits with matching fabric strips:
Baste, gather, cut along slit guideline, and neatly stitch for a polished finish. - Align armholes:
Ensure proper alignment and fit of the sleeves in the armholes. - Sew side seams:
Stitch the side seams of the garment for a complete form. - Attach cuffs:
Add cuffs to the sleeves following the pattern instructions. - Add buttons:
Incorporate buttons in the design as specified by the pattern. - Finish with a hem:
Complete the garment by hemming the edges for a polished look.
These steps ensure a stylish and well-crafted garment. I hope you enjoyed sewing your first front knot top with this detailed tutorial.
Check out some final images of this adorable top created with the Winslet’s Willow Front Knot Top Pattern:
Leave us your pictures and comments on how they turn out.
Share your creation using #madewithwinslets to be part of Winslet’s sewing community!