How to Sew a Sheath Dress?
Hello, my sewing friends! Today, I’m excited to teach you how to create your own sheath dress from start to finish. This dress is named for its form-fitting style, highlighting the waist with a snug skirt. It usually comes in sleeveless or long-sleeve options and typically reaches knee-length.
Sewing a sheath dress is a breeze, making it great for beginners and professionals. Beginners can practice their skills, while professionals can whip up a stylish dress in no time. In this guide, I’ll take you through each step of sewing this dress, so you can easily make one yourself!
I have selected the Celestia Keyhole Sheath Dress Sewing Pattern from Winslet’s to sew my own sheath dress. Let’s dive into the process and make this elegant dress together!
What supplies do you need to sew a sheath dress?
First, you’ll need your Sewing Pattern. I used the Winslet’s Celestia Keyhole Sheath Dress Sewing Pattern for my dress, but feel free to choose any pattern you prefer.
In addition to your pattern, gather these essentials: Sewing Machine, Tape Measure, Chalk, Shears, Pins, Sewing Iron, Needles, Thread (3-ply polyester is best), Thread Cutter, and an Invisible Zipper.
Fabric Recommendation
The pattern that I am using suggests using fabrics like cotton blend, georgette, or viscose.
Cotton blends are awesome for sewing because they’re super easy to handle. They’re great for warmer weather, come in lots of different textures, and are absorbent, easy to clean, durable, and gentle on your skin.
Georgette is another cool fabric for making dresses because it drapes nicely and takes dye well. It’s often used for fancy stuff like dresses, evening gowns, and blouses, and you can find it in all sorts of solid colors.
Then there’s viscose, which is soft, flexible, and absorbent, kind of like a budget-friendly silk. It has that silky look and feel, but without the hefty price tag. Plus, it’s breathable like cotton, so you’ll feel comfy and chill wearing it.
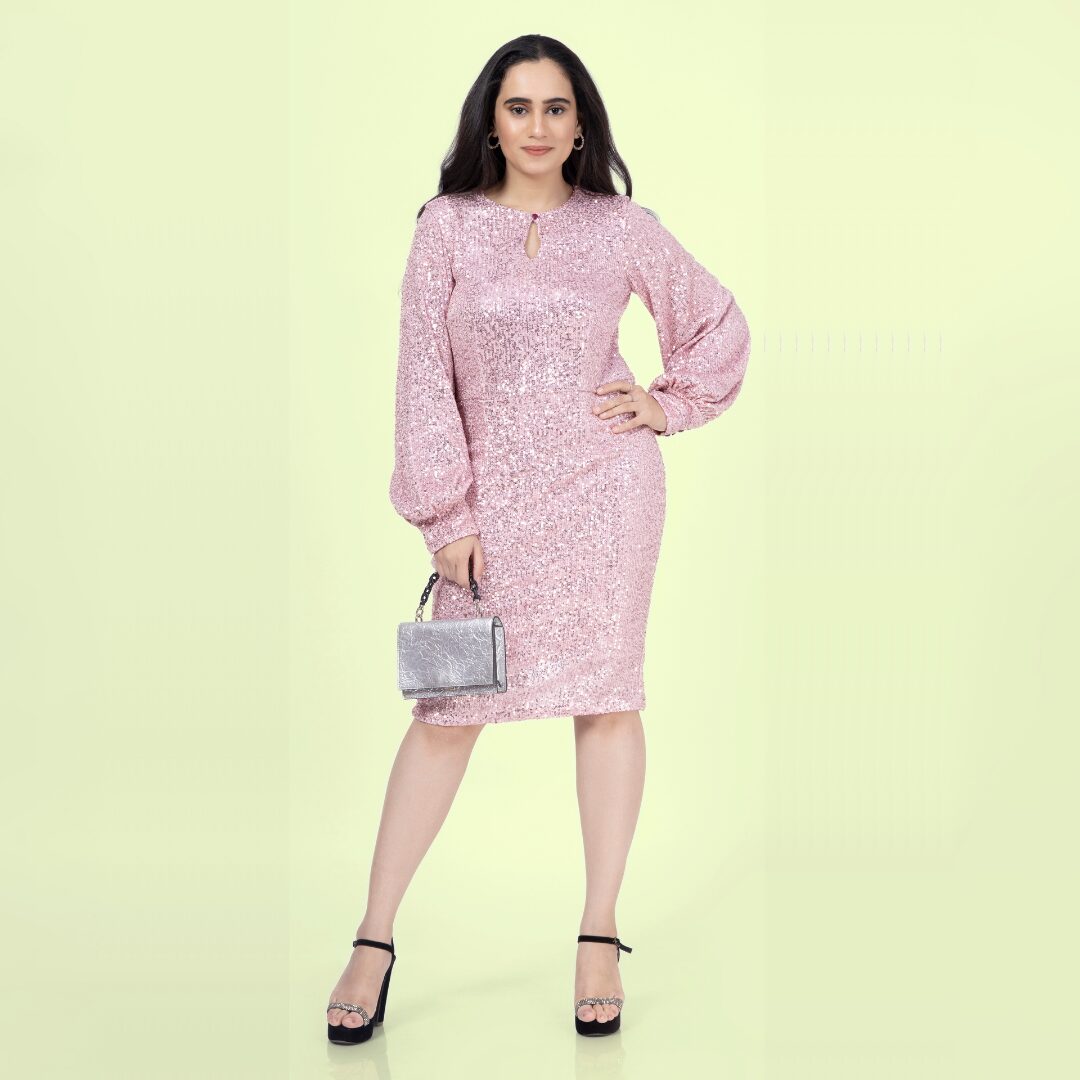
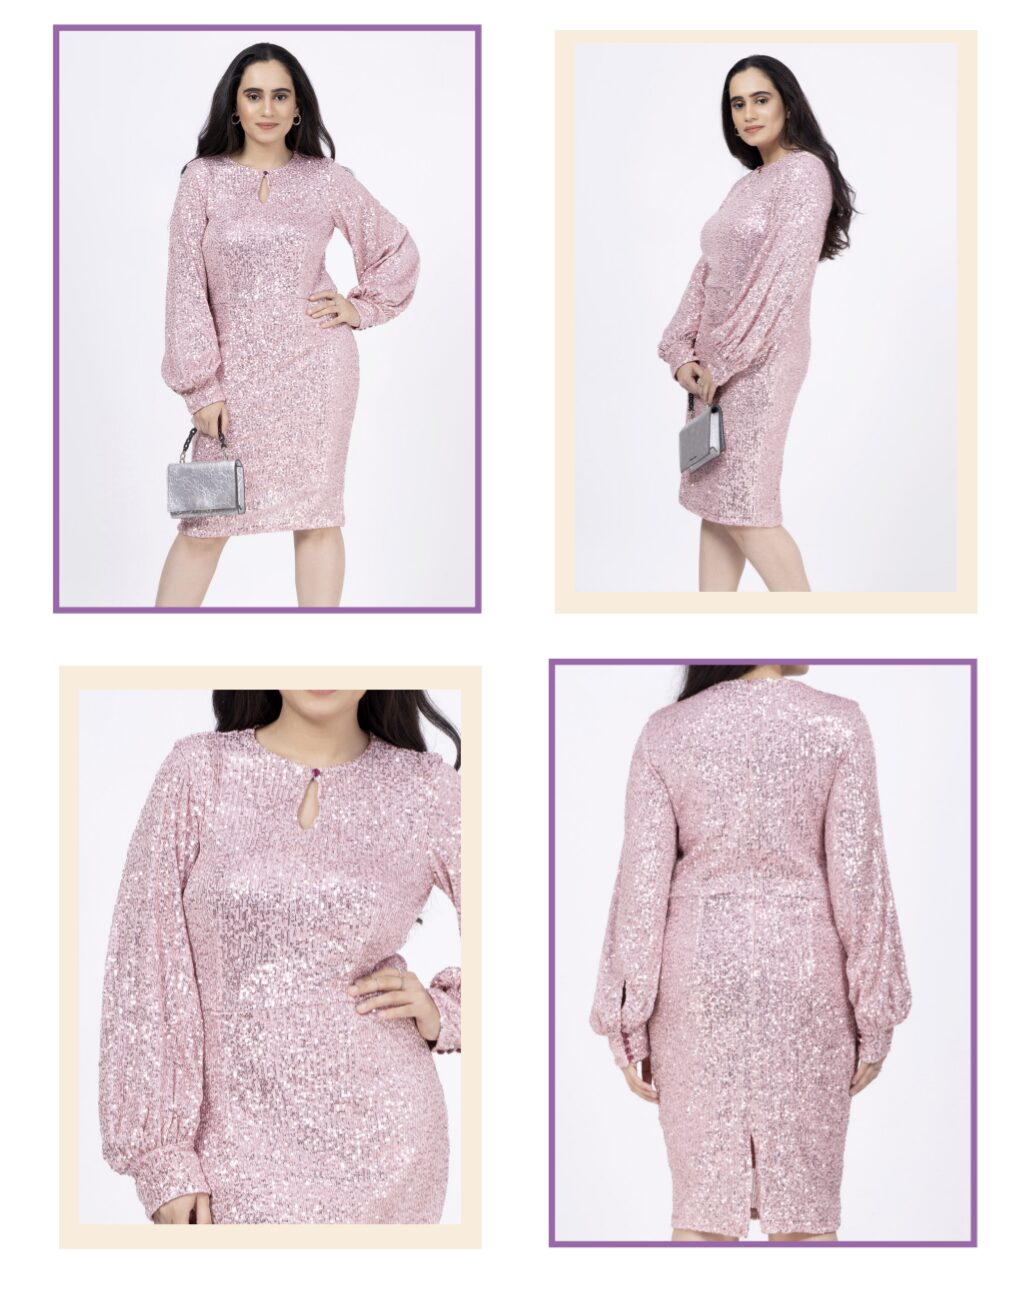
Usually, I like to go with the fabric recommended in the pattern. In the image above, the model is sporting Winslet’s Celestia Sheath Dress, made from georgette sequin fabric. So, why this fabric specifically? It’s all about the sparkle! The sequins give it a radiant shine, perfect for a party look. Considering all these advantages, I opted for this fabric for my project.
Size Charts
Before you start sewing, make sure your measurements are just right.
1. Bust: Wrap a measuring tape around the fullest part of your bust, ensuring it’s parallel to the ground and not too tight or too loose.
2. Waist: Find the narrowest part of your waist, usually above your belly button and below your rib cage. Wrap the measuring tape around this area.
3. Hips: Measure the widest part of your hips, usually around your hip bones and buttocks. Ensure the measuring tape is parallel to the ground.
The body measurements and final garment measurements for sizes (XS, S, M, L, XL, 2XL, or 3XL) are detailed below for Winslet’s Celestia Sheath Dress. Choose a size that corresponds most closely to your body measurements. It’s worth noting that if your exact measurements are not listed in the table, you may want to consider ordering a size larger.
Body Measurements
| XS (inches) | XS (cm) | S (inches) | S (cm) | M (inches) | M (cm) | L (inches) | L (cm) | XL (inches) | XL (cm) | 2XL (inches) | 2XL (cm) | 3XL (inches) | 3XL (cm) | |
| Bust | 32 | 81.3 | 34 | 86.4 | 36 | 91.4 | 38 | 96.5 | 40 | 101.6 | 42 | 106.7 | 44 | 111.8 |
| Waist | 26 | 66.0 | 28 | 71.1 | 30 | 76.2 | 32 | 81.3 | 34 | 86.4 | 36 | 91.4 | 38 | 96.5 |
| Hip | 34 | 86.4 | 36 | 91.4 | 38 | 96.5 | 40 | 101.6 | 42 | 106.7 | 44 | 111.8 | 46 | 116.8 |
Final Garment Measurements
| XS (inches) | XS (cm) | S (inches) | S (cm) | M (inches) | M (cm) | L (inches) | L (cm) | XL (inches) | XL (cm) | 2XL (inches) | 2XL (cm) | 3XL (inches) | 3XL (cm) | |
| Bust Round | 32 | 81.2 | 34 | 86.3 | 36 | 91.4 | 38 | 96.5 | 40 | 101.6 | 42 | 106.6 | 44 | 111 |
| Full Length (from Centee Back) | 37.5 | 95.2 | 37.75 | 95.8 | 38.25 | 97.1 | 38.75 | 98.4 | 38.75 | 98.4 | 39.5 | 100.3 | 40 | 101.6 |
| Sleeve Length | 24 | 60.9 | 24.25 | 61.5 | 24.5 | 62.2 | 24.75 | 62.8 | 25 | 63.5 | 25.25 | 64.1 | 25.5 | 64.7 |
| Waist Round | 27 | 68.5 | 29 | 73.6 | 31 | 78.7 | 33 | 83.82 | 35 | 88.9 | 37 | 93.9 | 39 | 99 |
| Hip Round | 35 | 88.9 | 37 | 93.98 | 39 | 99.06 | 41 | 104 | 43 | 109.2 | 45 | 114.3 | 47 | 119.3 |
Fabric Yield (Main Fabric)
| Width of the Fabric | XS (yards) | XS (meters) | S (yards) | S (meters) | M (yards) | M (meters) | L (yards) | L (meters) | XL (yards) | XL (meters) | 2XL (yards) | 2XL (meters) | 3XL (yards) | 3XL (meters) |
| 45” | 1.70 | 1.56 | 2.01 | 1.83 | 2.31 | 2.11 | 2.65 | 2.43 | 3.05 | 2.79 | 3.51 | 3.21 | 4.03 | 3.69 |
| 60” | 1.28 | 1.17 | 1.50 | 1.38 | 1.73 | 1.58 | 1.99 | 1.82 | 2.29 | 2.09 | 2.63 | 2.41 | 3.02 | 2.77 |
Fabric Yield (Lining Fabric)
| Width of the Fabric | XS (yards) | XS (meters) | S (yards) | S (meters) | M (yards) | M (meters) | L (yards) | L (meters) | XL (yards) | XL (meters) | 2XL (yards) | 2XL (meters) | 3XL (yards) | 3XL (meters) |
| 45” | 0.47 | 0.43 | 0.55 | 0.50 | 0.63 | 0.58 | 0.73 | 0.66 | 0.83 | 0.76 | 0.96 | 0.88 | 1.10 | 1.01 |
| 60” | 0.88 | 0.81 | 1.04 | 0.95 | 1.19 | 1.09 | 1.37 | 1.25 | 1.58 | 1.44 | 1.81 | 1.66 | 2.08 | 1.91 |
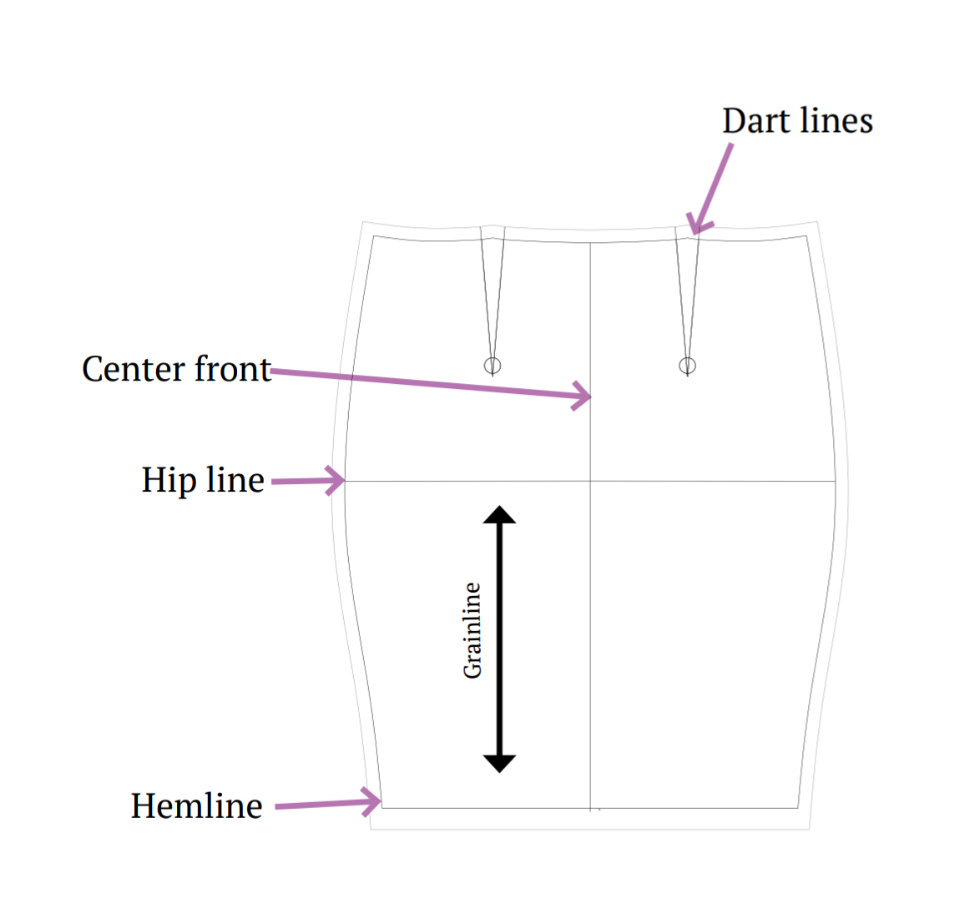
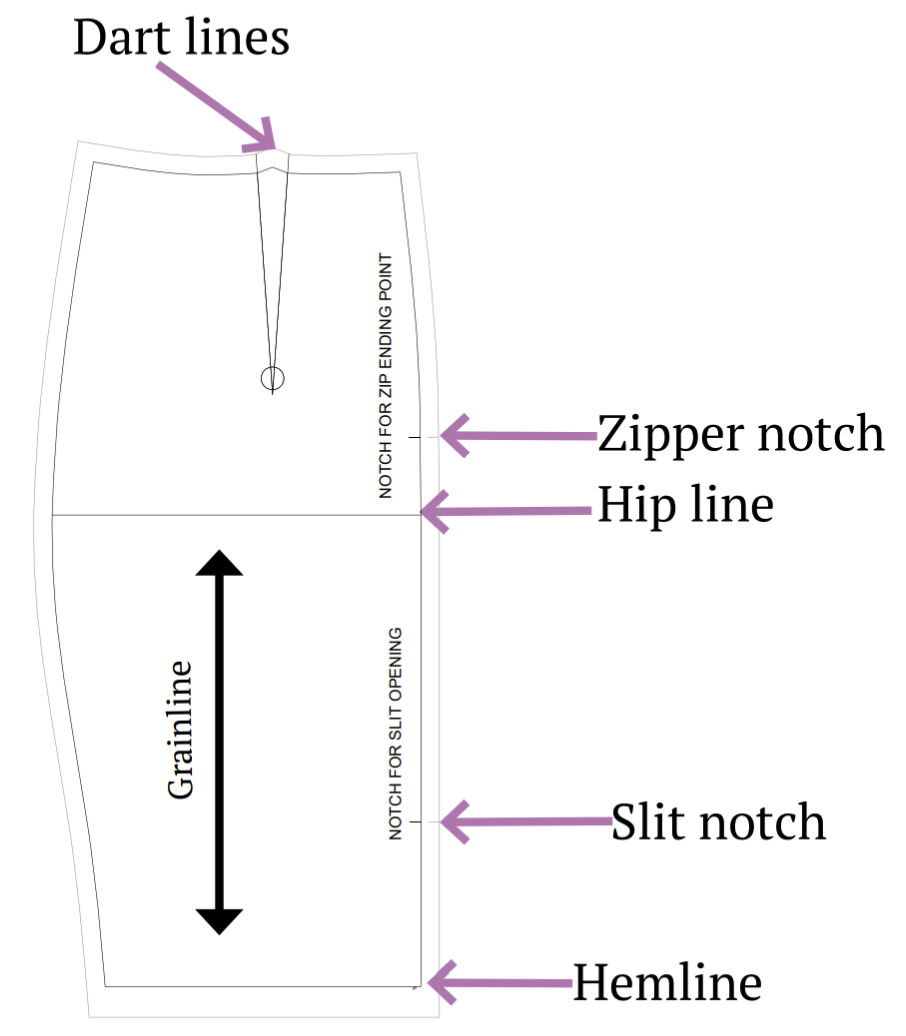
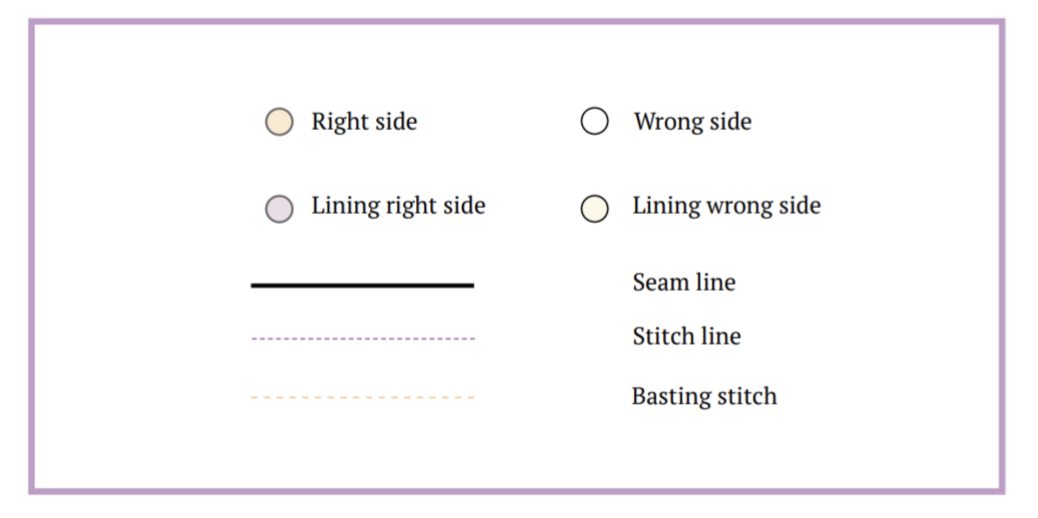
Pattern Marking and Inventory
Before commencing sewing, ensure you address the essential pattern marking and inventory details pertinent to the pattern being used.
The Winslet’s Celestia Sheath Dress Pattern that I’m using entails the following:
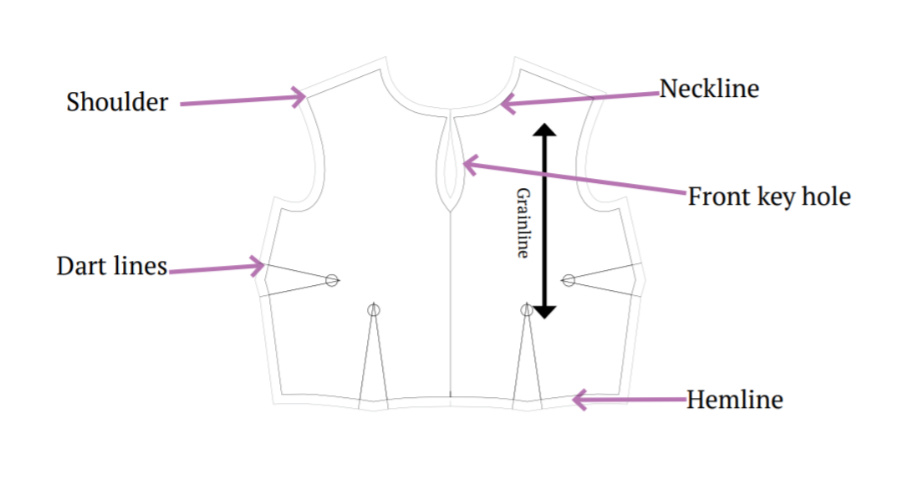
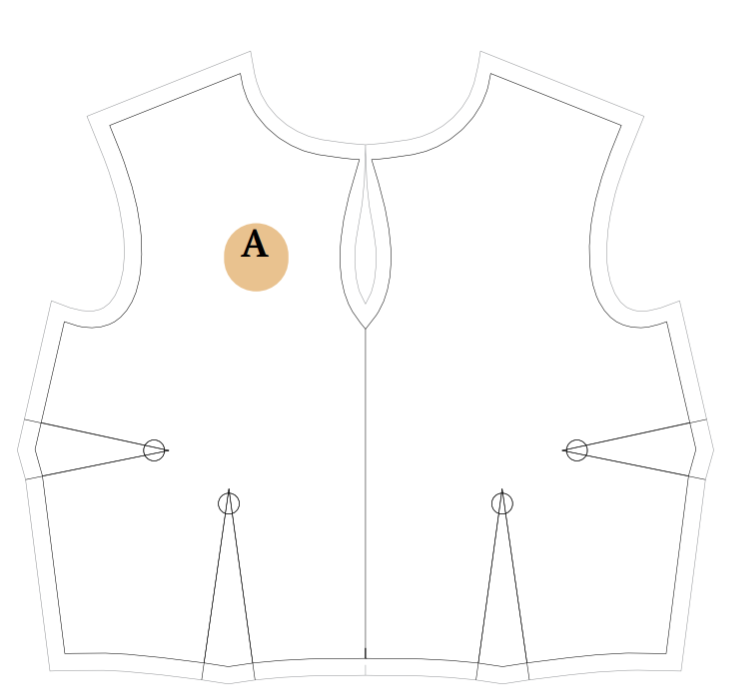
A. Front Bodice: Cut one piece of fabric for the front of the dress.
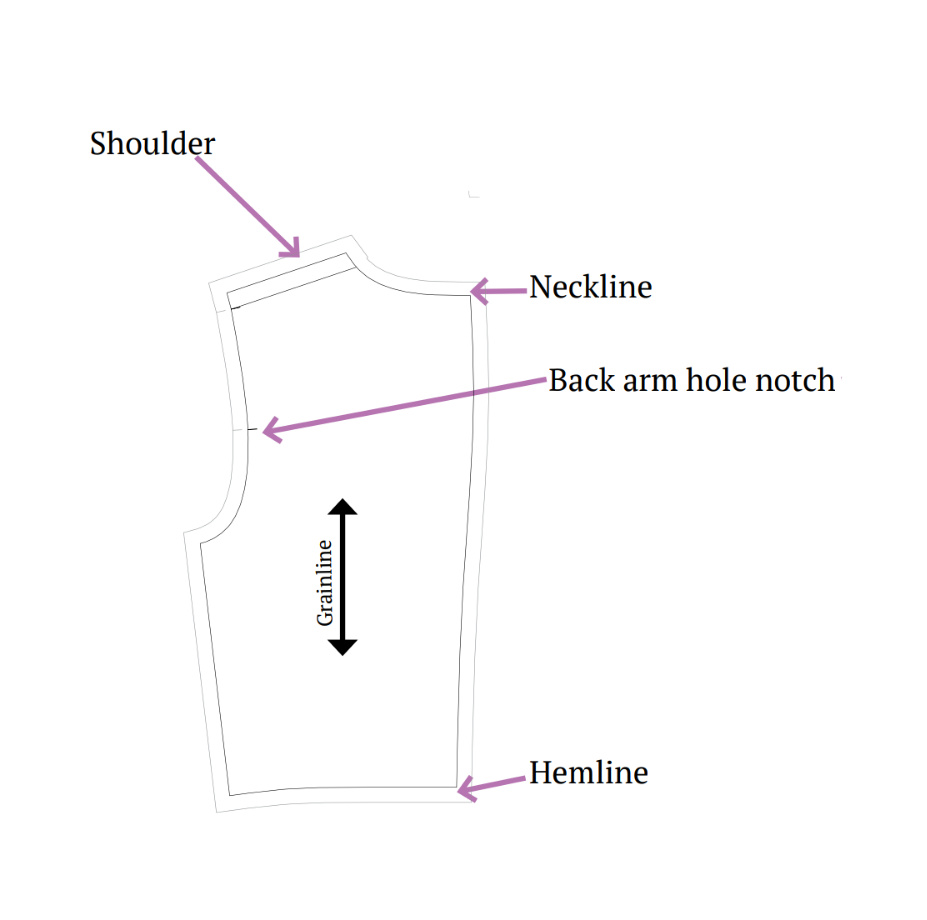
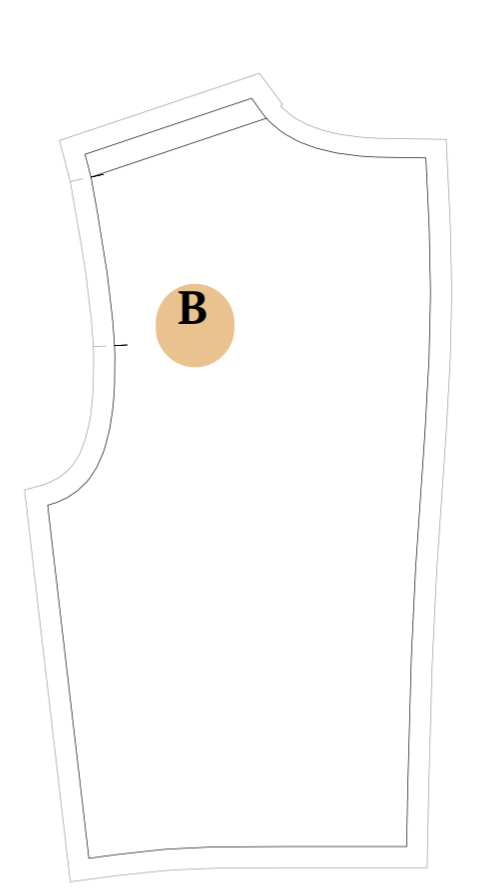
B. Back Bodice: Cut two pieces of fabric for the back of the dress.
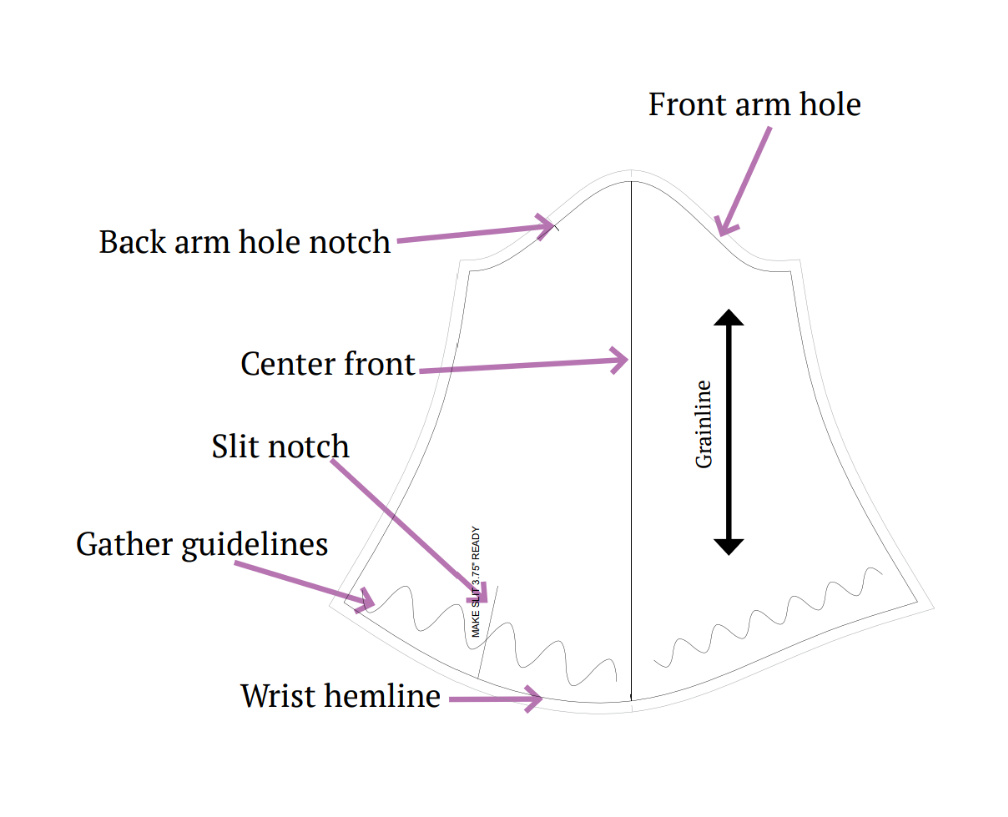
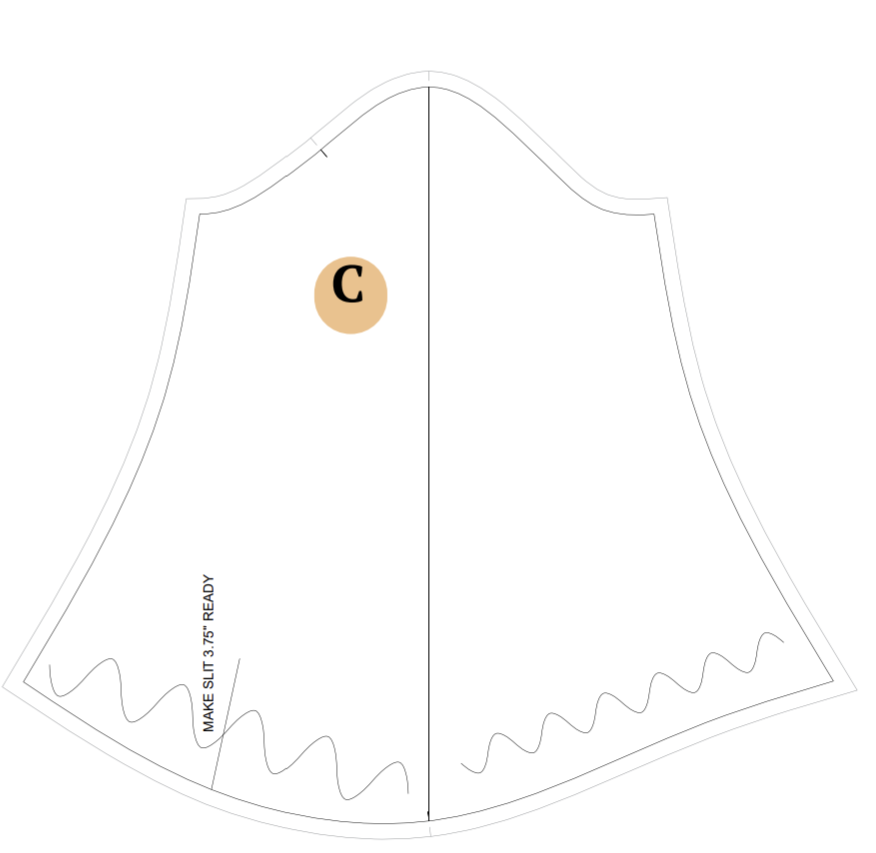
C. Sleeve: Cut two pieces of fabric for the sleeves.
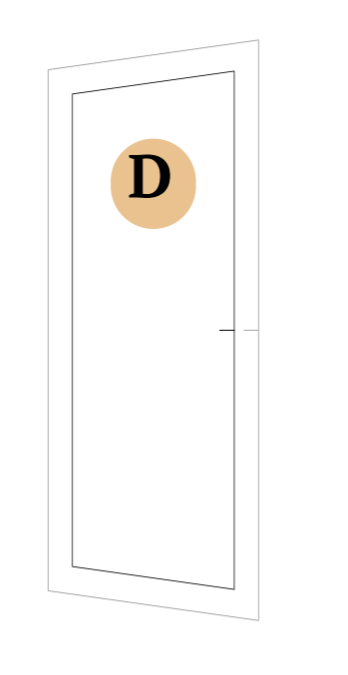
D. Cuff: Cut two pieces of fabric for the cuffs.
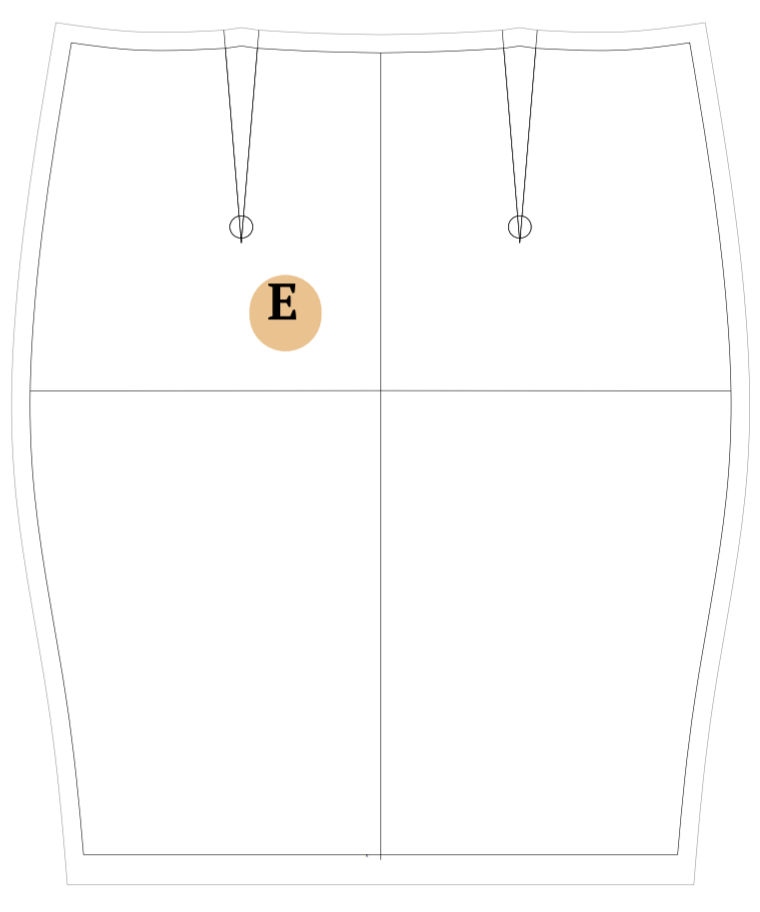
E. Front Skirt: Cut one piece of fabric for the front of the skirt.
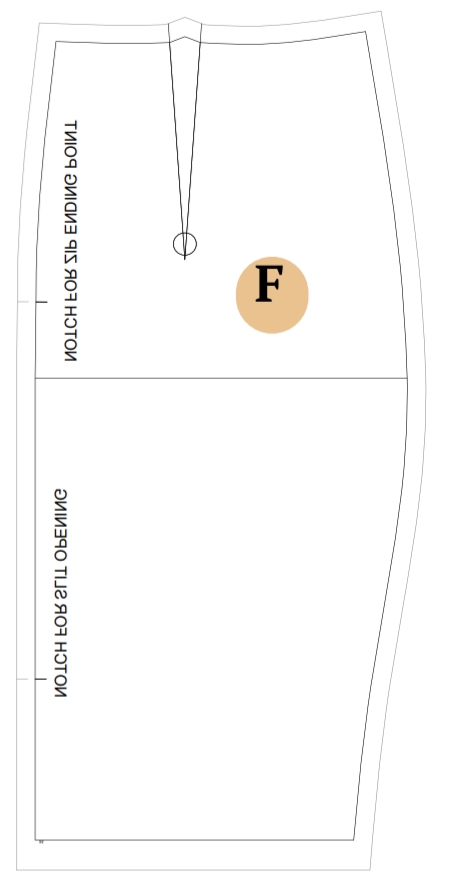
F. Back Skirt: Cut two pieces of fabric for the back of the skirt.
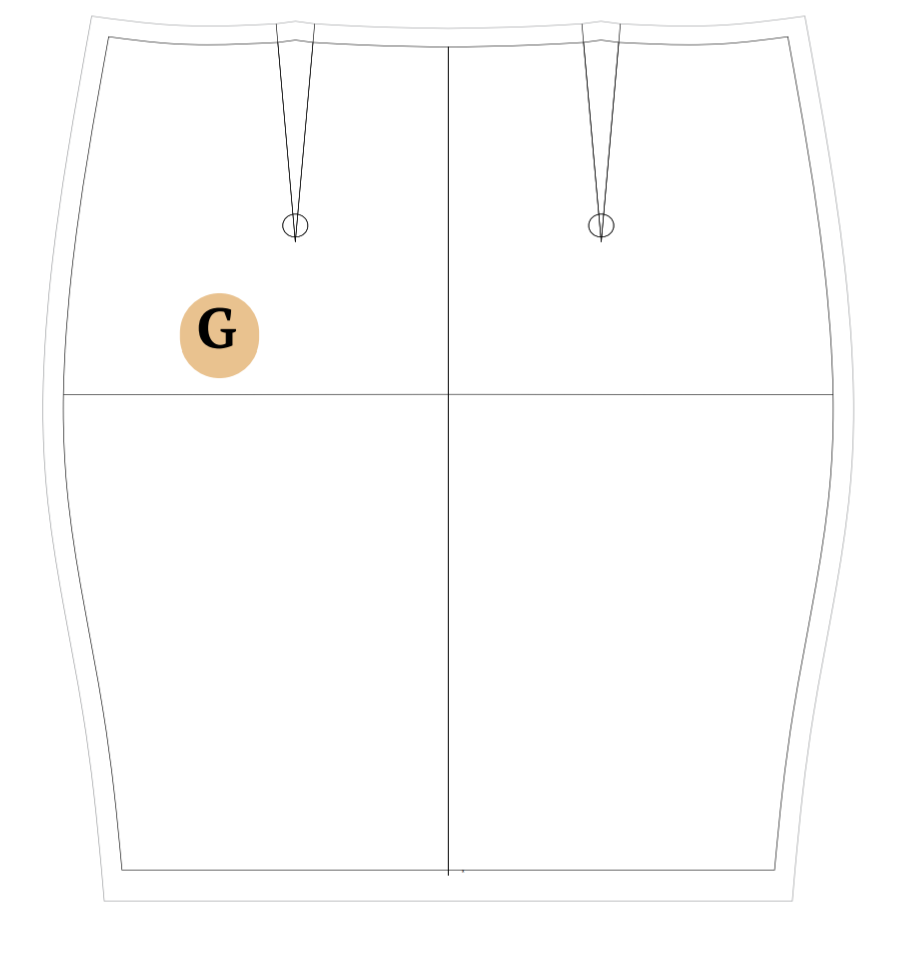
G. Front Skirt Lining: Cut one piece of fabric for the lining of the front of the skirt.
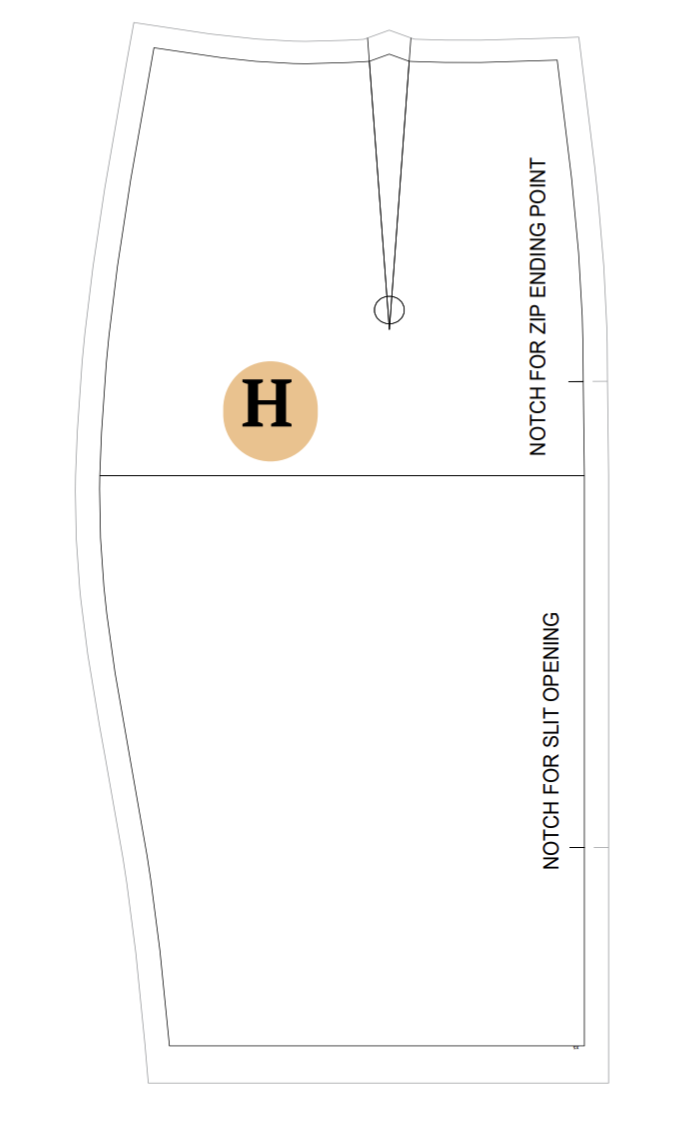
H. Back Skirt Lining: Cut two pieces of fabric for the lining of the back of the skirt.
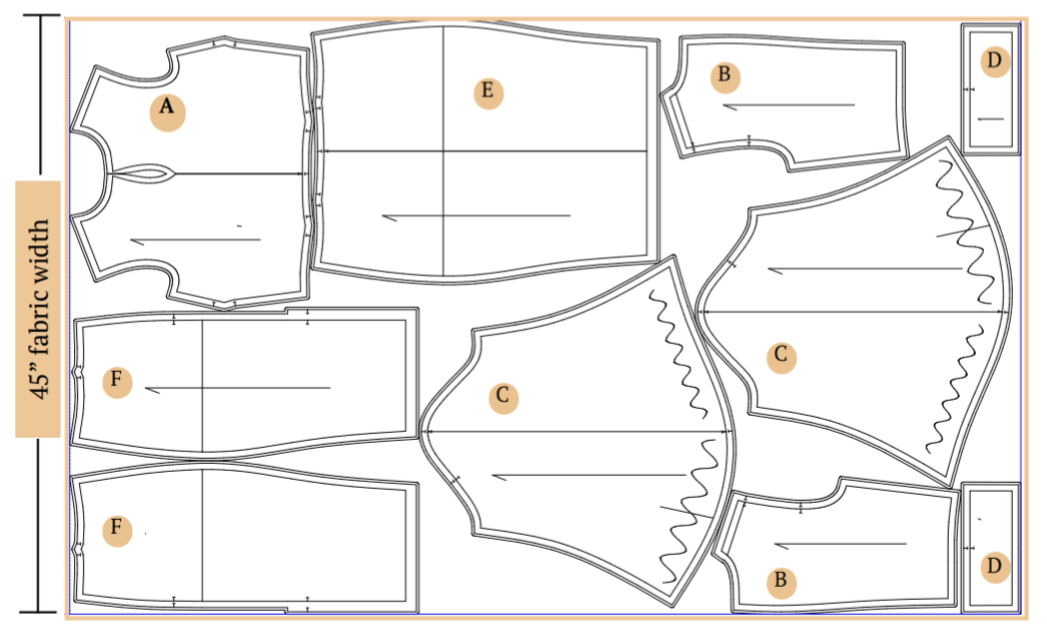
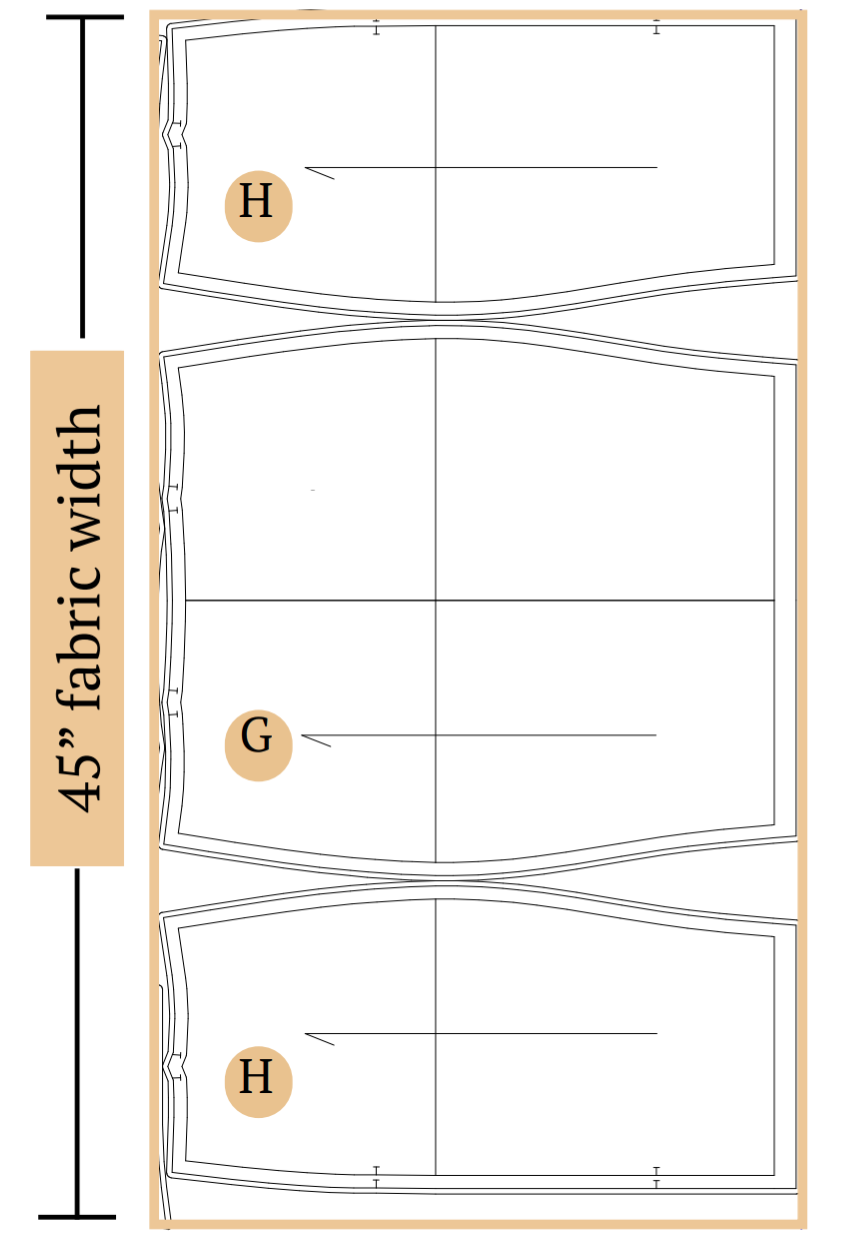
Cutting Layout
For the Winslet’s Celestia Sheath Dress Pattern, follow the cutting layout shown in the image below. “Small” size has been used for representation of this cutting layout. The layout also mentions that the pattern pieces are non-directional, meaning you can place them in any direction on the fabric.
Fabric Preparation and Cutting
- Lay out your pattern pieces: Arrange the pattern pieces on your fabric following the cutting layout. Make sure the grainline arrow is parallel to the selvage edge.
- Cut your fabric: Trace around the pattern pieces and cut them out using fabric shears. Remove any pen, pencil, or chalk lines, and cut out any notches on the edges. These markings help with assembly.
- Transfer pattern markings: Use a marking pen, pencil, or chalk to transfer markings like circles and buttonholes to the wrong side of the fabric. Mark the center front of pieces cut on the fold to help align them accurately during assembly.
Steps to Sew a Sheath Dress
Here’s my detailed guide on how I crafted my sheath dress using Winslet’s Celestia Sheath Dress Pattern:
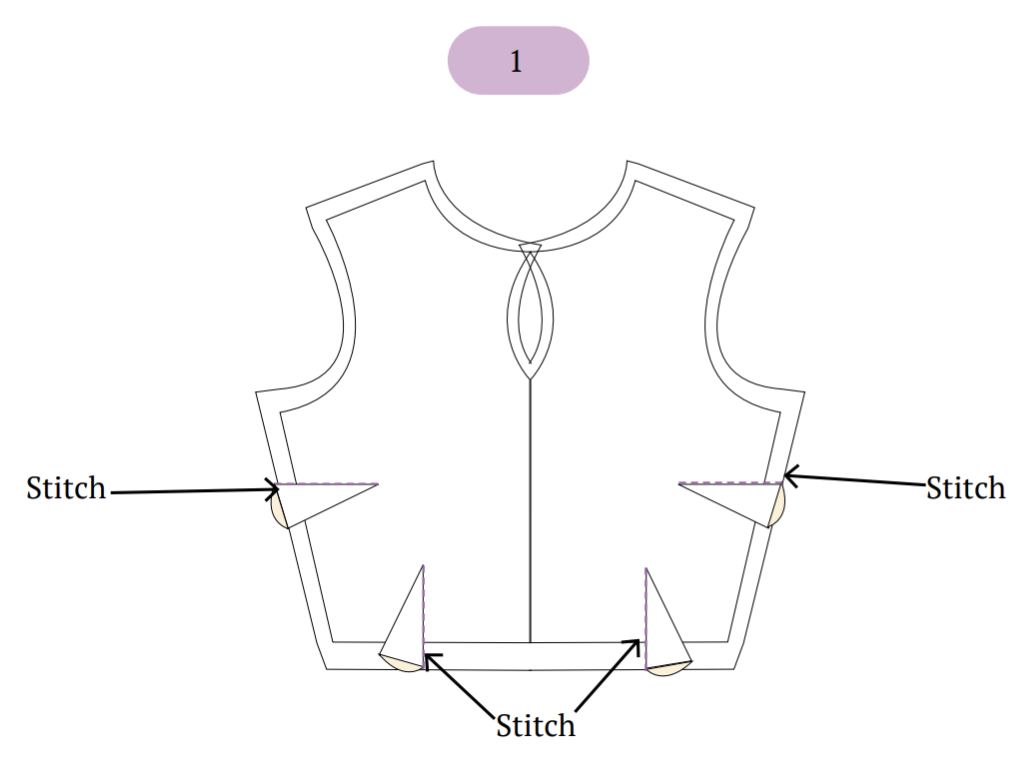
1. Fold the fabric with the right sides together, making sure the dart legs line up on the front bodice part. Sew along the dart fold on the inside to secure it. Iron the dart to one side to make the finished garment less bulky. Do this for all the darts.
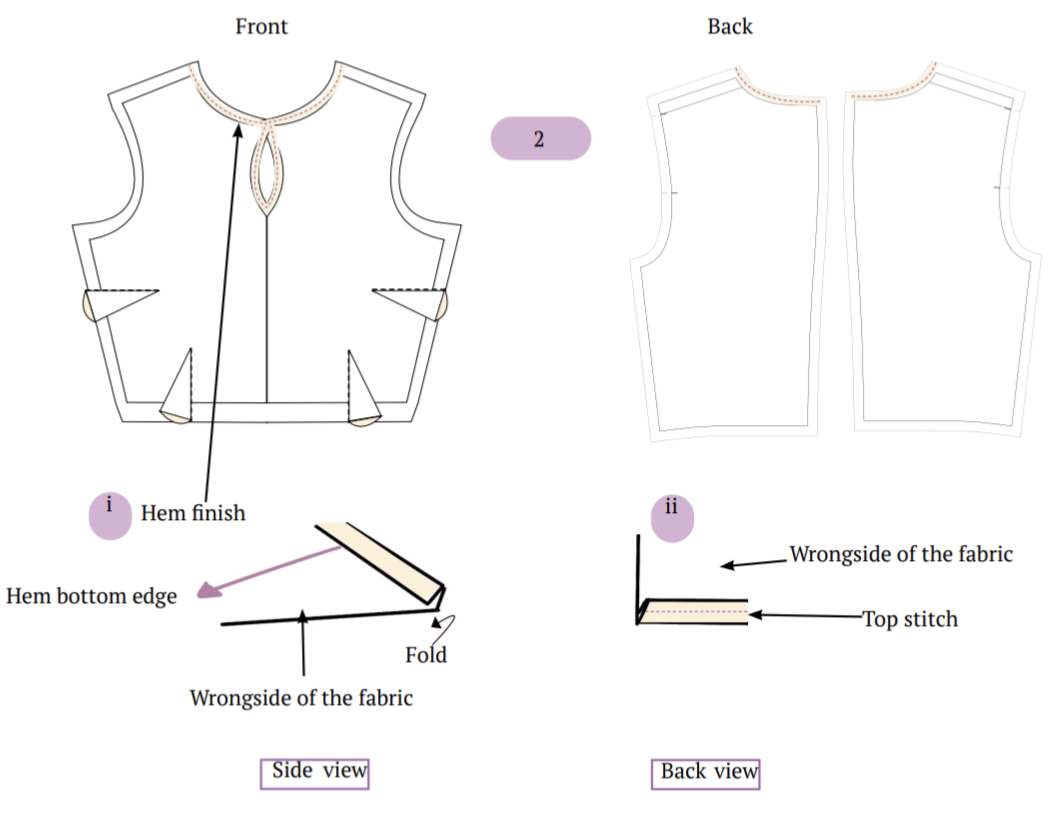
2. To finish the front and back neck, fold it over twice so the raw edge is hidden, then topstitch along the neckline.
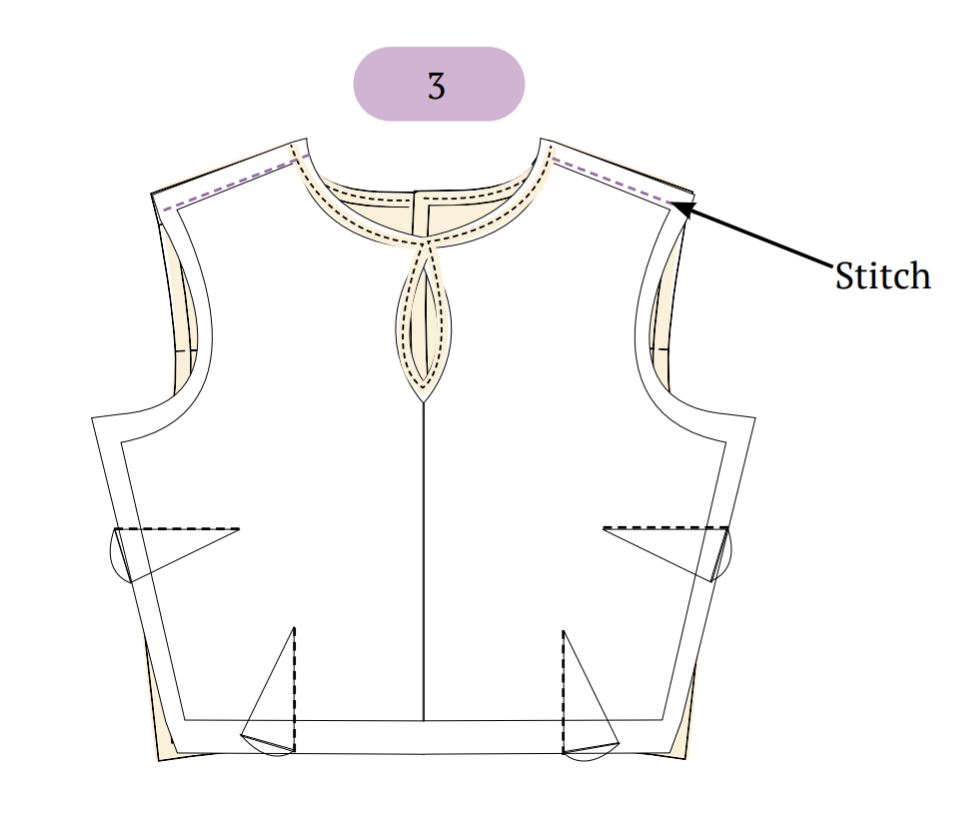
3. Put the front bodice on top of the back bodice with the right sides together, matching the shoulders, and sew the shoulder seam using an overlock stitch.
4. To make gathers on the sleeves:
Sew basting stitches along the sleeve hem, following the marked lines for gathering.
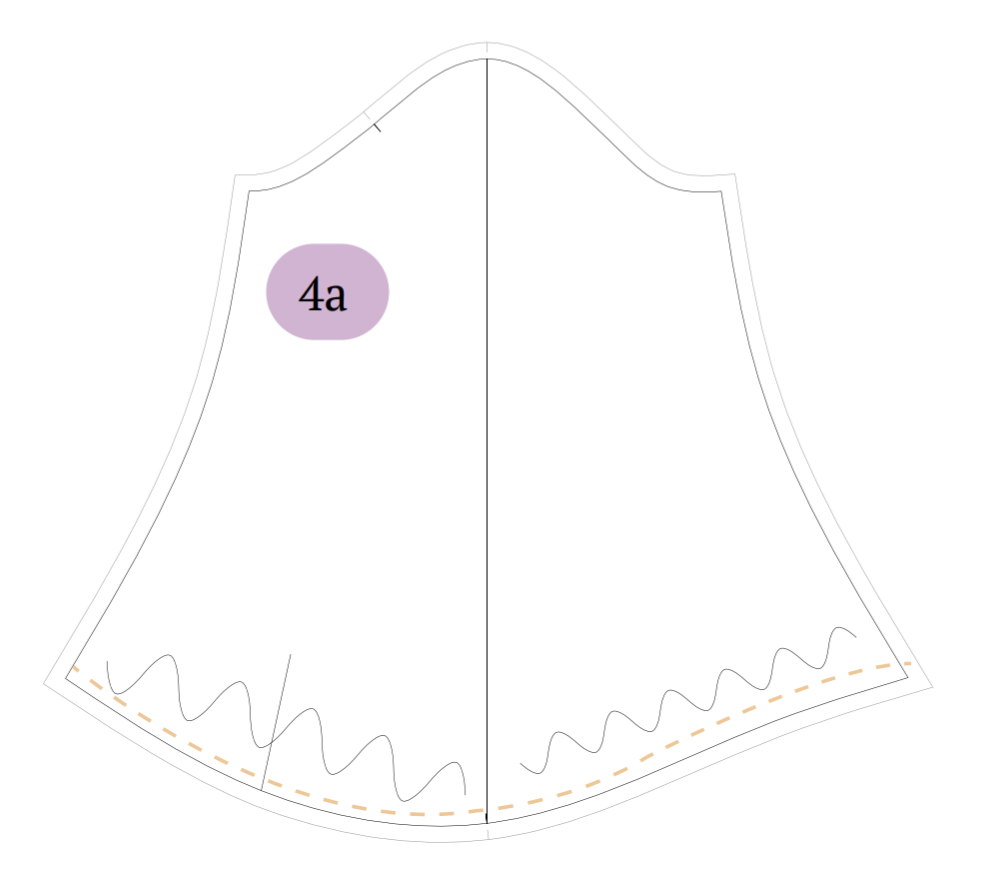
Gently pull the thread to gather the fabric, spreading the gathers evenly to match the cuff wrist round’s required measurement.
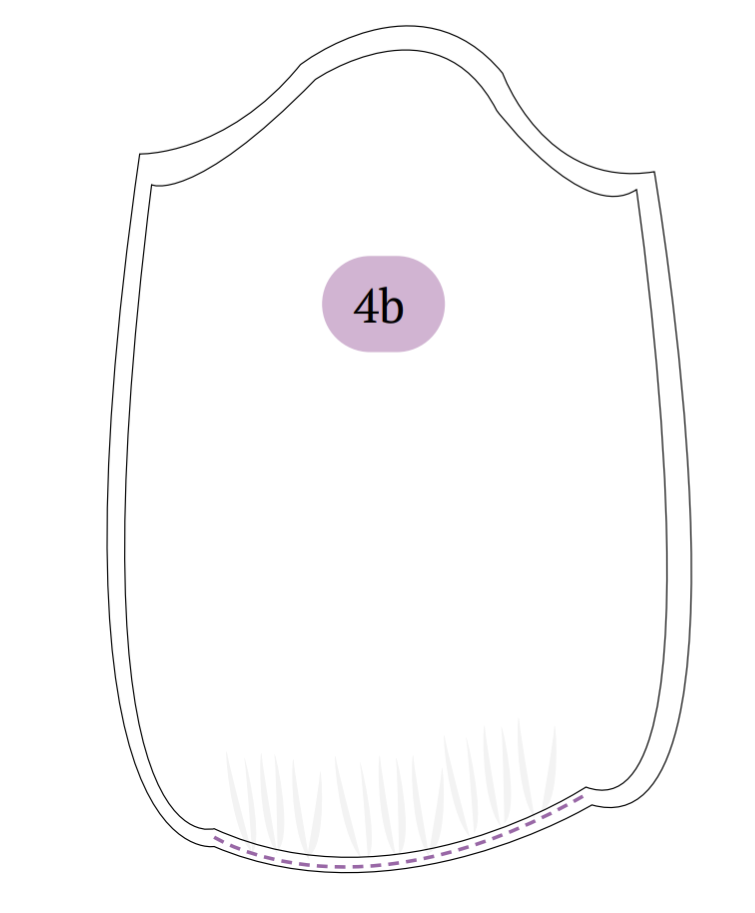
Sew over the basting stitches to secure the gathers in place. Repeat this for the other sleeve.
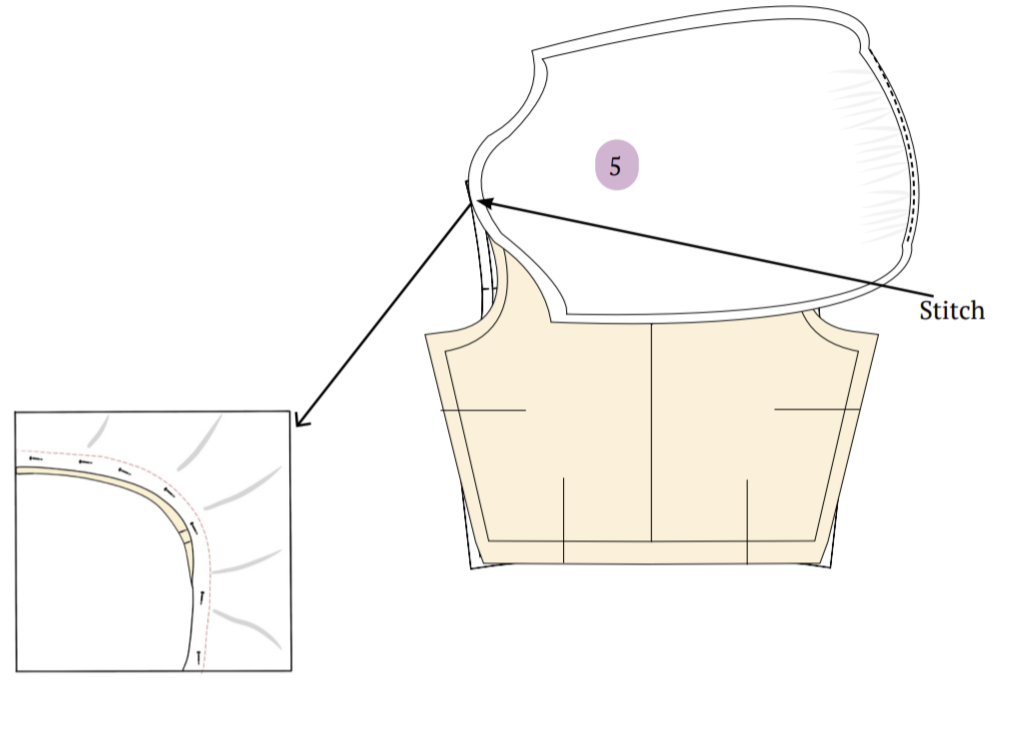
5. Turn the bodice so the right side is facing out. Then, put the sleeve on top of the bodice with the right sides together, lining up the sleeve’s back notch with the bodice’s shoulder seam. Sew along the armhole to attach the sleeve, and do the same with the other sleeve.
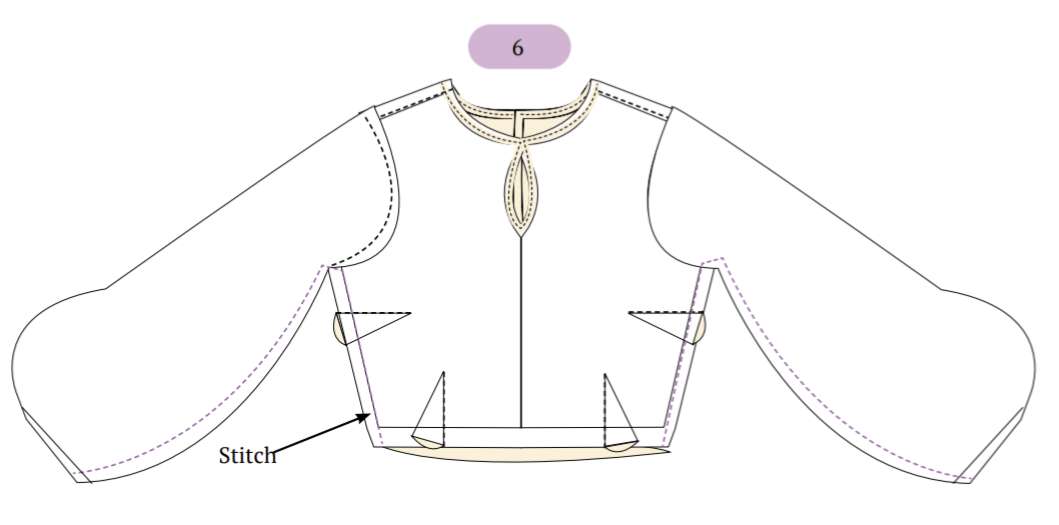
6. Turn the bodice and sleeves wrong side out, with the right sides facing each other. Line up the seams of the sleeves with the seams of the bodice, then sew them together.
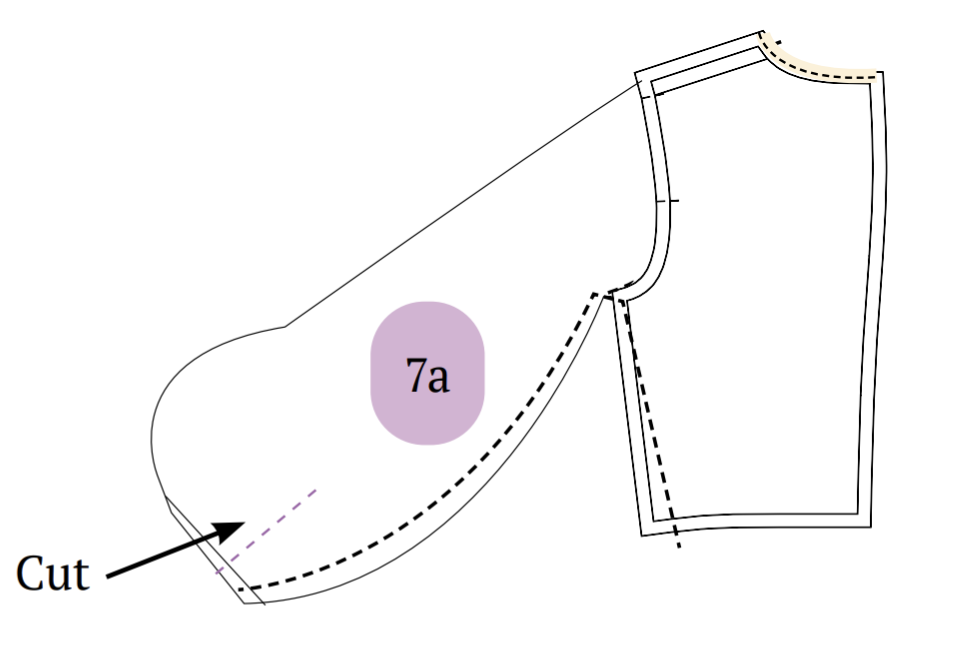
7. To prepare and add cuffs to sleeves:
Start by cutting a slit following the marked lines on the sleeve.
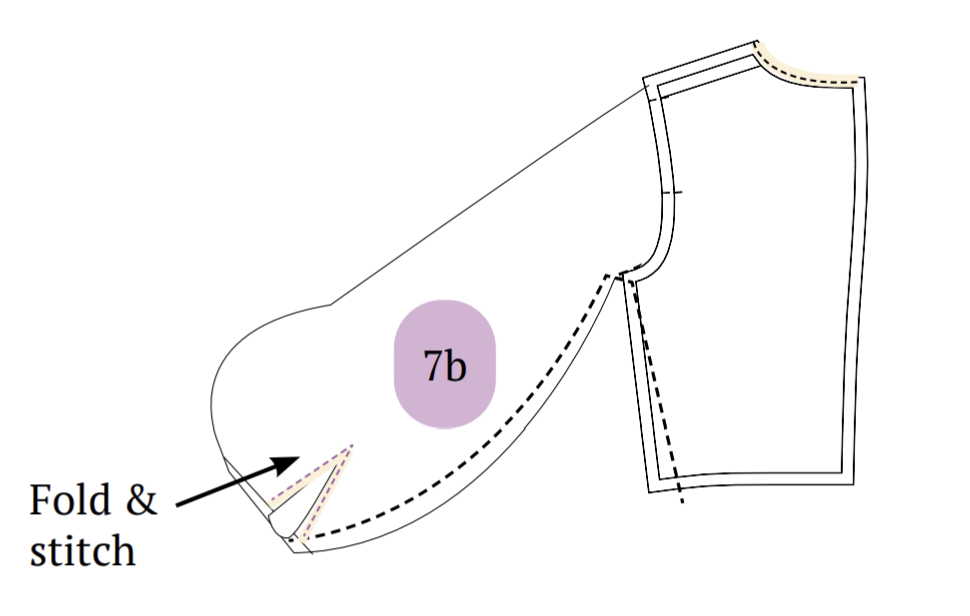
Then, finish the slit by folding the fabric’s edge inward twice to make a neat hem. Topstitch along the fold, ensuring to reinforce it with a backstitch for extra strength. Remember to tuck the fabric’s edge inside to stop it from fraying.
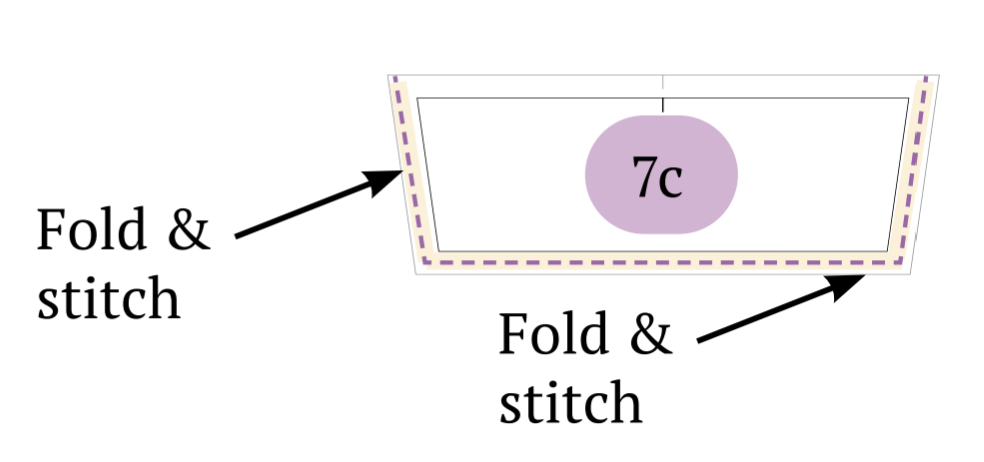
Use the same method to finish the side and bottom edges of the cuff.
Afterward, place the prepared cuff onto the sleeve with their right sides together, matching the wrist circumference. Sew along the seamline to attach the cuff to the sleeve.
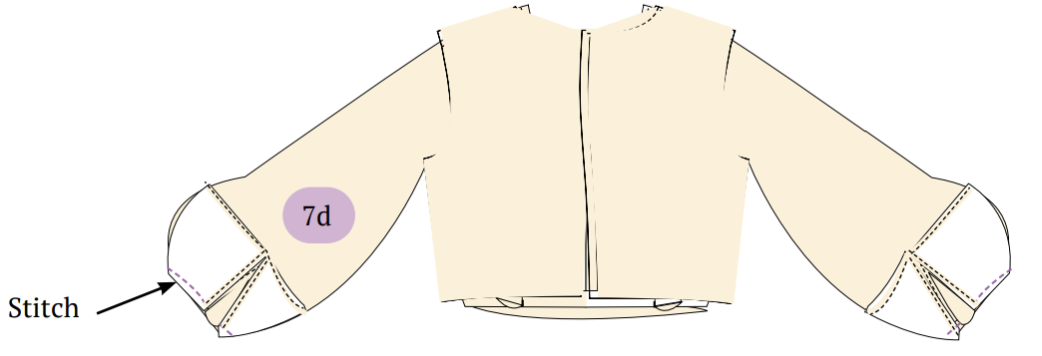
Repeat this process for the other sleeve and cuff.
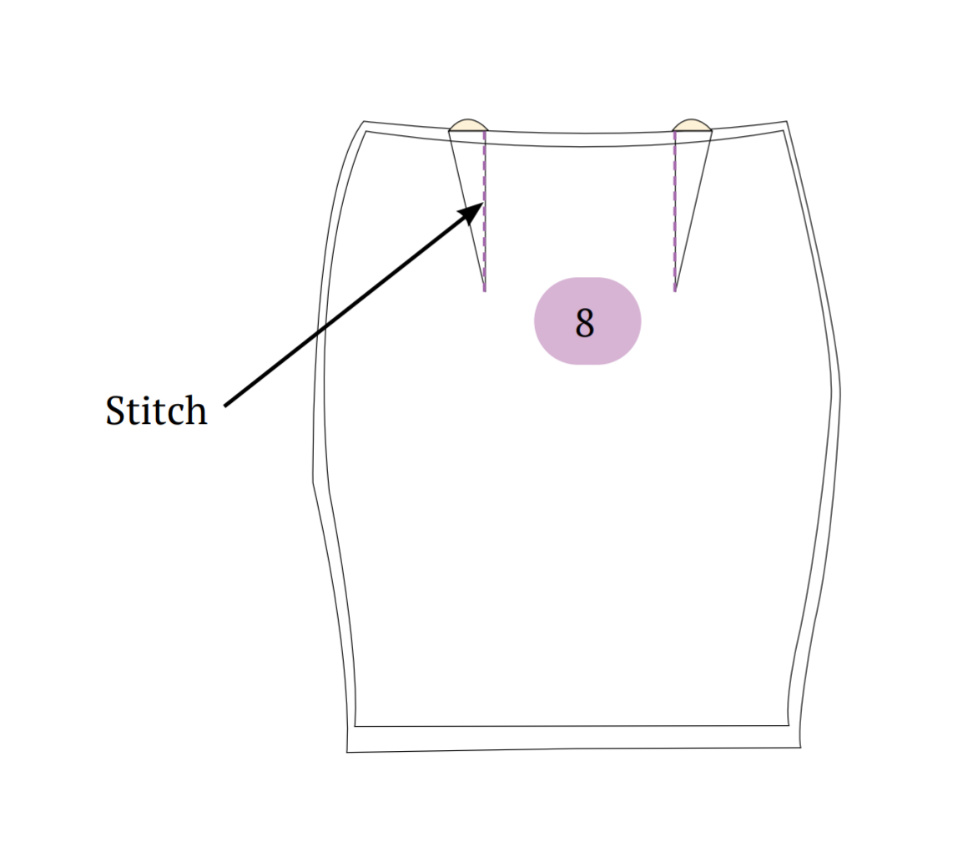
8. Fold the fabric with the right sides together, aligning the dart on the front skirt. Sew along the dart line on the inside to secure it. Iron the dart to one side to make the finished garment less bulky. Do the same for the back skirt and the lining panels of both the front and back skirts.
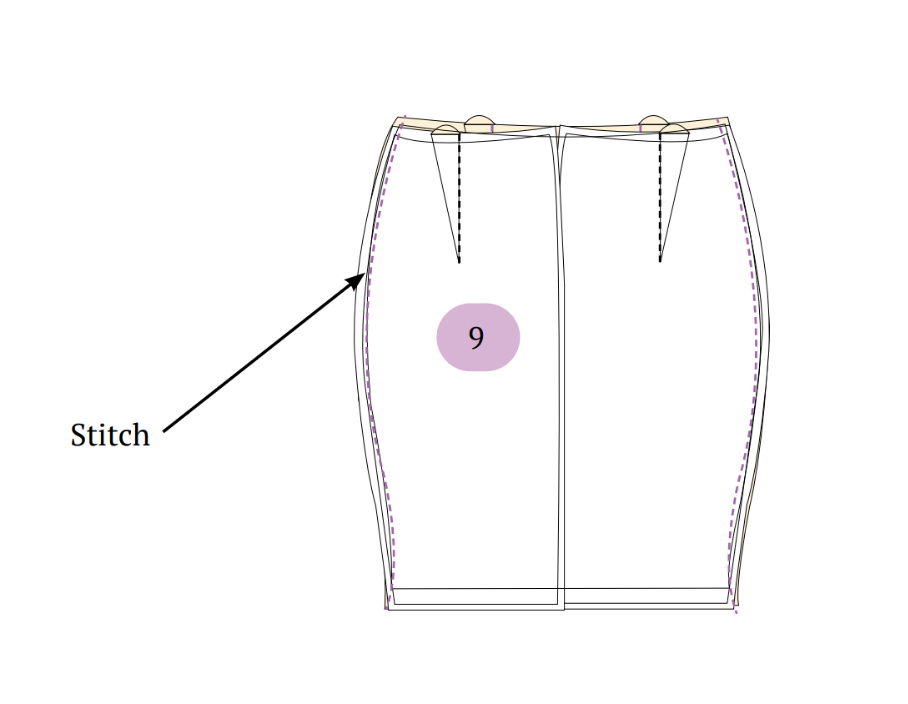
9. Put the front skirt on top of the back skirt with the right sides together, matching the side seams, and sew along the seamline to join them. Do the same for the lining panels of the skirt.
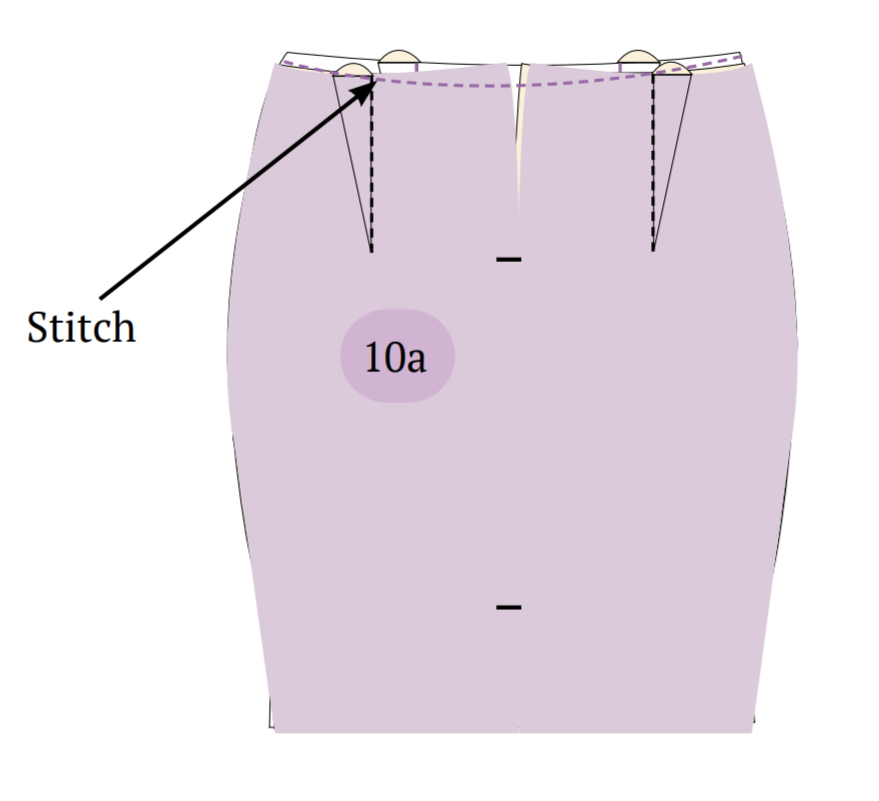
10. To attach the lining to the skirt:
Place the skirt lining on top of the main skirt, making sure their wrong sides are facing each other. Match them at the waist round and sew along the seamline to join them.
Align the center back seam of the back panel and sew between the slit notch and the zipper notch.
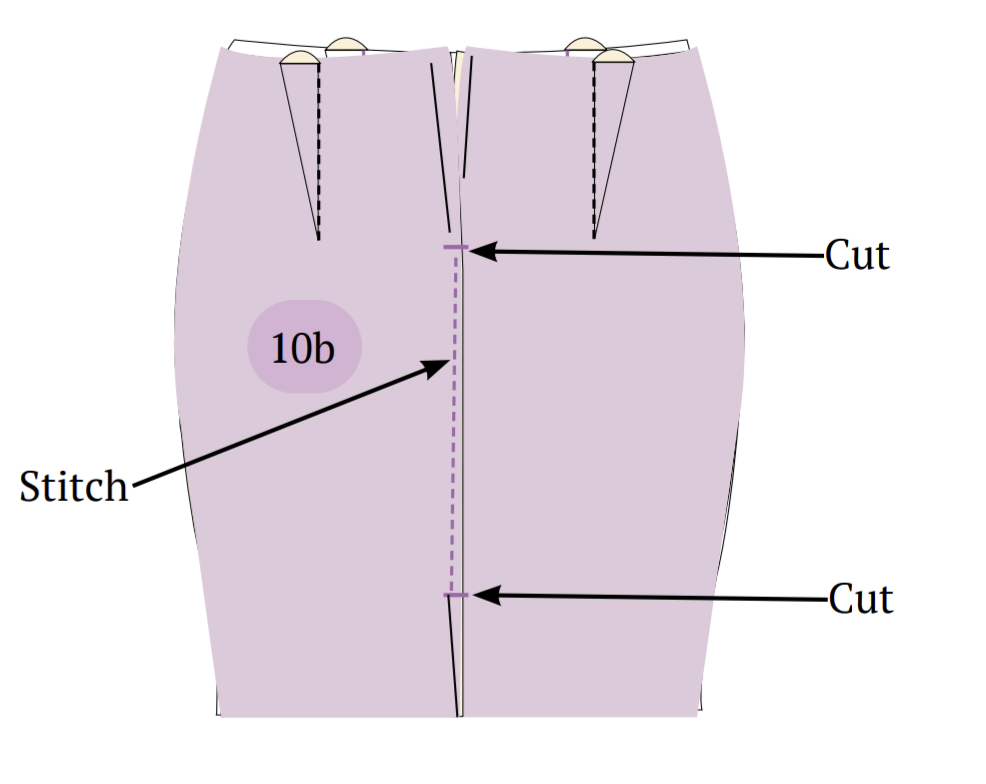
Cut along the seam at the specified slit notch and zipper notch to improve the seam’s appearance.
11. Connect the front bodice top to the skirt by inserting the front bodice panel into the skirt. Ensure their right sides are facing each other. Sew along the waist round seamline and align the side seams. Remember to lock the stitch at the end. You can also use an overlock stitch for the waist round.

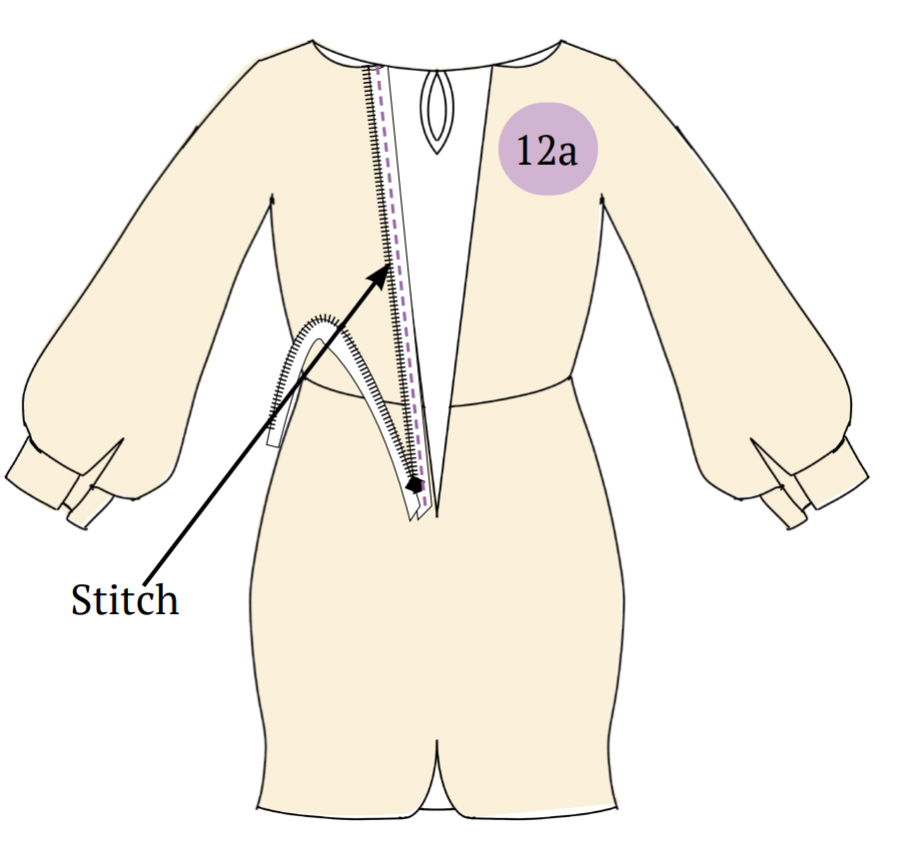
12. To attach the concealed zipper:
Place the open zipper along the center back seam with the right sides together and sew it to the dress using a zipper foot.
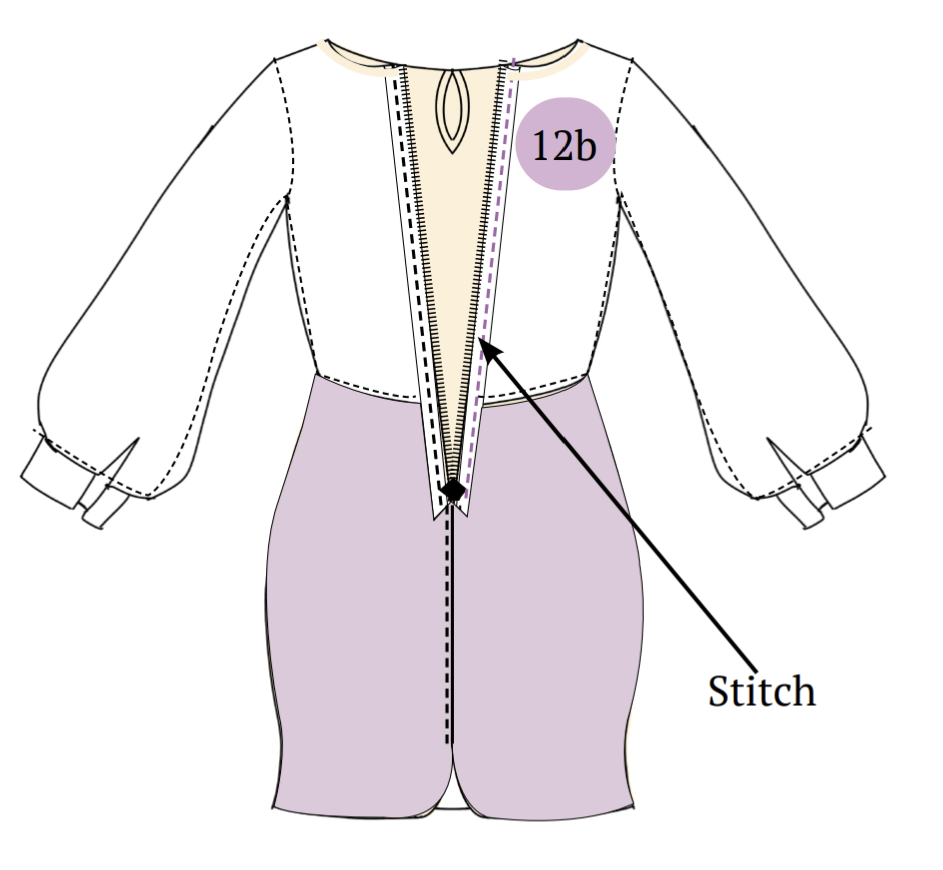
Turn the dress inside out and sew the other side of the zipper to the opposite panel, folding the seam inward from the seamline.
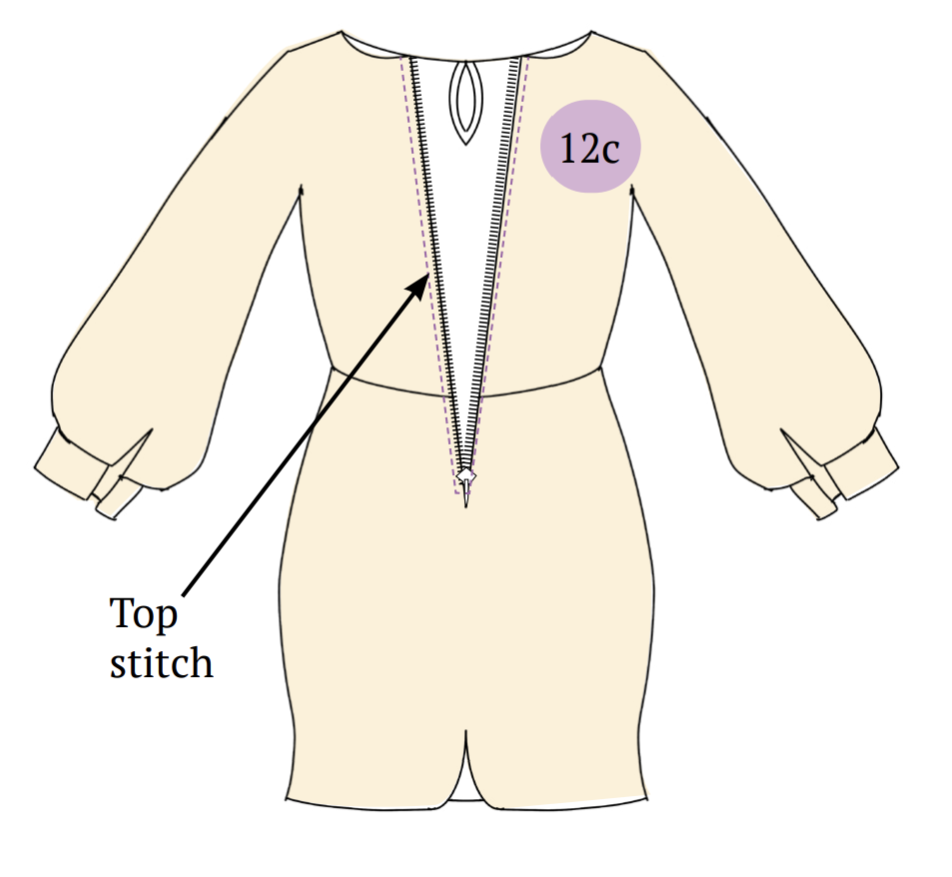
Flip the dress right side out and sew a topstitch along the zipper’s edge to hide the zipper seam. Also, reinforce the bottom edge by sewing a lock stitch on the wrong side of the dress.
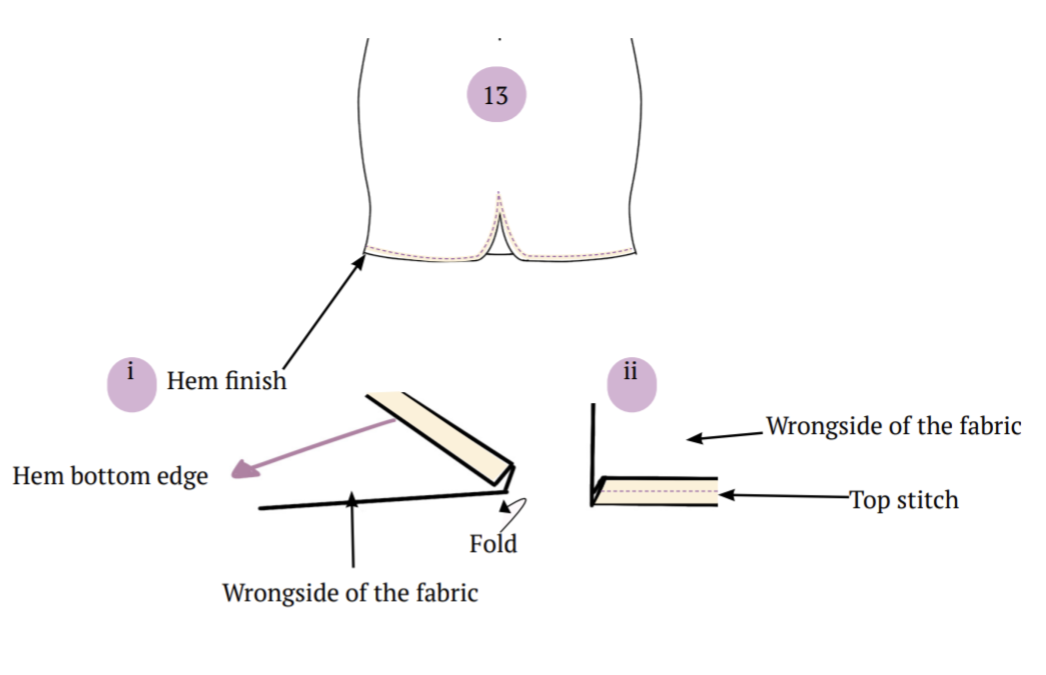
13. To complete the hem round and slit, fold the fabric’s bottom edge twice towards the wrong side for a tidy hem. Topstitch along the folded hem, reinforcing it with a backstitch at the end. Remember to tuck the fabric’s edge inside to prevent fraying.
Treat each layer separately, finishing the skirt lining and main skirt fabric separately for a polished look.
Summary
The sheath dress is a timeless wardrobe essential that every lady should own. Its versatility knows no bounds – perfect for any occasion. Dress it to the nines with sparkling pearls and dazzling shoes, and you’re set for a semi-formal affair. Need to tackle the workday? Simply add a sleek suit jacket and classic pumps for a professional look. With a sheath dress, you’re always fashionably prepared.
Here are some photos of the Winslet’s Celestia Sheath Dress Pattern’s finished dress:
Will you be making this dress for yourself? Let me know in the comments below! Try many other dress patterns here or other fun sewing projects.
Join the Winslet sewing community by sharing your masterpiece with the hashtag #madewithwinslets!
If you are a sewist, have a look at our recommended sewing machines: beginner sewing machines, sewing tools and notions, coverstitch sergers and overlock machines, embroidery machines and quilting sewing machines, sewing practice sheets and sewing project planner.
If you are looking for sewing patterns, here are some great options: Activewear Sewing Patterns, Plus Size Sewing Patterns, Outerwear Sewing Patterns, Jumpsuit Sewing Patterns, Coord Set Sewing Patterns, Pants Sewing Patterns, Shorts Sewing Patterns, Skirts Sewing Patterns, Dress Sewing Patterns, Top Sewing Patterns, Bodycon Sewing Patterns, Evening Dresses Sewing Patterns, Loungewear Sewing Patterns, Cottagecore Sewing Patterns, Free Sewing Pattern.
Happy Stitching.


