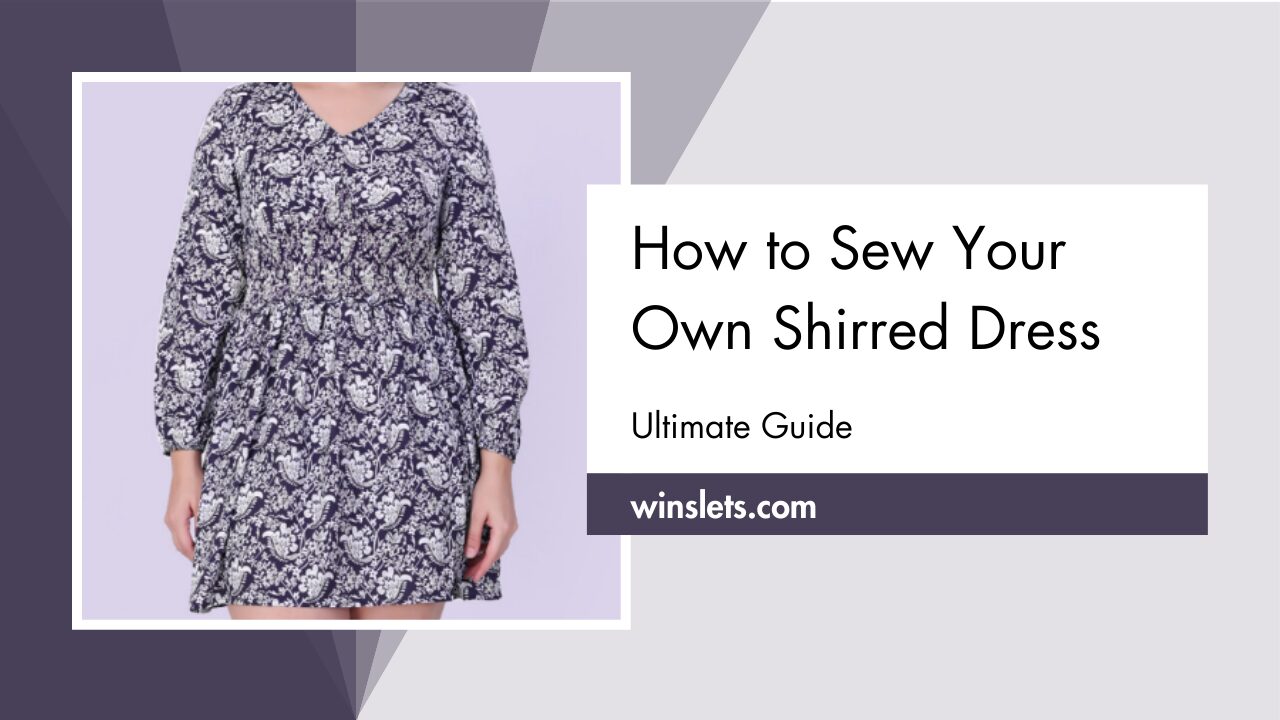
How to Sew a Shirred V-Neck Dress?
Have you wondered how to sew a shirred dress? One look at the Winslet’s DONNA Shirred Dress Pattern and I wanted to sew myself a summer v-neck shirred dress. This adorable pattern has a shirred waist for a figure-flattering fit. This is a step-by-step guide to make your own shirred dress!
What sewing supplies do you need to sew a shirred v-neck dress?
The basic supplies you need to sew a shirred v-neck dress are Sewing Pattern (I used Winslet’s DONNA Shirred Dress Pattern for my project), Sewing Machine, Tape Measure, Chalk, Shears, Pins, Iron, Needles, Thread (preferably 3-ply polyester), Thread Cutter, Elastic Band, and Elastic Thread.
Fabric Recommendation
The best fabrics for shirring are light-weight ones. Adhere to cotton blend, modal satin or light weight denim. Steer clear of anything too heavy like leather.
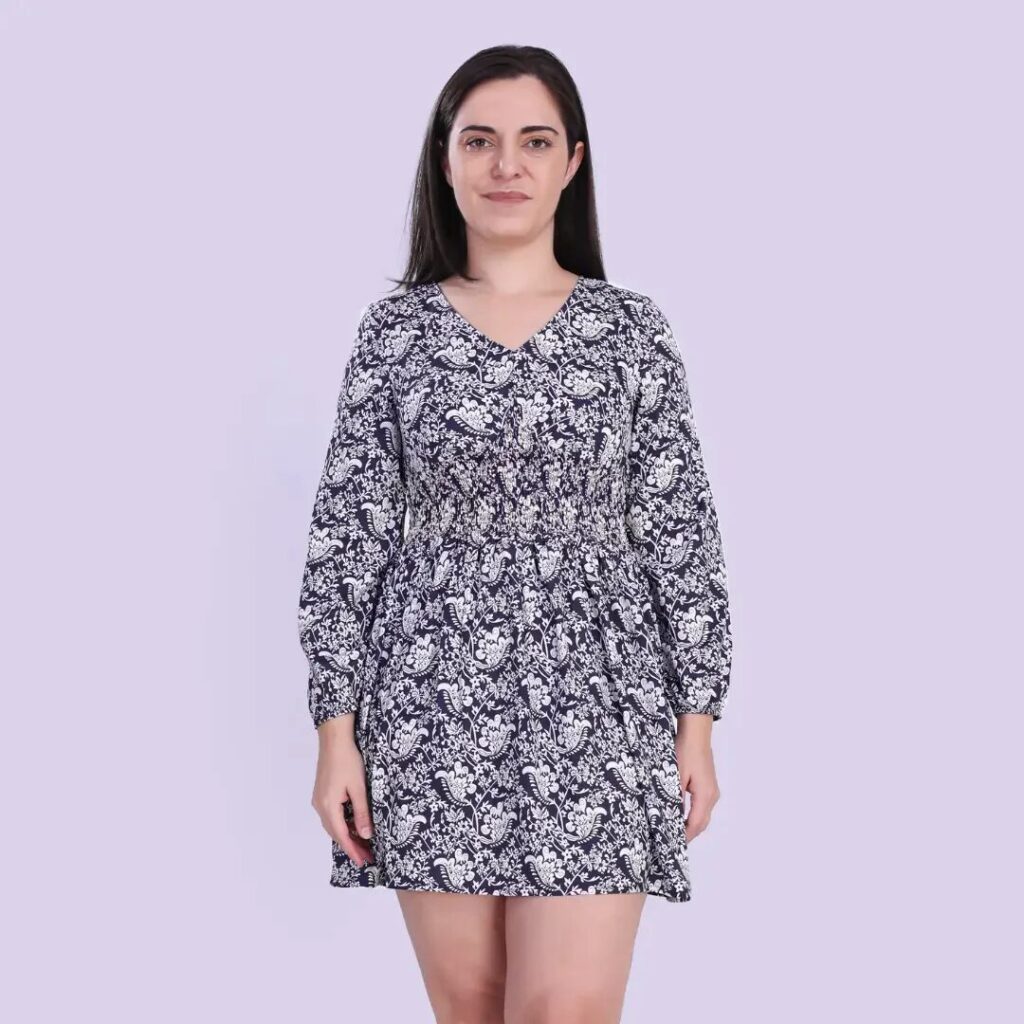
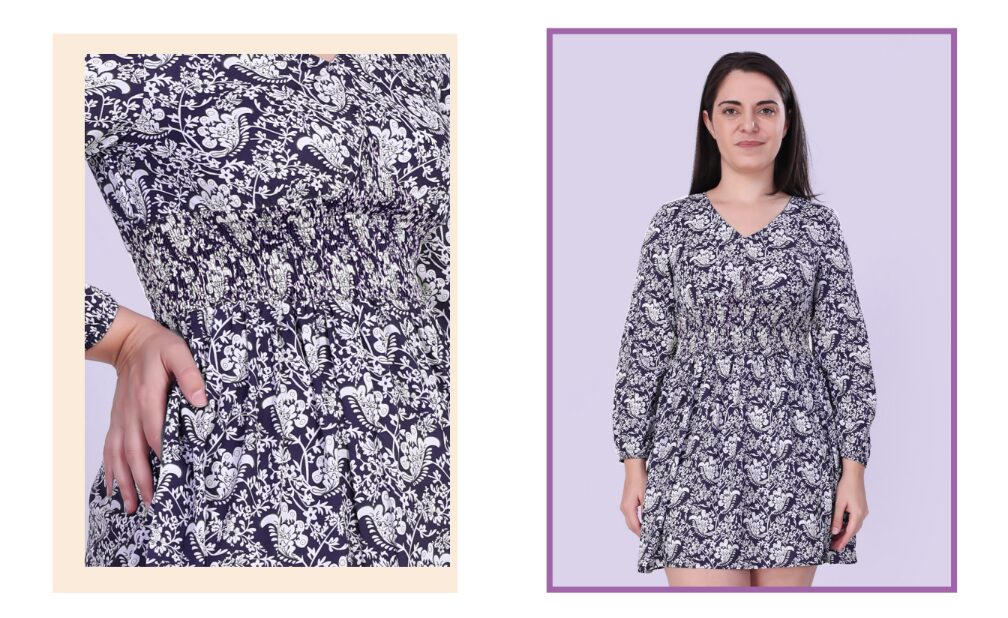
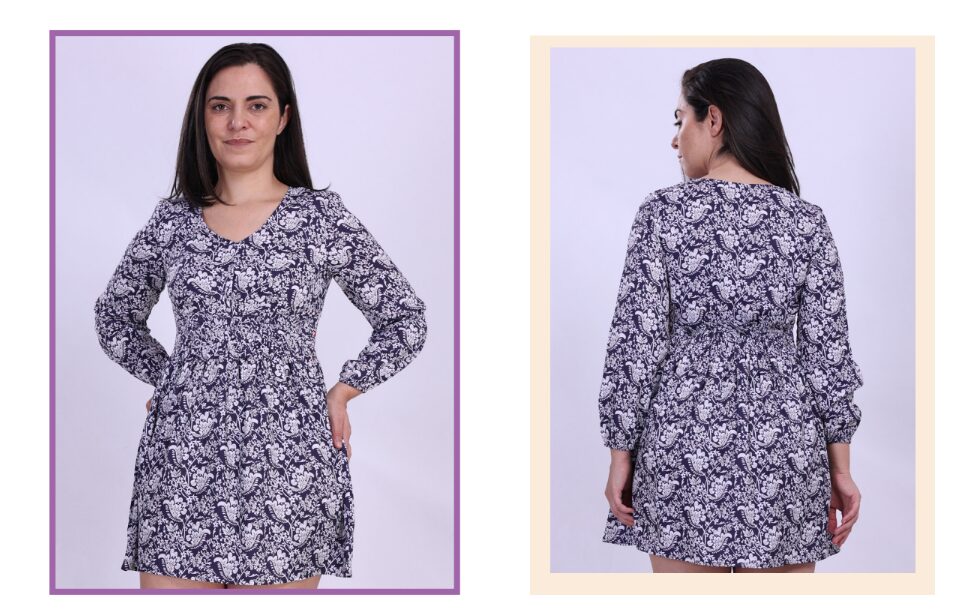
The model above features a shirred v-neck dress made with the Winslet’s DONNA Shirred Dress Pattern. The dress is made from 100% viscose crepe fabric. This fabric offers a luxurious feel resembling silk yet providing the comfort of cotton. Versatile for all seasons, it is soft and tactile.
All in all, this fabric was ideal for my dress. The shirring looked great with the floral print, and it was simple to sew and iron.
Size Charts
The shirred v-neck dress sewing pattern measurements for sizes (XS, S, M, L, XL, 2XL, or 3XL) are detailed below. Choose a size that corresponds most closely to your body measurements.
Measure the largest areas for the chest and hips, and for the waist, measure at its narrowest part just above the belly button.
It’s worth noting that if your exact measurements are not listed in the table, you may want to consider ordering a size larger.
The size chart includes measurements in both inches and centimeters for your reference.
Body Measurements
| XS (inches) | XS (cm) | S (inches) | S (cm) | M (inches) | M (cm) | L (inches) | L (cm) | XL (inches) | XL (cm) | 2XL (inches) | 2XL (cm) | 3XL (inches) | 3XL (cm) | |
| Bust | 32 | 81.3 | 34 | 86.4 | 36 | 91.4 | 38 | 96.5 | 40 | 101.6 | 42 | 106.7 | 44 | 111.8 |
| Waist | 26 | 66.0 | 28 | 71.1 | 30 | 76.2 | 32 | 81.3 | 34 | 86.4 | 36 | 91.4 | 38 | 96.5 |
Final Garment Measurements
| XS (inches) | XS (cm) | S (inches) | S (cm) | M (inches) | M (cm) | L (inches) | L (cm) | XL (inches) | XL (cm) | 2XL (inches) | 2XL (cm) | 3XL (inches) | 3XL (cm) | |
| Chest Round | 32 | 81.2 | 34 | 86.3 | 36 | 91.4 | 38 | 96.5 | 40 | 101.6 | 42 | 106.6 | 44 | 111.7 |
| Full Length (from back shoulder) | 32.5 | 82.5 | 32.75 | 83.1 | 33 | 83.8 | 33.25 | 84.4 | 33.5 | 85 | 33.75 | 85.7 | 34 | 86.3 |
| Sleeve Length | 21 | 53.3 | 21 | 53.3 | 21 | 53.3 | 21.25 | 53.9 | 21.5 | 54.6 | 21.75 | 55.2 | 22 | 55.8 |
Fabric Yield
| Width of the Fabric | XS (yards) | XS (meters) | S (yards) | S (meters) | M (yards) | M (meters) | L (yards) | L (meters) | XL (yards) | XL (meters) | 2XL (yards) | 2XL (meters) | 3XL (yards) | 3XL (meters) |
| 45” | 1.84 | 1.69 | 2.17 | 1.98 | 2.55 | 2.33 | 2.93 | 2.68 | 3.38 | 3.09 | 3.88 | 3.55 | 4.46 | 4.08 |
| 60” | 1.30 | 1.18 | 1.52 | 1.39 | 1.79 | 1.64 | 2.06 | 1.89 | 2.37 | 2.17 | 2.73 | 2.49 | 3.14 | 2.87 |
Steps To Follow For Sewing a Shirred V-Neck Dress
Let’s dive into the steps for sewing your very own unique shirred v-neck dress:
Pattern Marking and Inventory
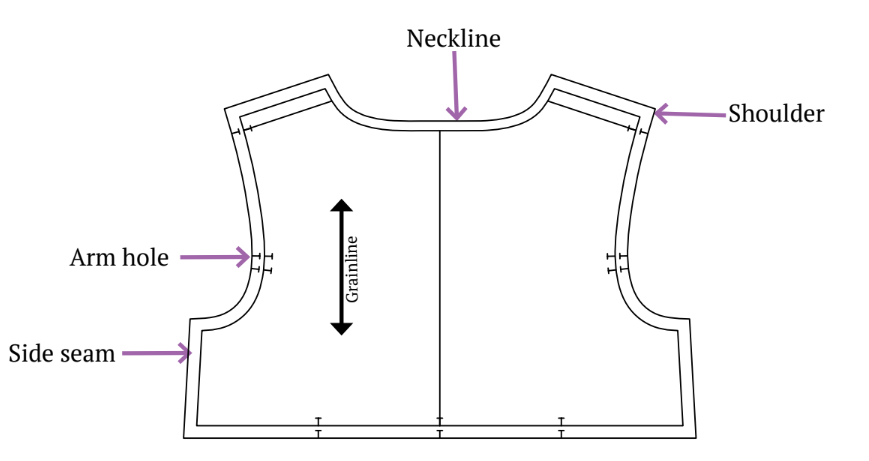
Once you have printed and assembled your pattern, you will cut:
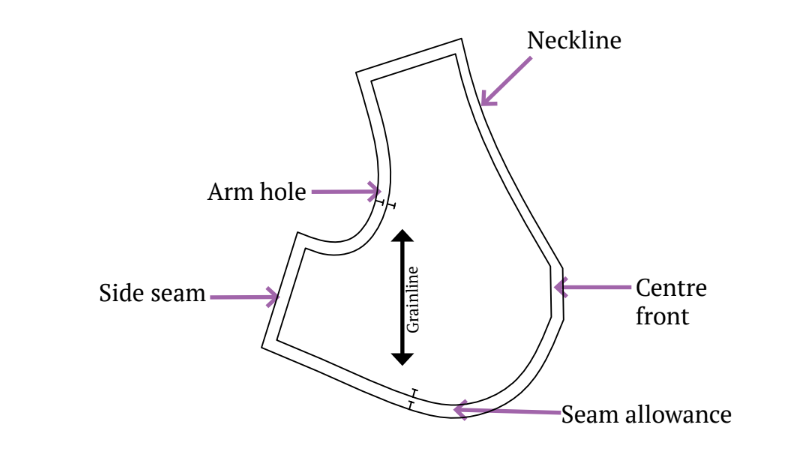
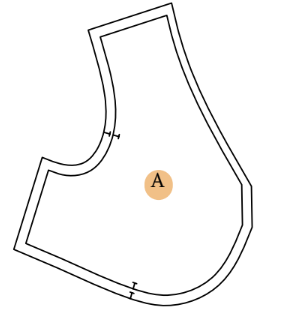
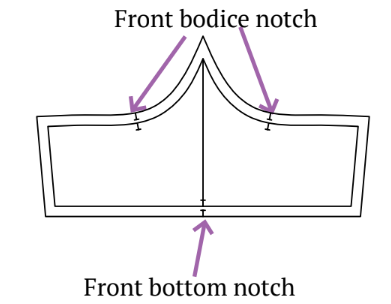
A. Cut Front Top Bodice x2 fabric
B. Cut Back Top Bodice x1 fabric

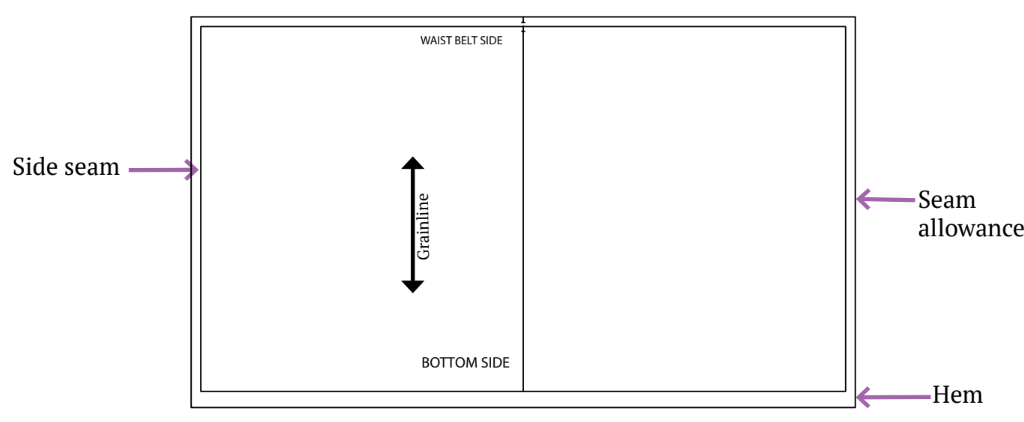
C. Cut Front/Back Bottom x2 fabric

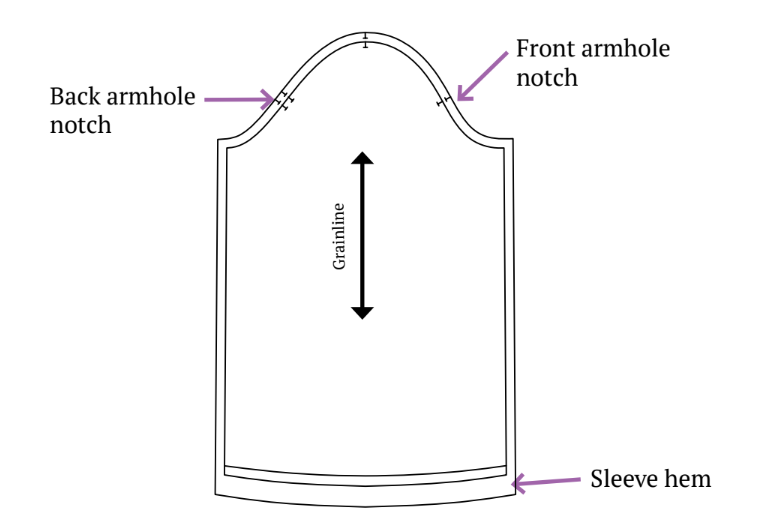
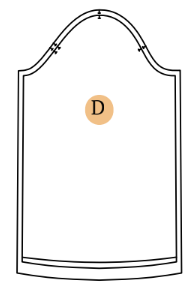
D. Cut Sleeve x2 fabric
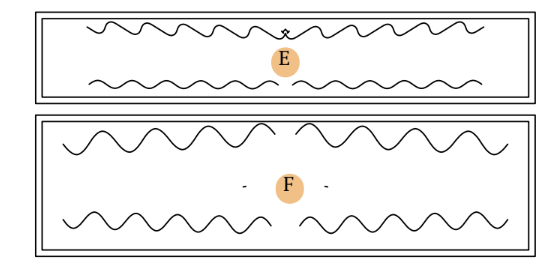
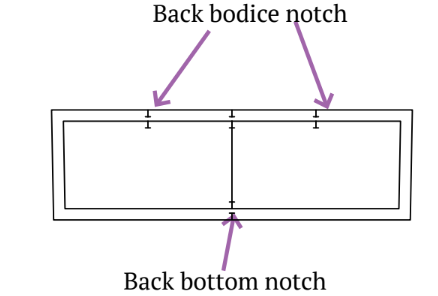
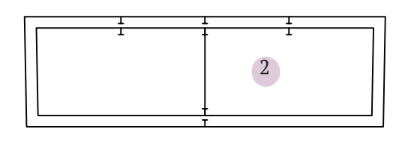
E. Cut Back Shirring Panel x1 fabric
F. Cut Front Shirring Panel x2 fabric
G. Cut Binding Strip x1 fabric


The fabric does not need to be cut for the following patterns; rather, they will be employed during the sewing procedure.
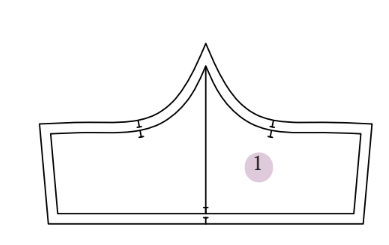
1. Front Waist Panel
2. Back Waist Panel
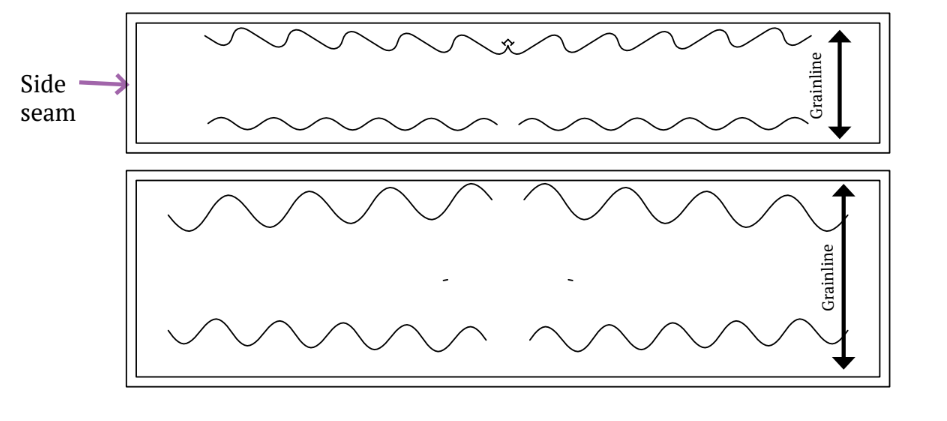
Cutting Layout
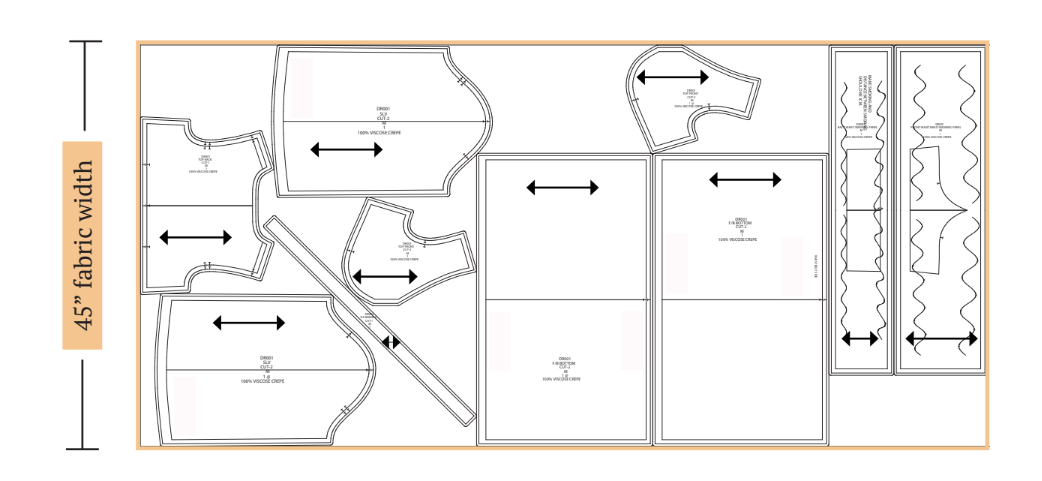
- Lay out fabric ensuring the garment is cut on-grain.
- Pin patterns for accurate cutting; layouts are nondirectional.
- Consider extra fabric for nap or prints.
Sewing Steps

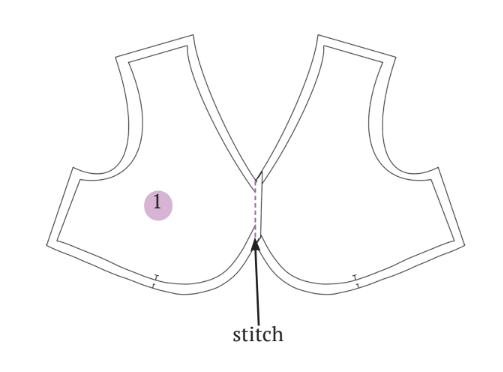
Step 1: Front Top Panels Connection
Join the front top panels by aligning their right sides and sewing along the center front.
Step 2: Top Bodice Assembly – Shoulders
Connect the front top panel to the back by aligning them with right sides together, and sew along the shoulder seam line. Only attach one shoulder at this point.
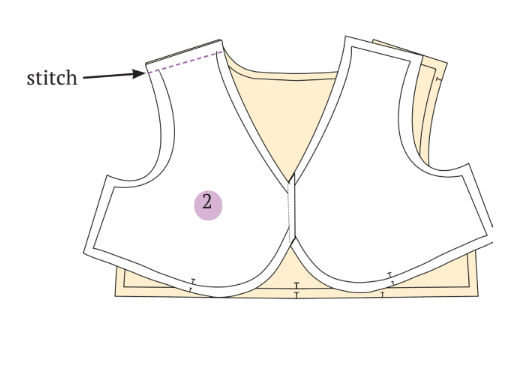
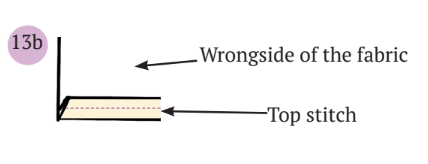
Step 3: Neckline Binding
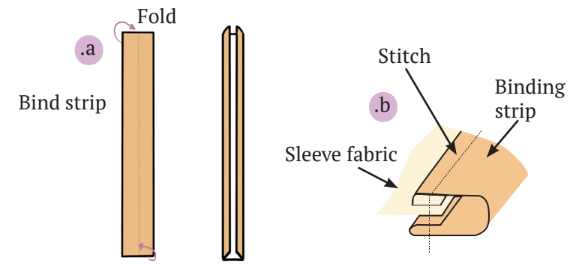
Secure the neckline with a binding strip, starting from the front open shoulder and concluding at the back shoulder.
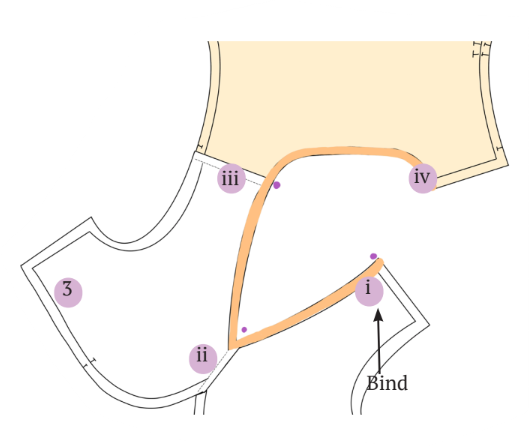
Fold the edges of the strip towards the wrong side, press with an iron, and position the neckline between the strip. Topstitch on the top to ensure a secure attachment.
Step 4: Completing Bodice – Shoulders
Sew the remaining shoulder seam of the front and back bodice by aligning them with their right sides together.

Step 5: Preparing Waist Panels for Shirring
Get the front and back waist panels ready for shirring by marking guidelines on the fabric at 0.5-inch or 1 cm intervals.
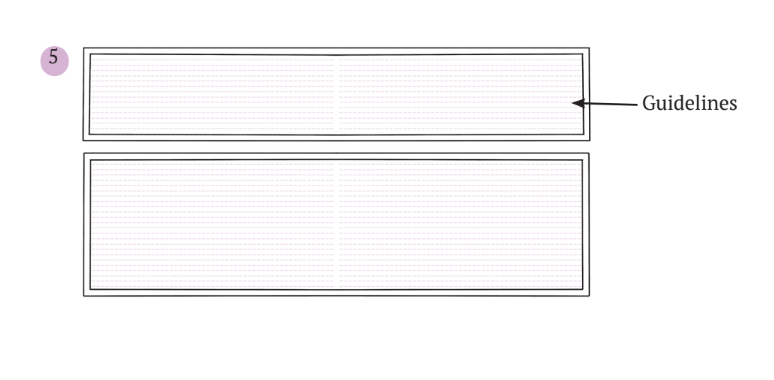
Tip: Before moving on to your actual garment, practice shirring on a fabric scrap to fine-tune the sewing machine settings.
Step 6: Shirring Elastic Setup
Wind the shirring elastic onto the bobbin, ensuring appropriate tension without overstretching. Utilize regular polyester thread for both your spool and needle.
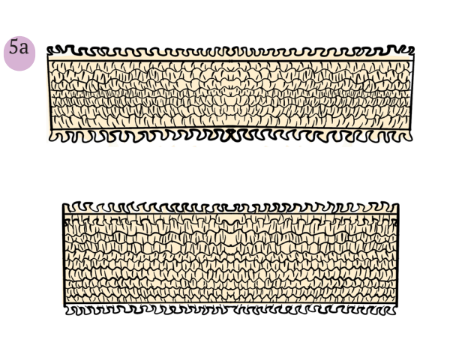
Tip: Decide on the color of shirring elastic you prefer. Typically, black and white are readily available, but other color options may also be considered.
Machine settings for shirring: Adjust the machine’s tension dial to a long straight stitch, such as setting it to 4 or 5, which corresponds to 3 to 4 stitches per inch. Proceed to sew shirring rows on the fabric’s right side.
Step 7: Gather Securement – Shirring
Ensure the elastic is secure by sewing two stitches, back-tacking two stitches, and avoiding the needle up/down button or automatic thread cutter. Smooth out the gathers and steam them with an iron to set the folds. Secure the shirring by top-stitching on the sides of the back panel.
Tip: When pulling the fabric at the end of each row, make sure not to tighten the elastic. Pull the elastic from the bobbin, not from the fabric itself.
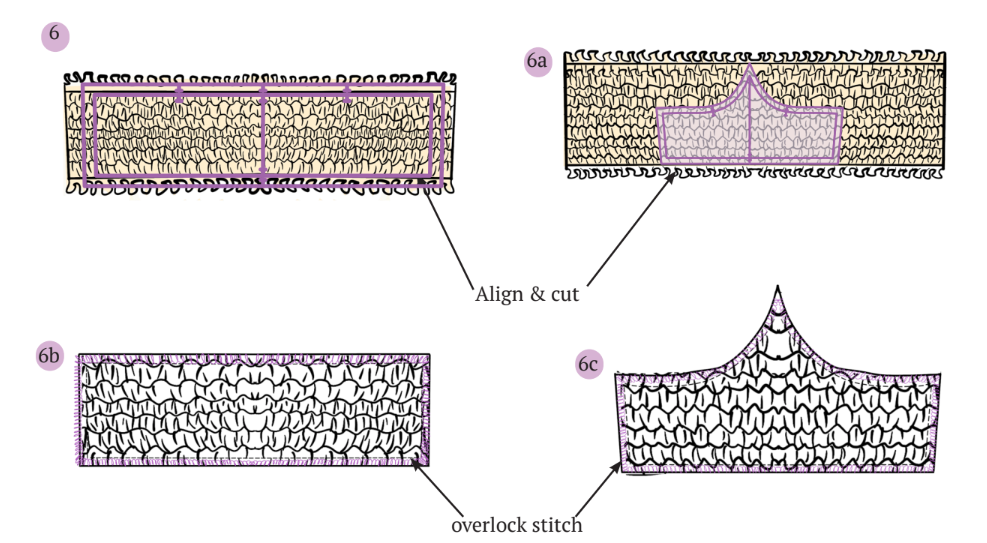
Step 8: Shirred Fabric Shaping
Shape the shirred fabric using the provided front and back waist panel pattern paper cutout. Position the pattern on the shirred fabric panel, mark along the pattern, and top stitch along the marked lines. Subsequently, cut along the marked lines and apply an overlock stitch along the seamline to complete the fabric.
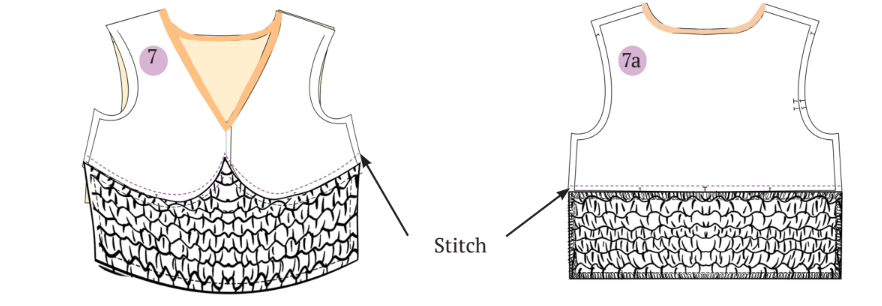
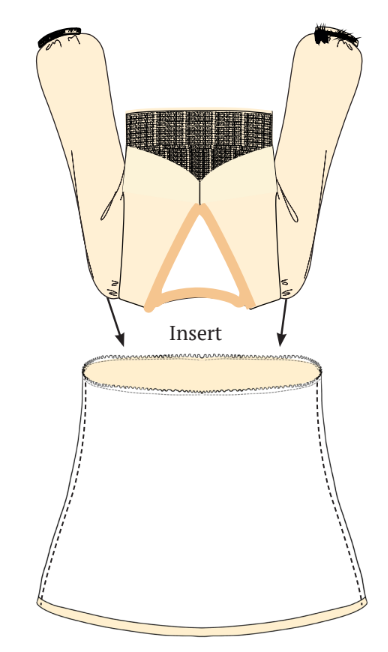
Step 9: Front and Back Waist Panel Attachment
Connect the front waist panel to the front top panel by aligning them with their right sides together and stitching along the seamline. Repeat the same process for the back panels.
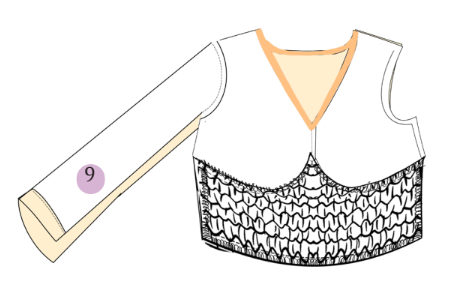
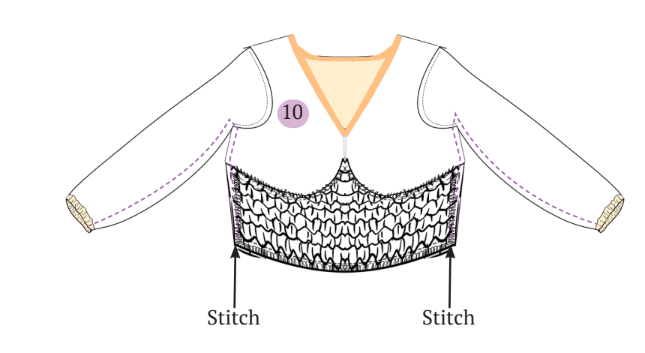
Step 10: Sleeve Attachment
Join the sleeve to the bodice by aligning the right sides together and sewing along the armhole seamline, ensuring proper alignment with the notches. Repeat the same process for the other sleeve.

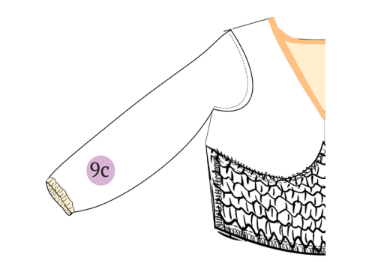
Step 11: Sleeve Wrist Hem Finish
Complete the sleeve wrist hem by folding the bottom edge twice towards the wrong side and sewing along the folded hem.
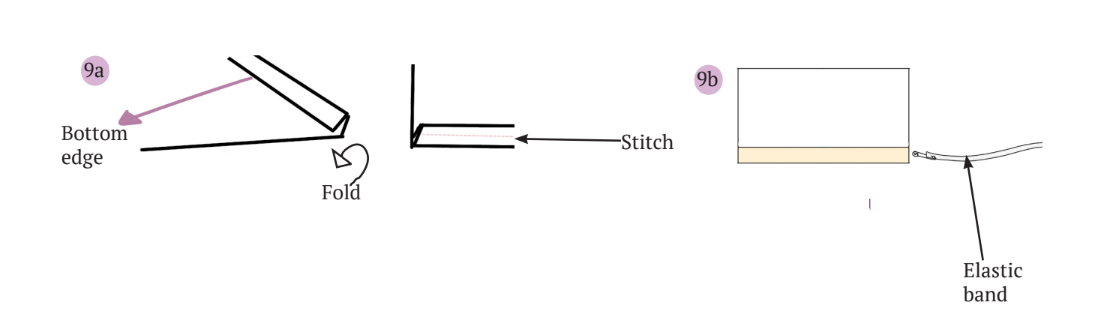
Make sure there is sufficient space to insert the elastic band.
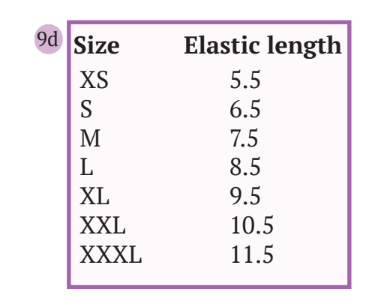
Insert the specified length of elastic band (refer to table 9d) into the wrist hem using a safety pin, and secure the end with a lock stitch to keep the elastic band in place.
Step 12: Side Seams Stitching
Join the side seams by turning the bodice with the right sides facing each other and sewing along the side seamline. Begin stitching from the sleeve wrist and finish at the waist.
Step 13: Front and Back Bottom Panel Gathers
Generate gathers on the front bottom panel of the dress by baste stitching on top of the waist seamline.
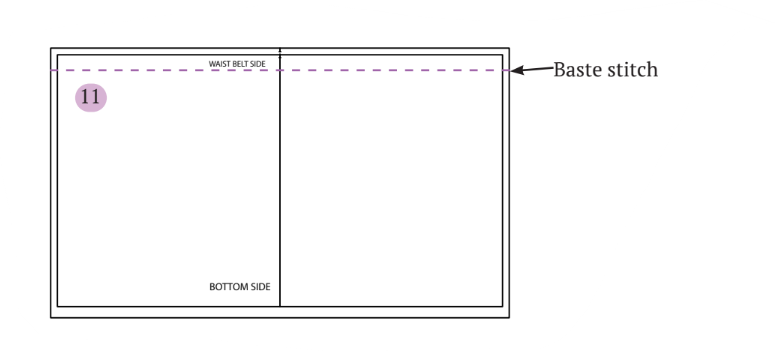
Pull a thread from the end to create gathers and adjust them to the desired waist length, matching the upper front bodice waist round. Secure the gathers in place by top-stitching over them.
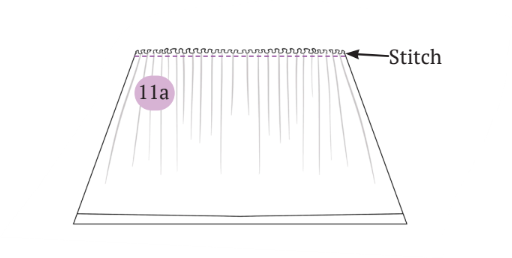
Repeat the process for the back bottom panel.
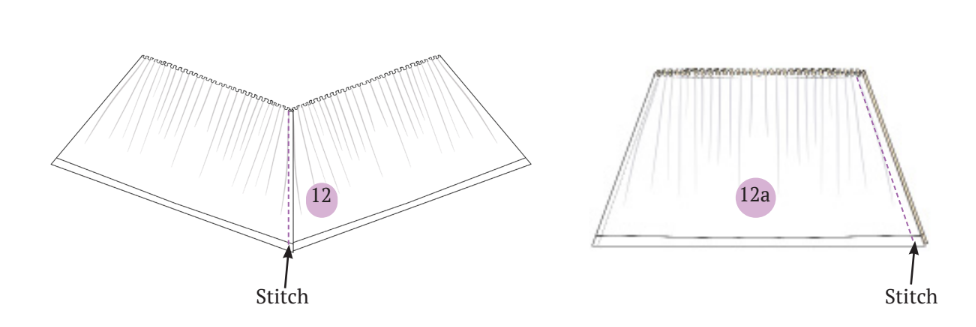
Step 14: Joining Front and Back Panels
Connect the front bottom panel to the back bottom panel by aligning them with their right sides together and sewing along the side seam seamline.
Step 15: Hem Finish
Complete the hem by folding the lower edge of the fabric twice in the direction of the wrong side and stitching along the folded hem.
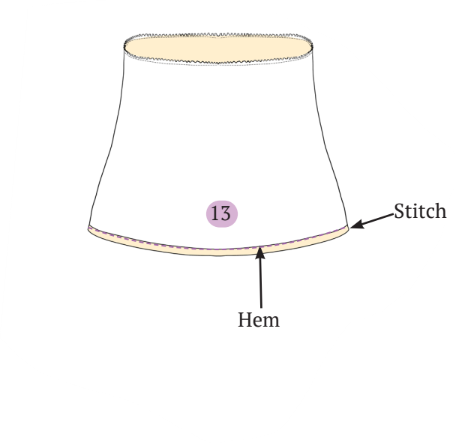
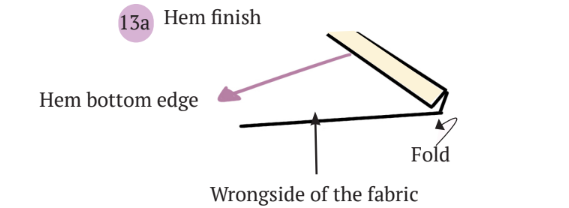
Make sure to tuck the fabric’s edge inside to avoid fraying.
Step 16: Final Bodice Assembly
Connect the front bodice top and bottom by inserting the front top bodice panel into the bottom. Ensure they are facing with the right sides together, then sew along the waist round seamline, aligning the side seams. Be sure to lockstitch at the end of the seam.
Tip: Alternatively, an overlock stitch can be applied to secure the waist round.

Summary
This shirred, cozy, and lovely dress has a lot of wear-ability. Yours would look great for a beach party, an evening out, or an everyday wear. What really matters are the shoes you choose to wear with this adorable dress and the fabric you choose. You won’t regret it, so go ahead and start sewing. The ideal balance is achieved with this shirred dress; it feels amazing, looks terrific, and conceals any potential tummy bulge!
Check out some final images of this adorable dress created with the Winslet’s DONNA Shirred Dress Pattern:
Did you finish this project? Share your photos with us and let us know how it went. We have a bunch of other sewing projects for you to try and also beautiful dress sewing patterns.
Join the Winslet sewing community by sharing your masterpiece with the hashtag #madewithwinslets!


