
How to Sew a Vintage Maxi Dress?
Have you wondered how to sew a vintage maxi dress? I recently got my hands on the Winslet’s DAISY Maxi Dress Pattern. It’s a long-sleeve dress with ruffles made from a special fabric. It comes in seven sizes, from XS to 3XL, so you can find the right one for you.
I thought it would be fun to give it a try, and guess what? I absolutely loved how my maxi dress turned out! It’s super easy to make, just right for those who know a bit about sewing.
Want to make one too? Follow along with my step-by-step guide, and your wardrobe will thank you!
What sewing supplies do you need to sew a vintage maxi dress?
The basic supplies you need to sew a vintage maxi dress are Sewing Pattern (I used Winslet’s DAISY Maxi Dress Pattern for my project), Sewing Machine, Tape Measure, Chalk, Shears, Pins, Iron, Needles, Thread (preferably 3-ply polyester), Thread Cutter, and Elastic Thread.
Fabric Recommendation
Maxi dresses pair well with airy materials like georgette, chiffon, silk blends, and crepe fabrics. The choice of these fabrics for maxi dresses is excellent due to their lightweight nature. These fabrics offer a graceful drape, enhancing the flow and movement of the dress.
For lining, silk, satin, or polyester fabrics are suitable.

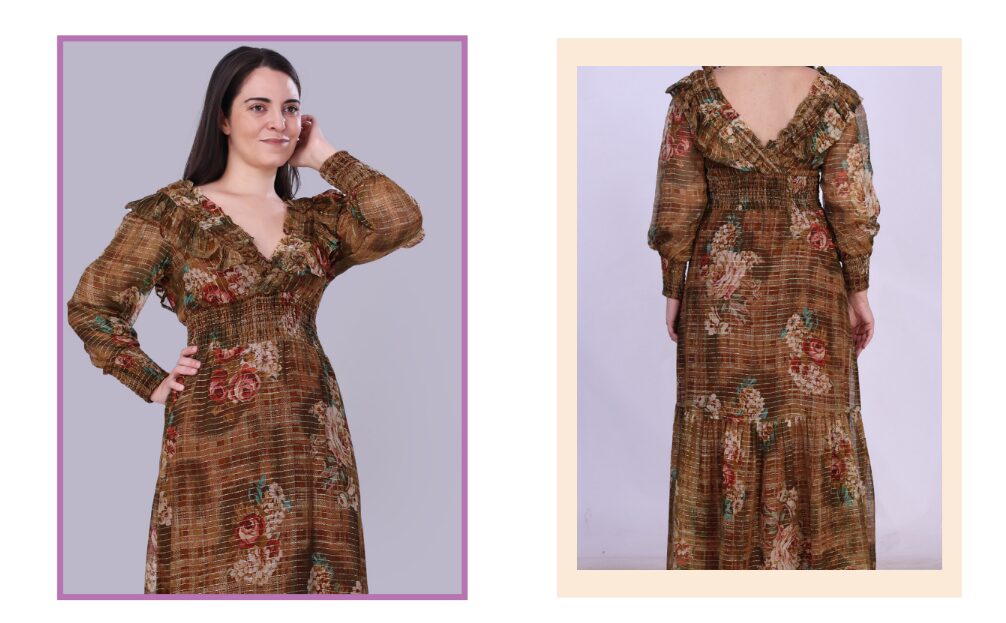
The model above features a vintage maxi dress made with the Winslet’s DAISY Maxi Dress Pattern. The dress is made from poly lurex georgette, a recommended fabric because it’s lightweight, breathable, strong, tear-resistant, quick-drying, dye-friendly, and perfect for layered dresses and skirts due to its flowing nature.
Size Charts
The maxi dress sewing pattern measurements for sizes (XS, S, M, L, XL, 2XL, and 3XL) are detailed below. Choose a size that corresponds most closely to your body measurements.
Measure the largest areas for the chest and hips, and for the waist, measure at its narrowest part just above the belly button.
It’s worth noting that if your exact measurements are not listed in the table, you may want to consider ordering a size larger.
The size chart includes measurements in both inches and centimeters for your reference.
Body Measurements
| XS (inches) | XS (cm) | S (inches) | S (cm) | M (inches) | M (cm) | L (inches) | L (cm) | XL (inches) | XL (cm) | 2XL (inches) | 2XL (cm) | 3XL (inches) | 3XL (cm) | |
| Bust | 32 | 81.3 | 34 | 86.4 | 36 | 91.4 | 38 | 96.5 | 40 | 101.6 | 42 | 106.7 | 44 | 111.8 |
| Waist | 26 | 66.0 | 28 | 71.1 | 30 | 76.2 | 32 | 81.3 | 34 | 86.4 | 36 | 91.4 | 38 | 96.5 |
Final Garment Measurements
| XS (inches) | XS (cm) | S (inches) | S (cm) | M (inches) | M (cm) | L (inches) | L (cm) | XL (inches) | XL (cm) | 2XL (inches) | 2XL (cm) | 3XL (inches) | 3XL (cm) | |
| Bust | 21.76 | 55.27 | 23.82 | 60.5 | 26.0 | 66.04 | 27.62 | 70.15 | 29.75 | 75.56 | 31.64 | 80.36 | 33.62 | 85.39 |
| Full Length | 52.85 | 134.23 | 53.22 | 135.17 | 53.67 | 136.32 | 54.20 | 137.66 | 54.92 | 139.49 | 55.24 | 140.3 | 55.76 | 141.63 |
| Sleeve Length | 22.5 | 57.15 | 22.75 | 57.78 | 23.0 | 58.42 | 23.25 | 59.05 | 23.5 | 59.15 | 23.75 | 59.78 | 24.0 | 60.96 |
Fabric Yield (Main Fabric)
| Width of the Fabric | XS (yards) | XS (meters) | S (yards) | S (meters) | M (yards) | M (meters) | L (yards) | L (meters) | XL (yards) | XL (meters) | 2XL (yards) | 2XL (meters) | 3XL (yards) | 3XL (meters) |
| 60” | 2.33 | 2.13 | 2.74 | 2.51 | 3.23 | 2.95 | 3.71 | 3.39 | 4.27 | 3.90 | 4.91 | 4.49 | 5.65 | 5.16 |
Fabric Yield (Lining)
| Width of the Fabric | XS (yards) | XS (meters) | S (yards) | S (meters) | M (yards) | M (meters) | L (yards) | L (meters) | XL (yards) | XL (meters) | 2XL (yards) | 2XL (meters) | 3XL (yards) | 3XL (meters) |
| 45” | 1.46 | 1.60 | 1.72 | 1.88 | 2.02 | 2.21 | 2.33 | 2.54 | 2.67 | 2.92 | 3.07 | 3.36 | 3.54 | 3.87 |
| 60” | 1.46 | 1.60 | 1.72 | 1.88 | 2.02 | 2.21 | 2.33 | 2.54 | 2.67 | 2.92 | 3.07 | 3.36 | 3.54 | 3.87 |
Steps To Follow For Sewing a Vintage Maxi Dress
Let’s dive into the steps for sewing your very own unique vintage maxi dress:
Pattern Marking and Inventory
The fabric needs to be cut into following pieces:
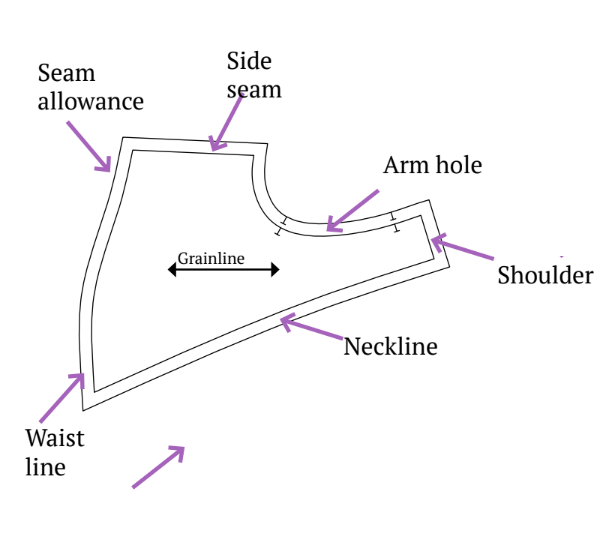
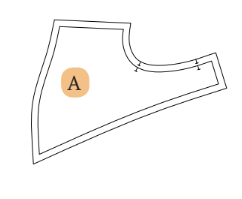
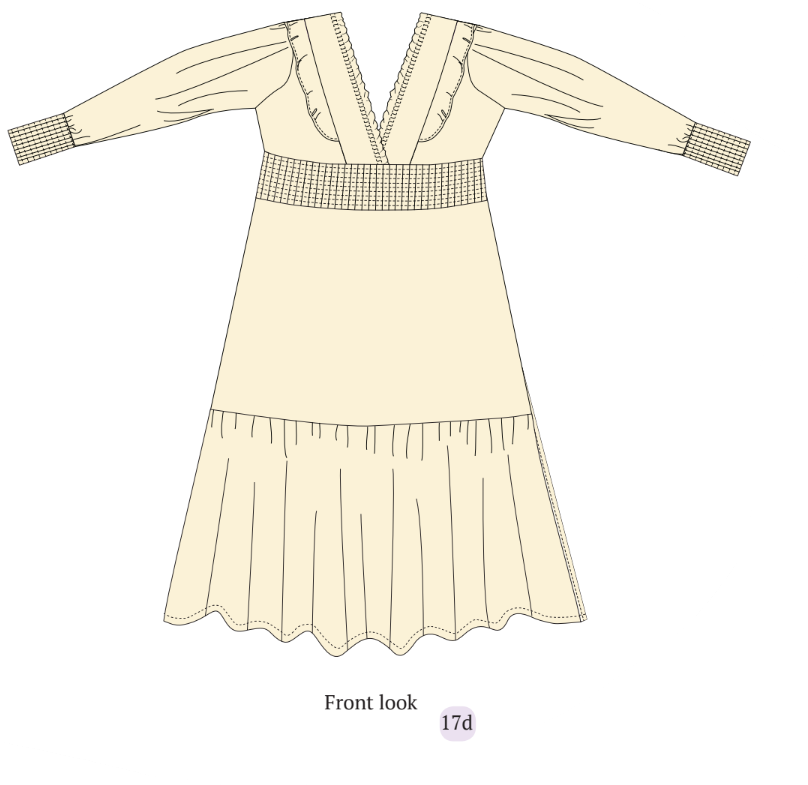
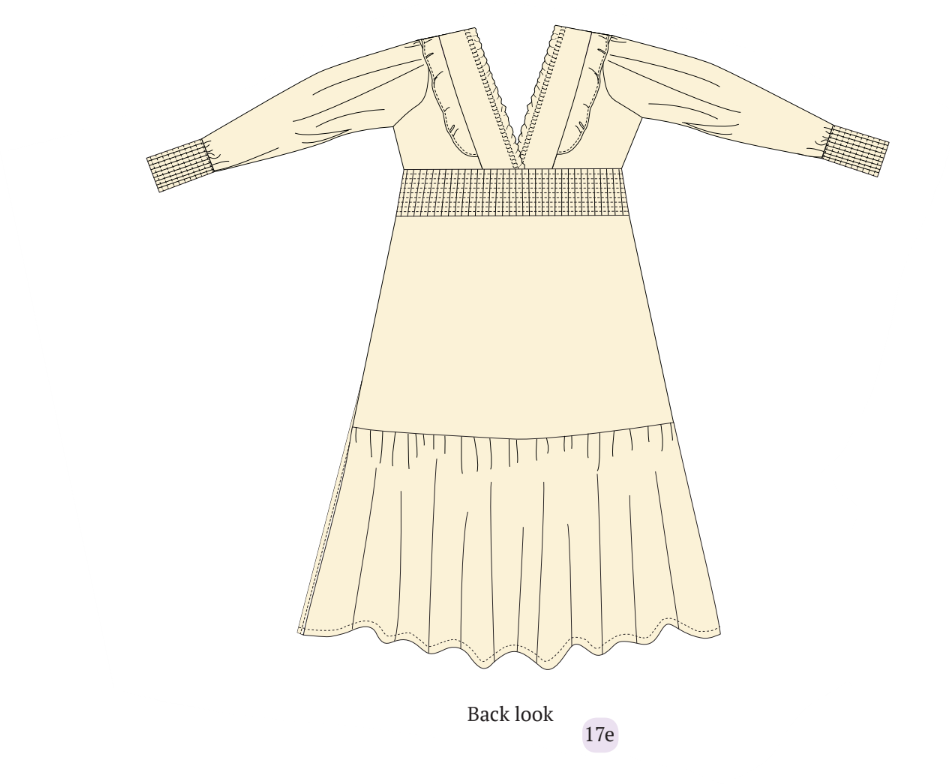
A. Front – cut x2 fabric
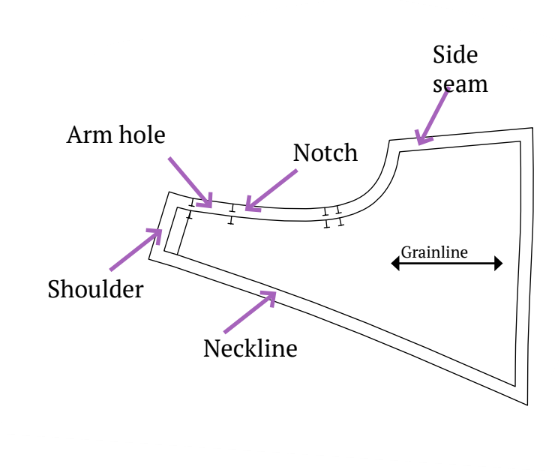
B. Back – cut x2 fabric
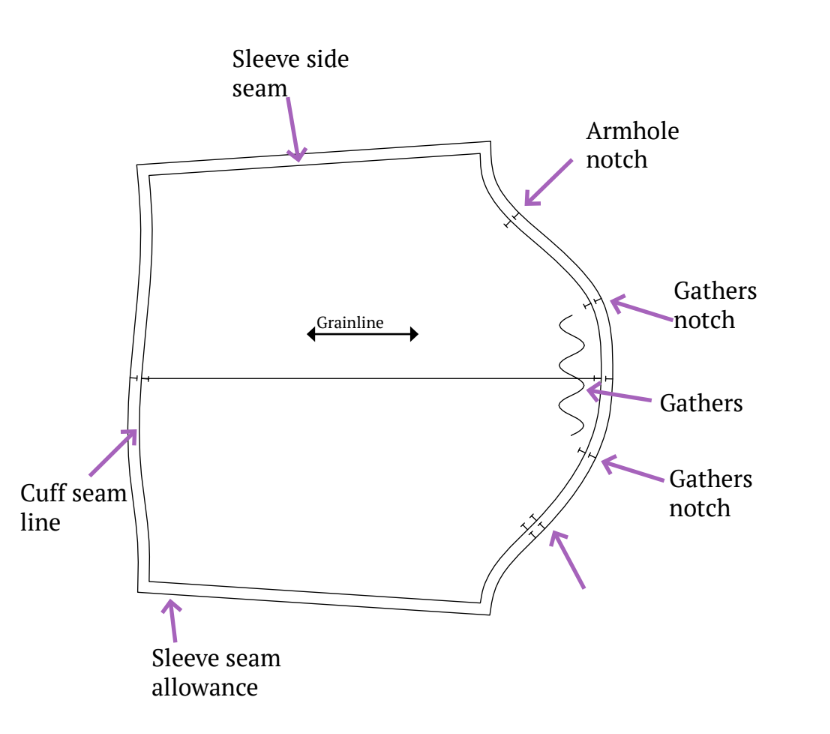
C. Sleeve – cut x2 fabric

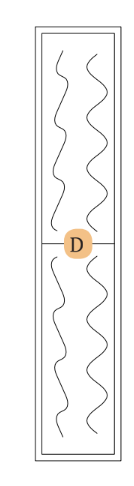
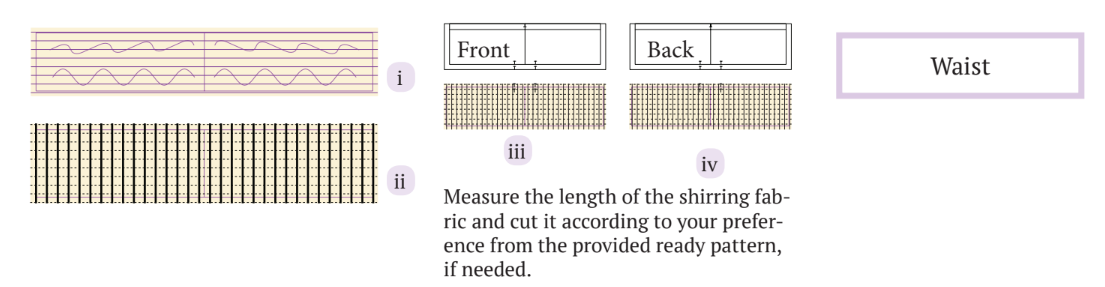
D. Waist Shirring Panel panel – cut x2 fabric

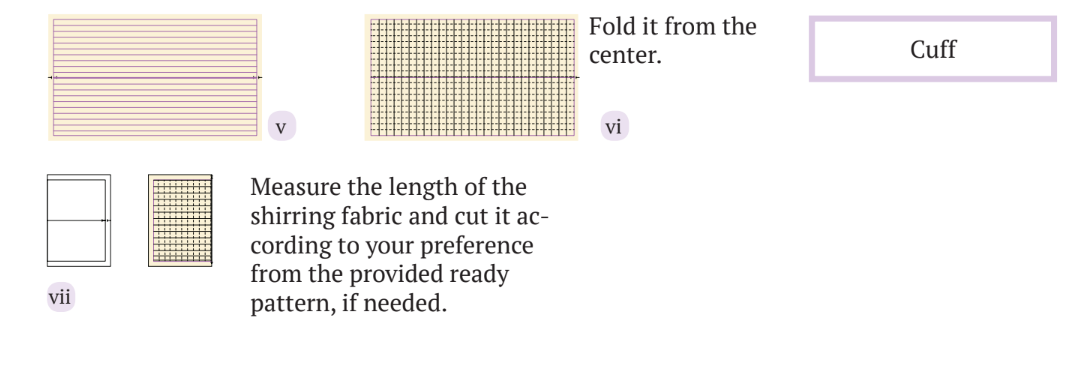
E. Cuff Shirring Panel – cut x2 fabric


F. Neck Center Front – cut x2 fabric


G. Front Neck Frill – cut x2 fabric

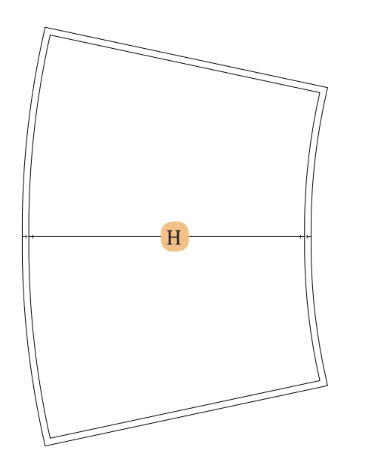
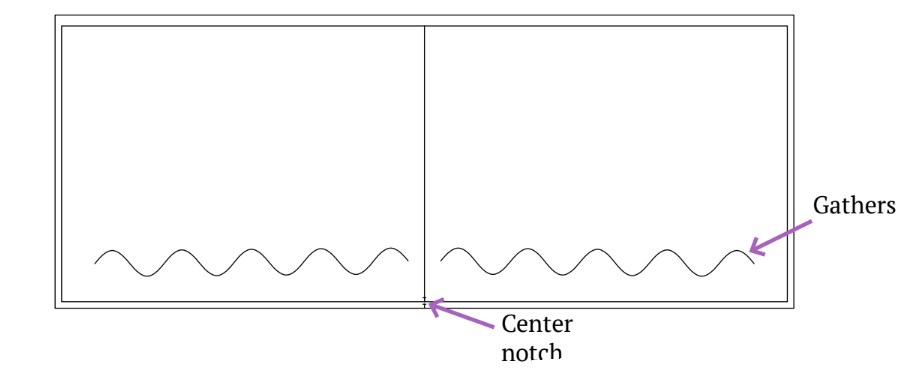
H. First Bottom Frill – cut x2 fabric
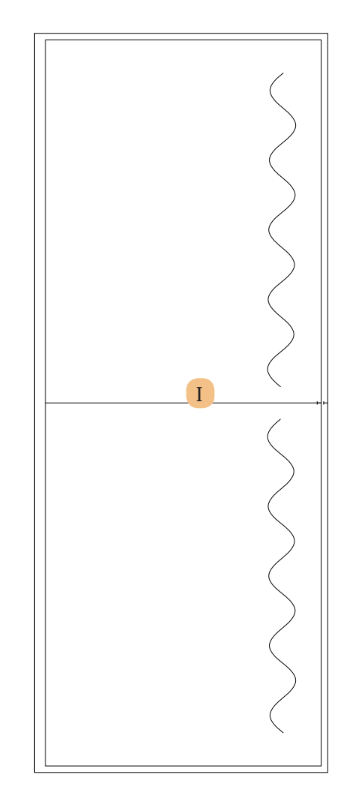
I. Bottom Frill – cut x2 fabric
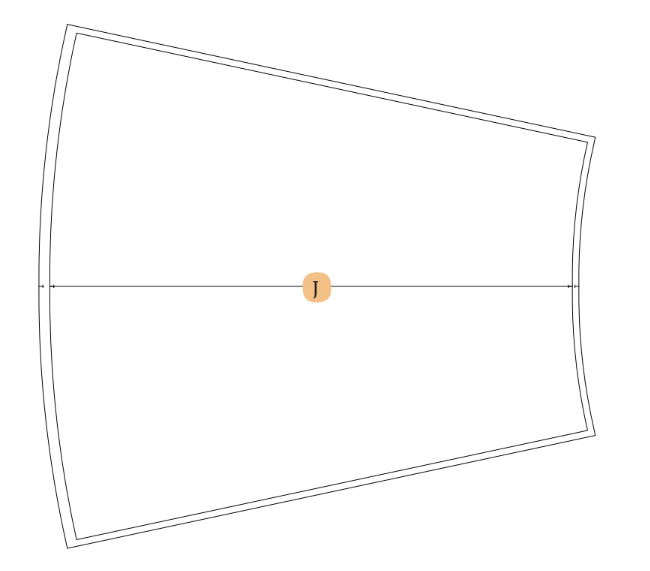
J. Bottom Lining – cut x2 fabric

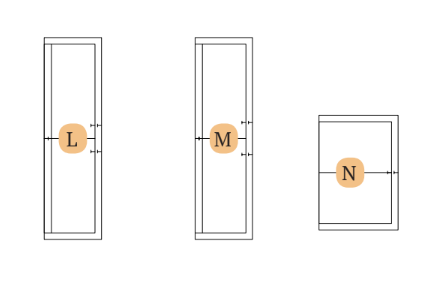
K. Neck Ready Pattern – cut x1 fabric
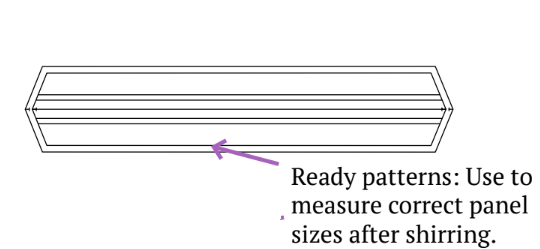

L. Waist Front Ready Pattern – cut x1 fabric
M. Waist Back Ready Pattern – cut x1 fabric
N. Cuff Ready Pattern – cut x2 fabric

Be sure to indicate all notches and design elements like darts and pleats on your fabric using the pattern pieces. When stitching the garment, carefully align the notches to ensure a proper match.
Cutting Layout
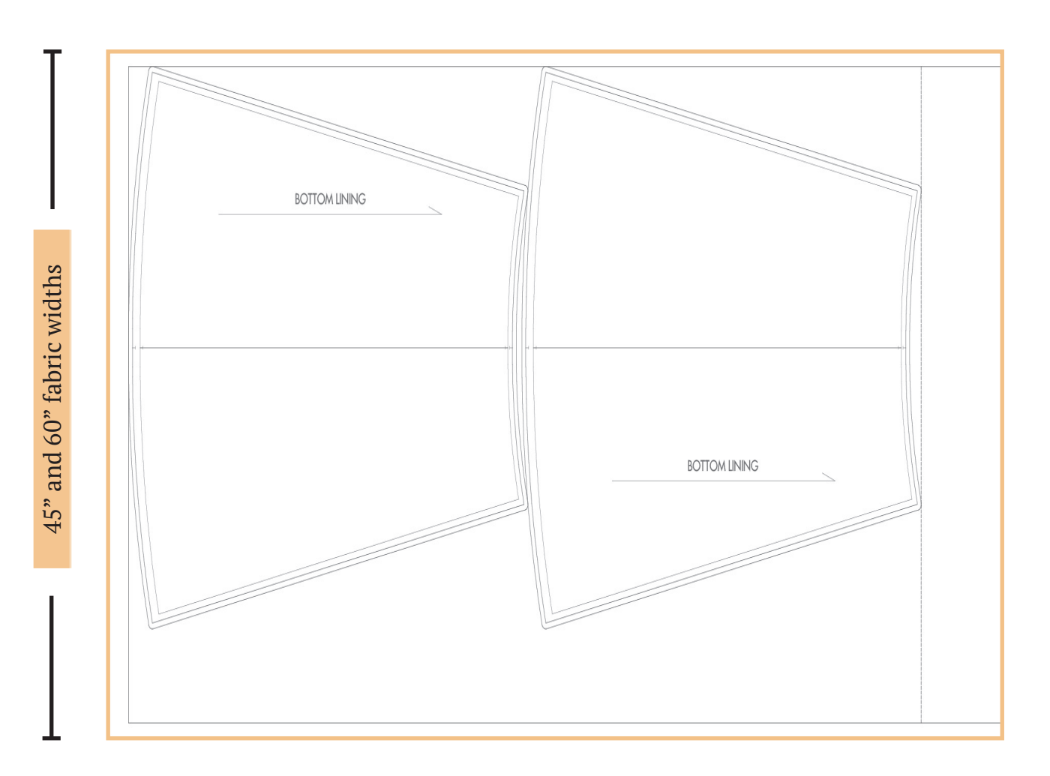
- Ensure the pattern layout is on-grain for fabric alignment.
- Use pins to secure fabric, aiding accurate cutting.
- If using fabric with nap or prints, purchase additional length.
Sewing Steps

HANDY TIP: For a smoother sewing process, it’s a good idea to iron the pattern pieces after each step.
HOW TO DO SHIRRING?
To make shirring, get elastic thread. Use it as the looper thread for lock stitching. Reduce the thread tension on your sewing machine. Always check the elastic thread on the spool to make sure there’s enough. Missing a seam in between can mess up the shirring effect.
It’s a good idea to practice on a piece of fabric before doing it on the final project.
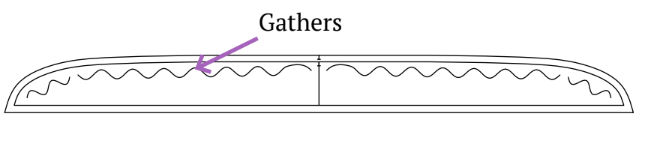
For shirring at the waist, you can use as many lines as you want. For example, if there are 9 shirring lines on the waist, mark 9 equally spaced seams on the fabric and start with a few stitches. Tie a knot to secure the loose end of the thread. Now, create 9 stitching lines on the waist.
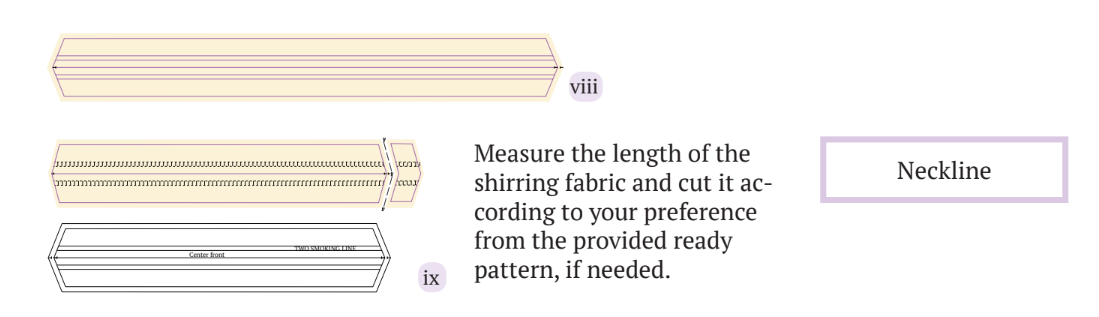
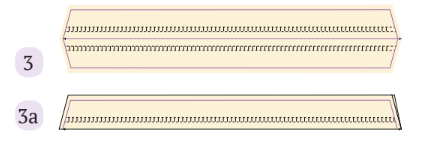
Repeat the same steps for the cuff and neckline, following the provided markings of 18 stitching lines for the cuff and 2 stitching lines for the neckline.
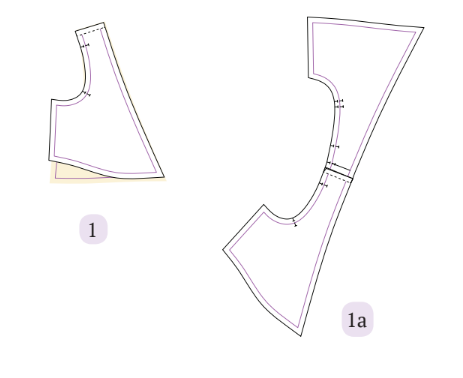
1. Put the front and back pattern pieces together with the good sides facing each other, and sew one shoulder seam.
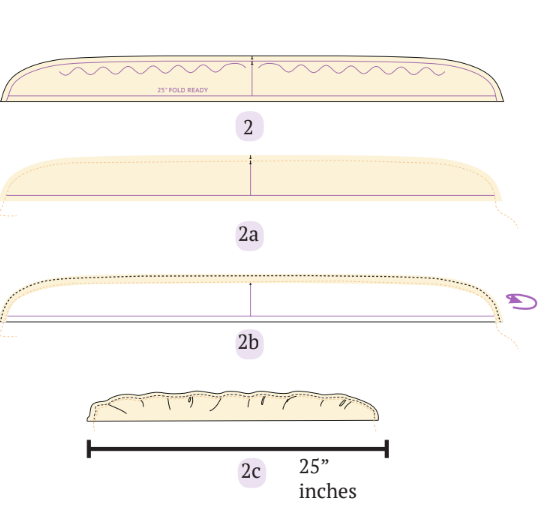
2. Lower the thread tension on your sewing machine and stitch temporary basting stitches above the neckline seam. After that, fold the seam allowance of the neck frill twice on the wrong side and sew to secure the raw edges. Then, tie a knot at one end of the basting threads and carefully pull it until you reach the frill length you want—25 inches for XS, S, M, and 26, 27, 28, and 29 inches for L, XL, XXL, and XXXL sizes, respectively.
3. Bend the front center of the neck along the marked center fold.
4. Take the front bodice and place the neck frill (with the underside facing up) on the right side of the front bodice. Then, put the neck center front panel (with the right side facing up) on top of it. Align all the notches as indicated and sew them together.

5. Make gathers on the armhole by sewing temporary basting stitches between the notches given on the armhole.
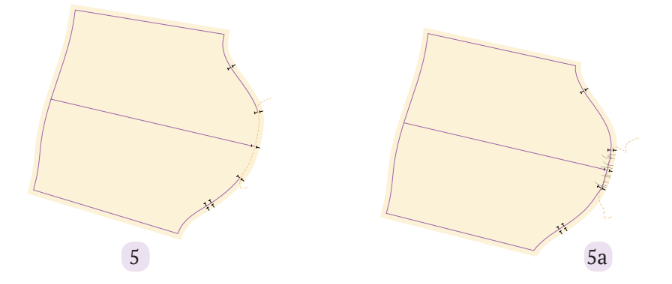
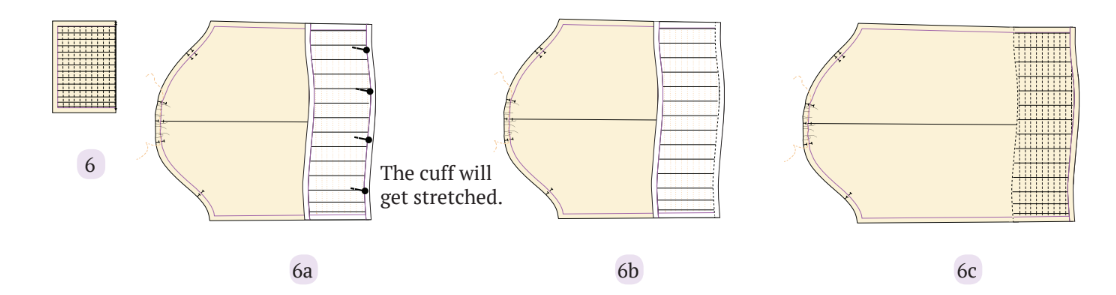
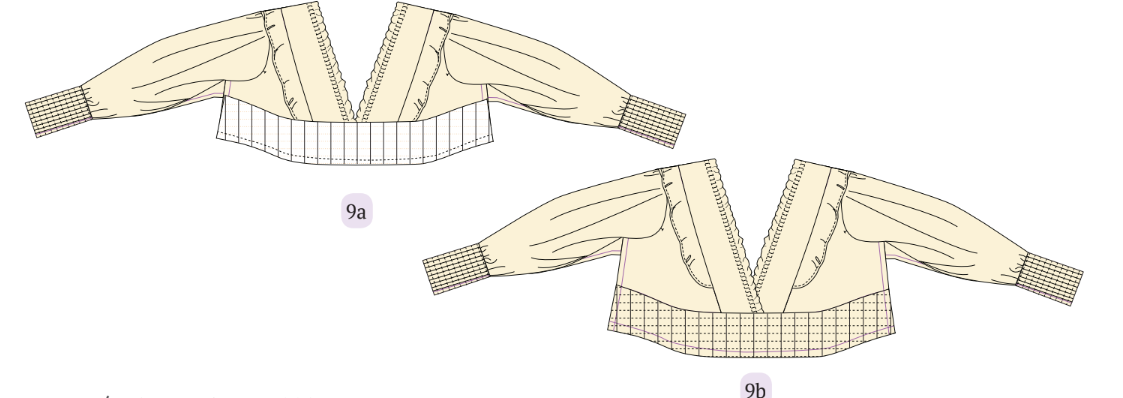
6. With the cuff ready pattern, align the shirring cuff pieces. Fold the shirring panel and position it on the sleeve’s cuff seam line, making sure the right sides are facing each other. Then, sew them together.
7. Align the notches on the sleeves (one in the front and two in the back). Put the sleeves on the bodice’s armhole seam line with the right sides together and secure them with pins. Make sure the gathers on the sleeves from the bodice armhole notches are the right length.

8. Do the same steps, starting from step 1 and going through step 7, for the other side of the bodice.
9. Take the shirring waist of the front piece and put it on the front bodice, making sure the right sides face each other. Match the given notches with the center front of the front bodice and pin them together. Pin both front bodices to the waist shirring and sew them.
Repeat the same steps with the back bodice and the back waist shirring.
10. Stitch the side seams of the upper bodice by flipping them so that the right sides are facing each other.

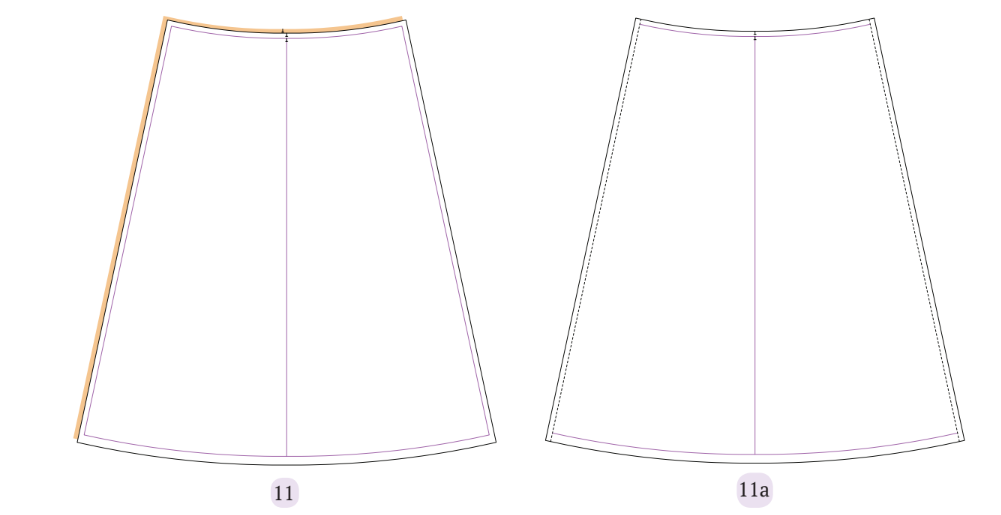
11. Put the front and back bottom lining pieces together with their good sides facing each other. Sew the side seams of the lining pieces together.
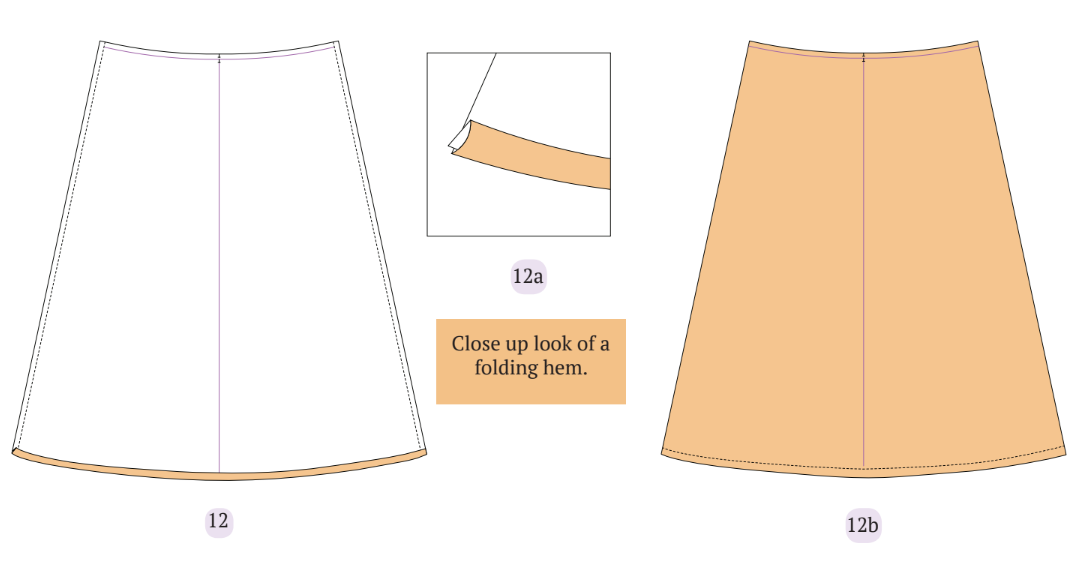
12. Fold the seam allowance of the bottom lining at the hemline twice on the wrong side. Sew from one intersection of the side seam and go back to it.
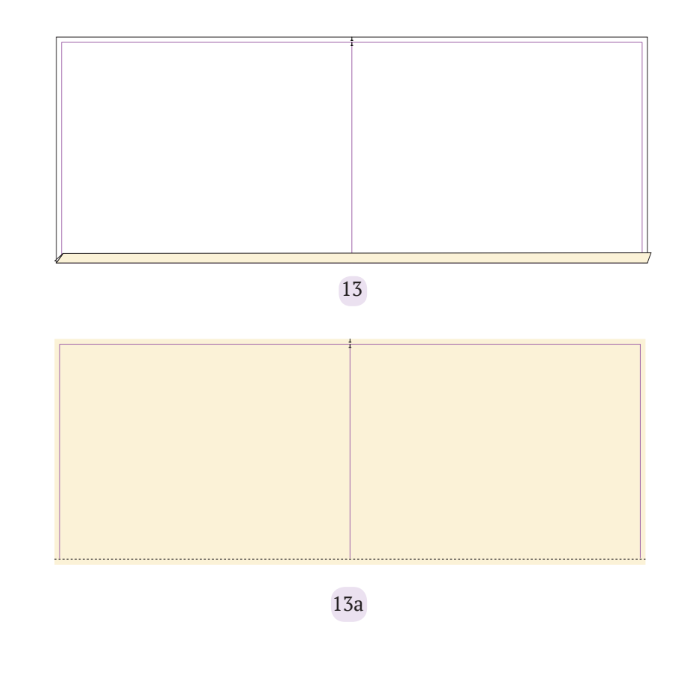
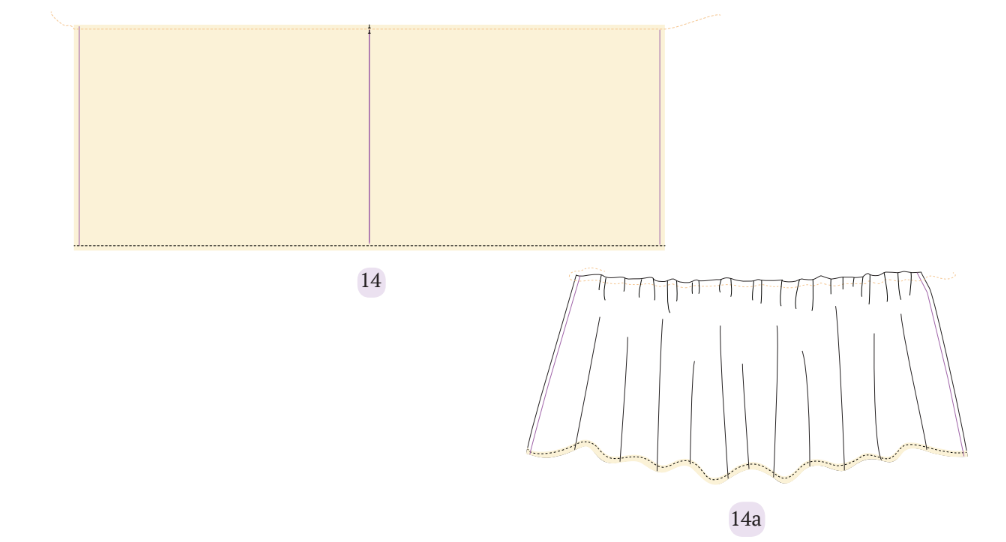
13. Double-fold the seam allowance of the bottom frill at the hemline on the wrong side. Then, sew along it.
14. Stitch temporary basting stitches along the top seamline. Pull them to form frills. Maintain the same width as the hemline of the first bottom piece.
15. Put the first bottom piece and the bottom frill piece together with their right sides facing each other. Then, sew them together.
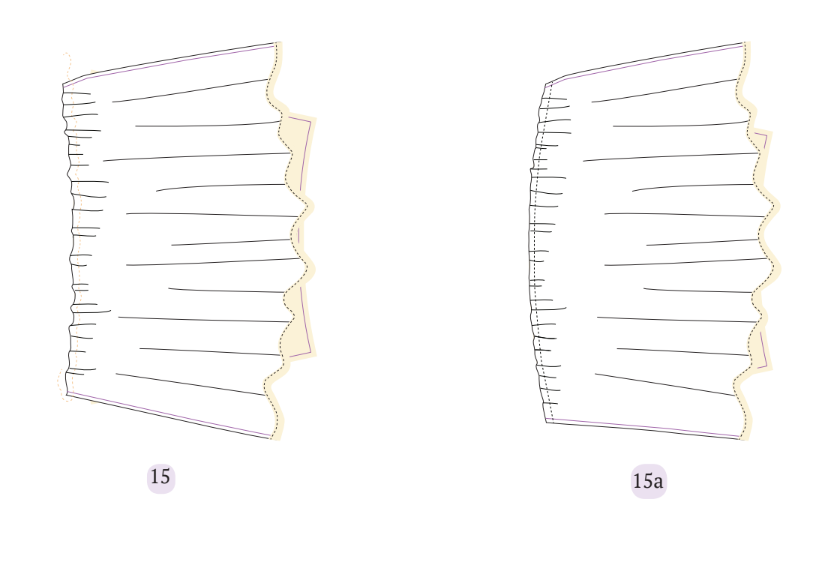
16. Align the first bottom piece and the bottom frill piece with their right sides facing each other. Stitch them together.

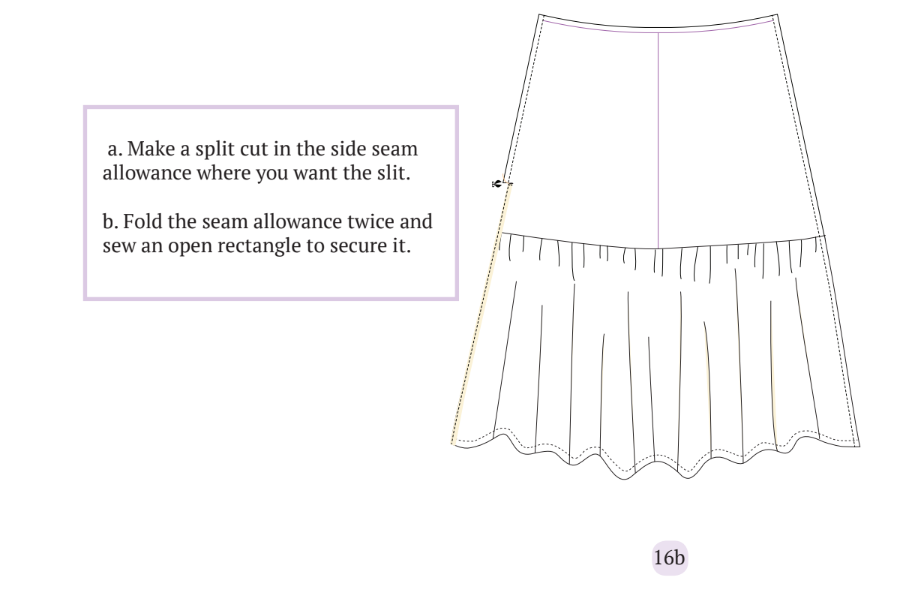
If you prefer having a slit on one side, you can sew down from the waistline to a length of 16 inches. You can choose the exact length of the slit based on your preference.
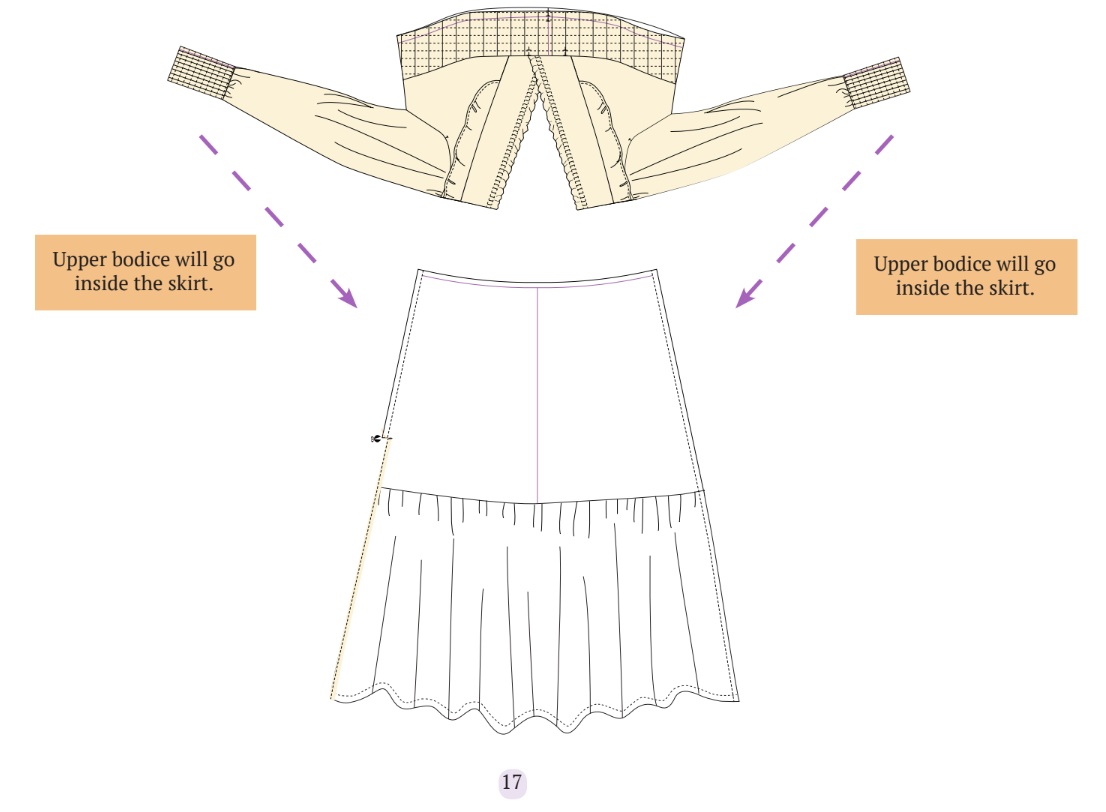
17. Insert the upper bodices into the bottom panel, ensuring their right sides are facing each other. Additionally, include the right side of the bottom lining to the bottom panel (remember that the lining should face right sides together with the wrong side of the bottom panel). Sew their waistlines together.

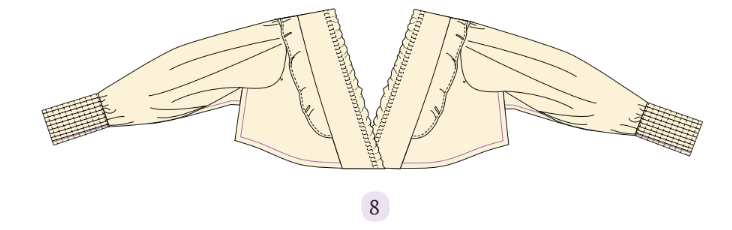
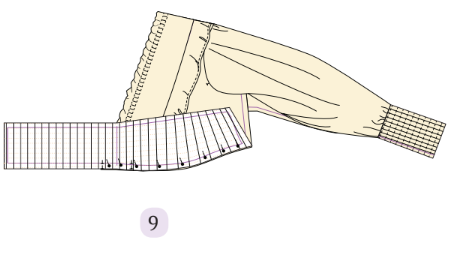
And that’s it! Your maxi dress is beautifully done and ready to be worn!
Summary
The maxi dress complements diverse body shapes and is comfortable.
Check out some final images of this adorable dress created with the Winslet’s DAISY Maxi Dress Pattern:

If you liked learning how to make this maxi dress with the Winslet’s DAISY Maxi Dress Pattern, make sure to pin it to your favorite Pinterest board or share it with friends on social media. I have other sewing projects here and Winslet’s has some great dress patterns if you want to try out more.
Join the Winslet sewing community by sharing your masterpiece with the hashtag #madewithwinslets!


