How to Sew a Flutter Sleeves Dress?
Have you wondered how to sew a flutter sleeves dress? Well, you’ve come to the right place!
Despite having a large collection of dresses, there are a few that I reach for on a regular basis like a flutter sleeves dress. It transitions seamlessly from a professional daytime look with a light-weight jacket to a stylish choice for a dinner date in the evening.
This sewing project is best suited for skilled sewers, however beginners and intermediates may give it a shot.
What sewing supplies do you need to sew a flutter sleeves dress?
The basic supplies you need to sew a flutter sleeves dress are Sewing Pattern (I used Winslet’s EUPHORIA Flutter Sleeve Dress Pattern for my project), Sewing Machine, Tape Measure, Chalk, Shears, Pins, Iron, Needles, Thread (preferably 3-ply polyester), Thread Cutter, Fusible Interfacing, and Buttons.
Fabric Recommendation
Flutter sleeves dresses work great with cotton blends, jersey knits, and viscose fabric.
I felt motivated to choose an exquisite knitted fabric, known for its forgiving nature during sewing, adept at concealing minor errors. And, did I mention its remarkable softness? Comfort – check!
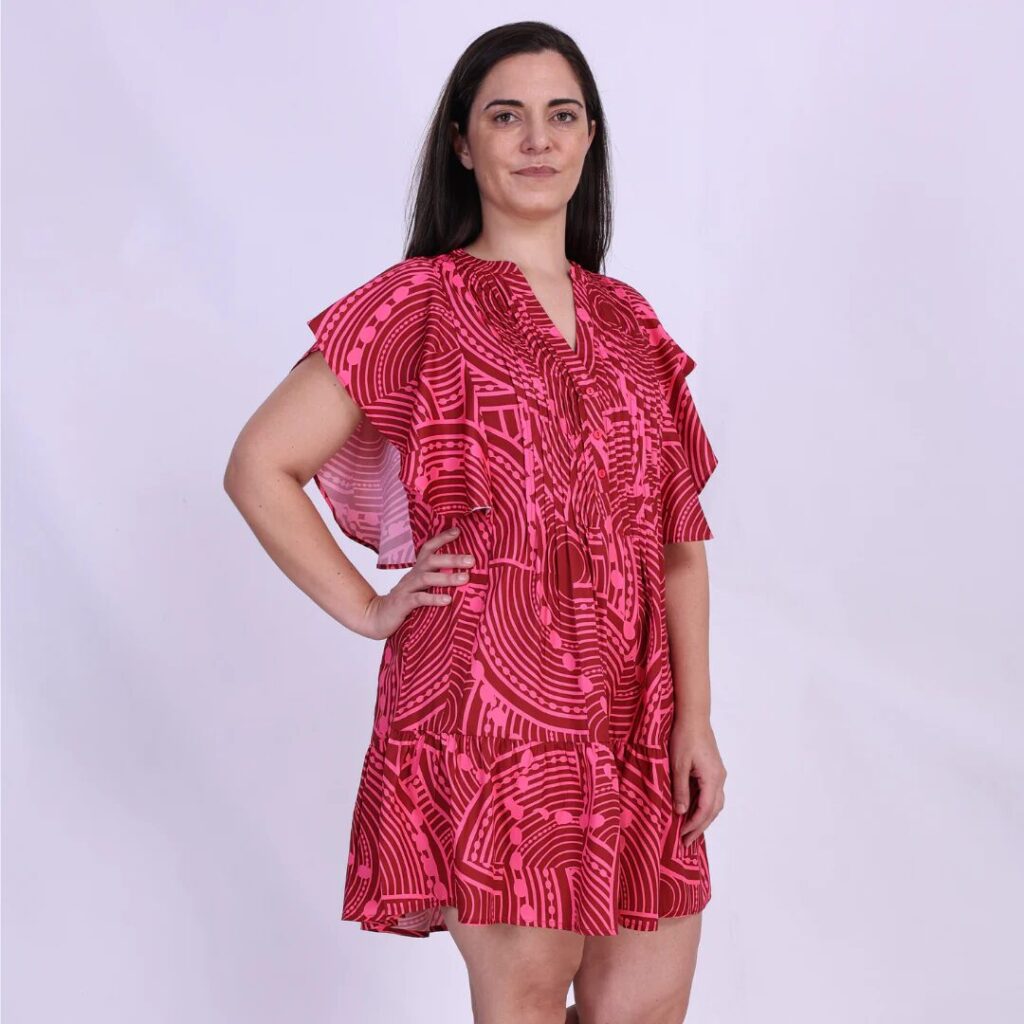
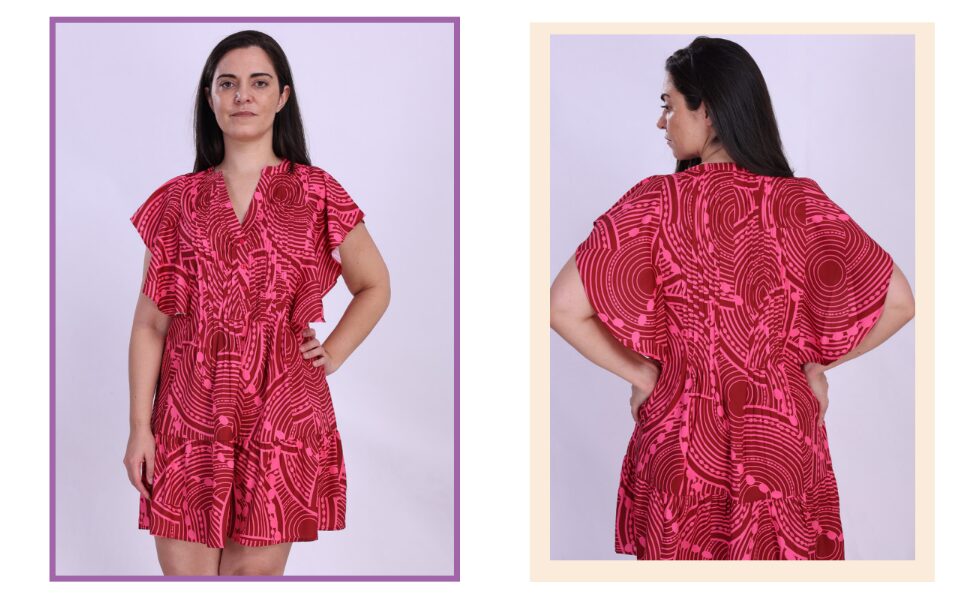
The model above features a flutter sleeves dress made with the Winslet’s EUPHORIA Flutter Sleeve Dress Pattern. The fabric used is a blend of cotton-viscose, that boasts breathability and comfort, ideal for summer. Its durable nature ensures prolonged wear, while the smooth feel and elegant drape enhance the overall aesthetic.
Size Charts
The flutter sleeves dress sewing pattern measurements for sizes (XS, S, M, L, XL, 2XL, or 3XL) are detailed below. Choose a size that corresponds most closely to your body measurements.
Measure the largest areas for the chest and hips, and for the waist, measure at its narrowest part just above the belly button.
It’s worth noting that if your exact measurements are not listed in the table, you may want to consider ordering a size larger.
The size chart includes measurements in both inches and centimeters for your reference.
Body Measurements
| XS (inches) | XS (cm) | S (inches) | S (cm) | M (inches) | M (cm) | L (inches) | L (cm) | XL (inches) | XL (cm) | 2XL (inches) | 2XL (cm) | 3XL (inches) | 3XL (cm) | |
| Bust | 32 | 81.3 | 34 | 86.4 | 36 | 91.4 | 38 | 96.5 | 40 | 101.6 | 42 | 106.7 | 44 | 111.8 |
| Waist | 26 | 66.0 | 28 | 71.1 | 30 | 76.2 | 32 | 81.3 | 34 | 86.4 | 36 | 91.4 | 38 | 96.5 |
Final Garment Measurements
| XS (inches) | XS (cm) | S (inches) | S (cm) | M (inches) | M (cm) | L (inches) | L (cm) | XL (inches) | XL (cm) | 2XL (inches) | 2XL (cm) | 3XL (inches) | 3XL (cm) | |
| Chest Round | 35 | 88.9 | 36.5 | 92.71 | 38 | 96.52 | 39.5 | 100.3 | 20.2 | 51.30 | 20.6 | 52.32 | 20.9 | 53.08 |
| Full Length | 33.5 | 85.09 | 34 | 86.36 | 34 | 86.36 | 34.5 | 87.63 | 20.9 | 53.08 | 21.9 | 55.62 | 22.95 | 58.29 |
| Sleeve Width | 6.5 | 16.51 | 6.5 | 16.51 | 6.5 | 16.51 | 6.75 | 17.14 | 7 | 17.78 | 7 | 17.78 | 7.25 | 18.4 |
Fabric Yield
| Width of the Fabric | XS (yards) | XS (meters) | S (yards) | S (meters) | M (yards) | M (meters) | L (yards) | L (meters) | XL (yards) | XL (meters) | 2XL (yards) | 2XL (meters) | 3XL (yards) | 3XL (meters) |
| 45” | 1.89 | 1.73 | 2.22 | 2.03 | 2.62 | 2.39 | 3.01 | 2.75 | 3.46 | 3.16 | 3.98 | 3.64 | 4.58 | 4.18 |
| 60” | 1.43 | 1.31 | 1.68 | 1.54 | 1.98 | 1.81 | 2.28 | 2.08 | 2.62 | 2.40 | 3.01 | 2.75 | 3.46 | 3.17 |
Steps To Follow For Sewing a Flutter Sleeves Dress
Let’s dive into the steps for sewing your very own unique flutter sleeves dress:
Pattern Marking and Inventory
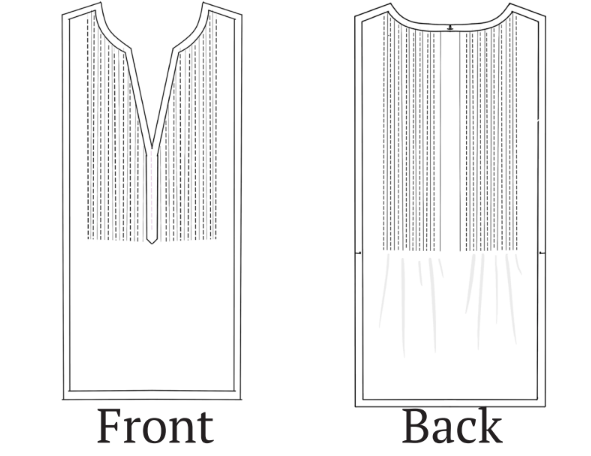
Cut out the fabric according to the following pattern instructions:
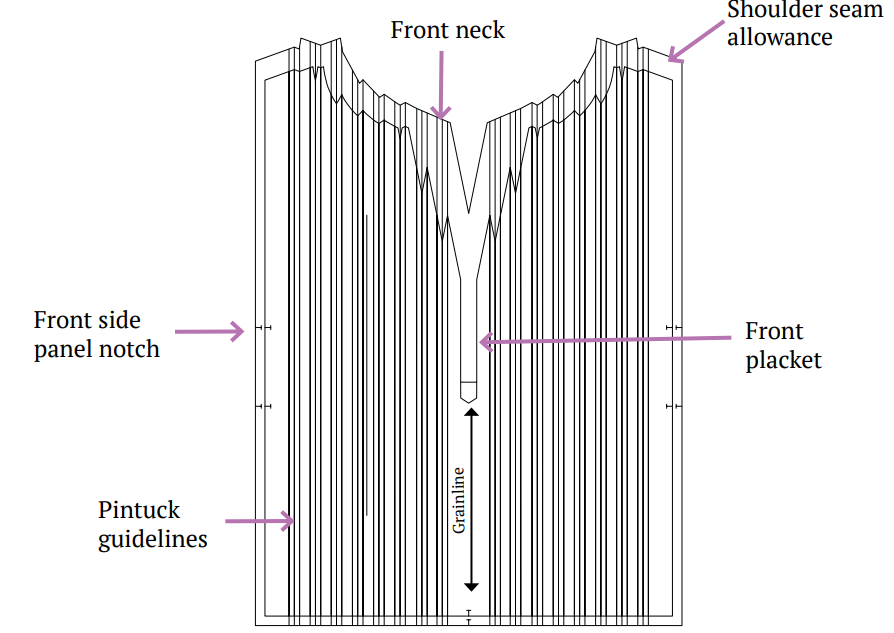
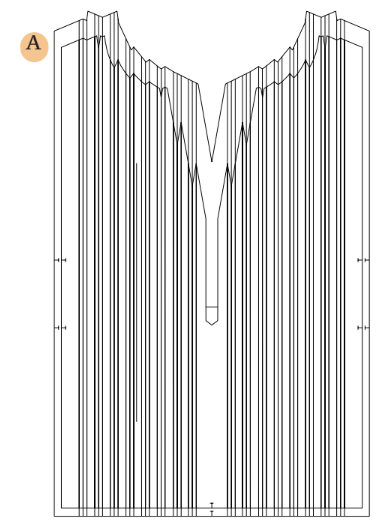
A. Center Front Bodice: Cut one fabric piece as per the pattern.
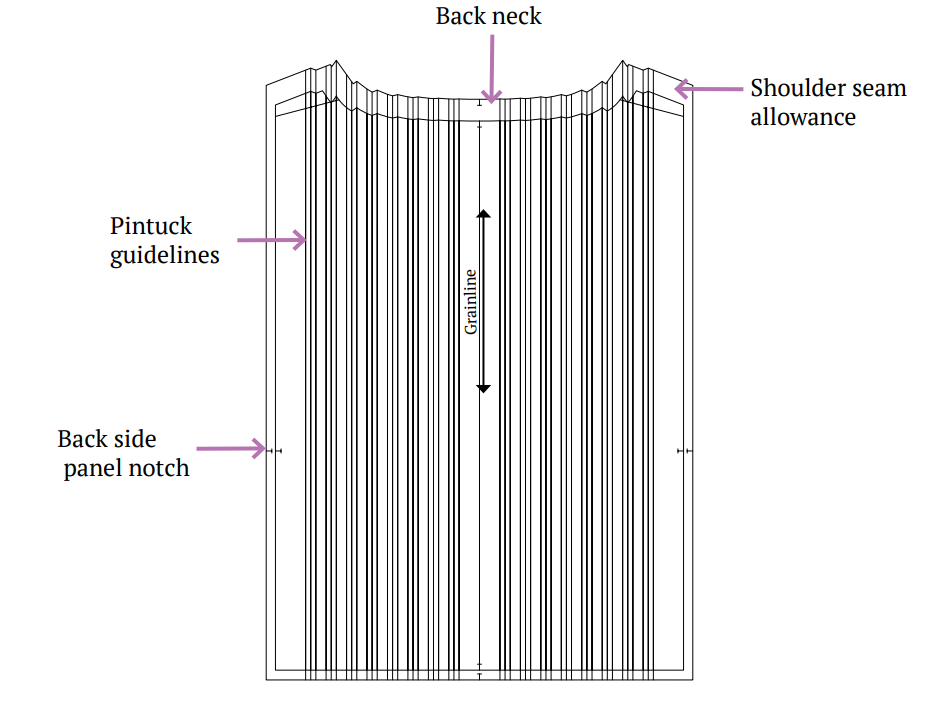
B. Center Back Bodice: Cut one fabric piece following the pattern.
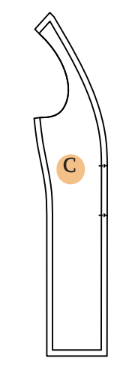
C. Side Front Bodice: Cut two fabric pieces based on the pattern.

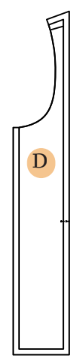
D. Side Back Bodice: Cut two fabric pieces using the pattern.
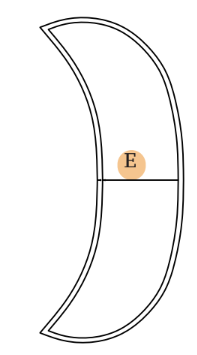
E. Sleeve: Cut two fabric sleeves following the pattern instructions.
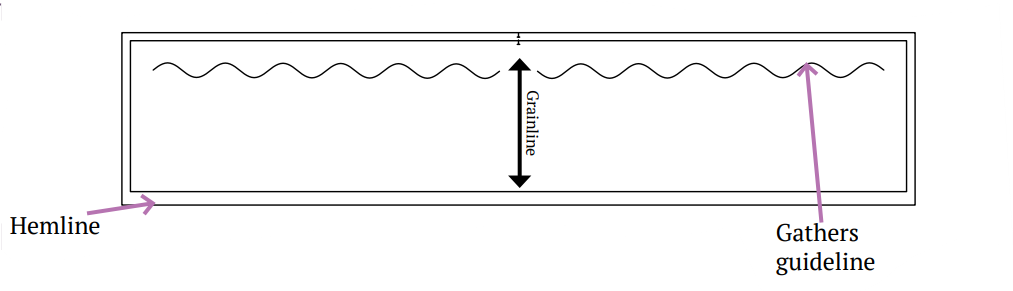
F. Bottom Dress Panel: Cut two fabric panels according to the pattern.

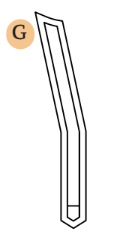
G. Front Placket: Cut four fabric pieces for the placket following the pattern instructions.
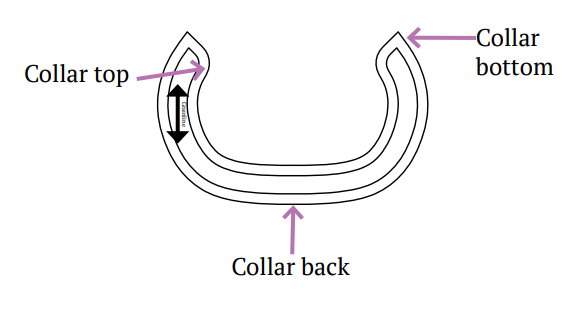
H. Collar: Cut two fabric collar pieces based on the pattern.

I. Armhole Binding: Cut two fabric strips for armhole binding as per the pattern.


Cutting Layout

- Ensure the pattern layout is on-grain for fabric alignment.
- Use pins to secure fabric, aiding accurate cutting.
- If using fabric with nap or prints, purchase additional length.
Sewing Steps
1. Create pintucks on the front and back bodice by folding the fabric along the designated pintuck lines, bringing the wrong sides together. Position the folded fabric beneath the presser foot and start sewing from the folded edge.

After completing the initial tuck, continue sewing along all the indicated lines until you reach the desired quantity of pintucks for the dress. Utilize the provided measurements for the front and back bodice as a reference.
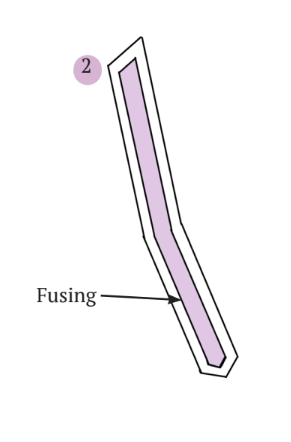
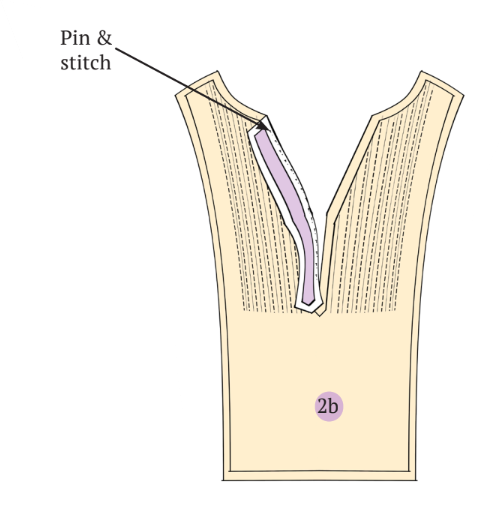
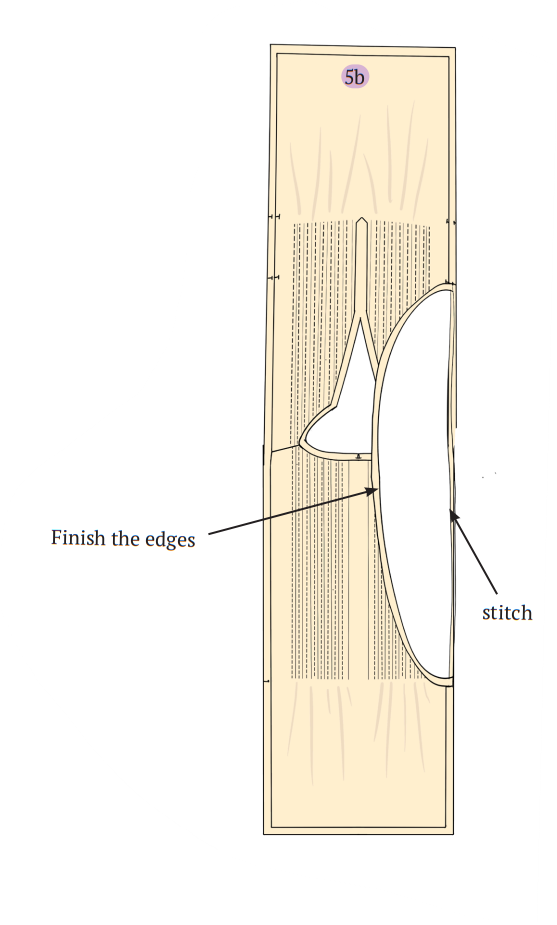
2. Cut the fusible material for the front placket pieces using the same pattern as the front placket, making sure to exclude any seam allowance. Place the fusible material with the adhesive side facing the wrong side of the fabric, aligning them together. Iron the pieces thoroughly to securely fuse the material onto the front placket.
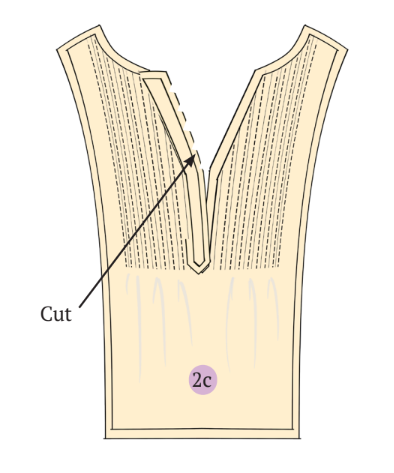
Cut along the center front where the placket is intended to be positioned, halting 1 inch before reaching the end of the placket.
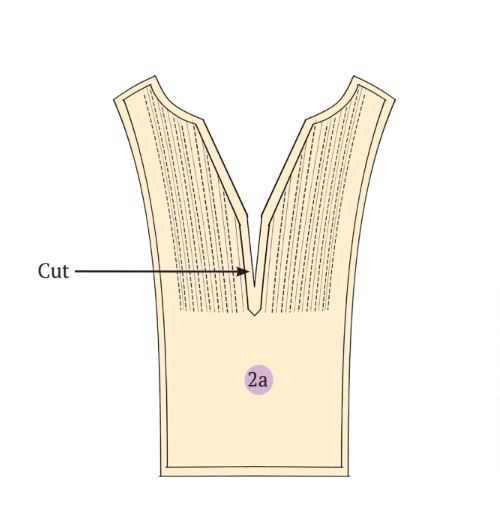
Affix the placket to the front bodice by aligning and pinning it with the right side facing the right side of the fabric, adhering to the markings provided in the pattern. Sew along the seamline, ensuring to stop and secure the stitch where the cut is located on the front bodice.
After completing the stitching, make 3 to 4 cuts into the seam allowance along the opening to achieve a well-finished seam. Open the placket and iron it thoroughly for a neat and polished appearance.
Connect the placket facing to the front placket by sewing along the designated seamline. Ensure proper alignment of the notches and stop sewing at the same point as previously indicated. Trim the seam allowance in 3 to 4 locations along the seam to achieve a tidy and polished appearance.
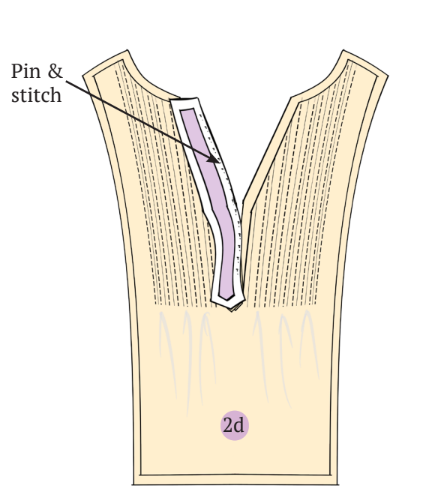
Unfold the placket, iron it thoroughly, and under-stitch along the placket joint for a polished finish. Repeat the identical procedure for the other side.
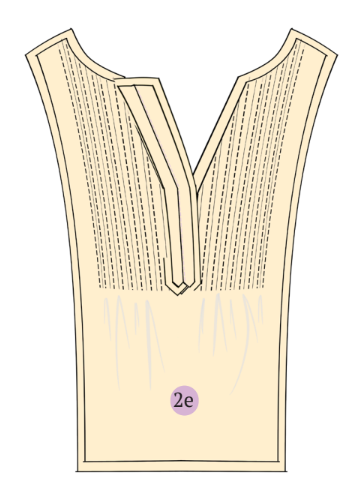
Fold the placket facing towards the wrong side, and use an iron to flatten and tidy the placket until it appears neat and well-pressed.
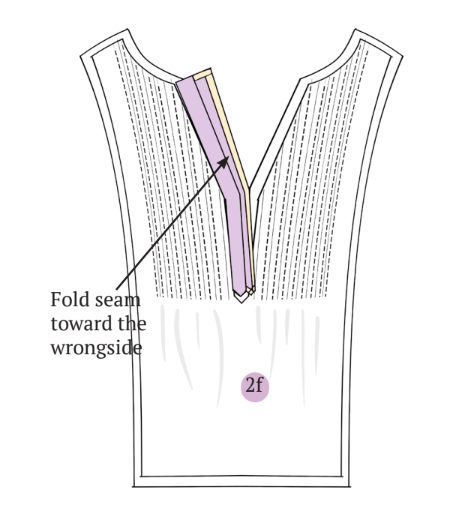
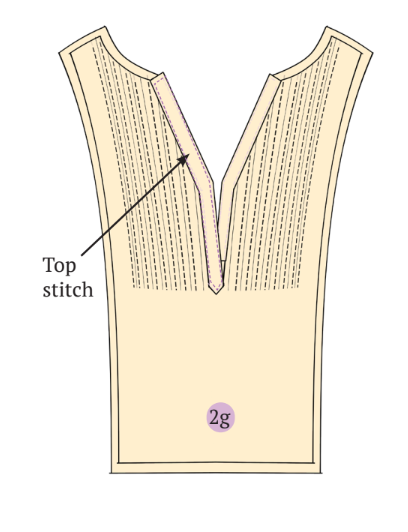
Fold the seam edges towards the wrong side starting from the seamline. Stitch the placket facing onto the wrong side and then proceed to top-stitch. Repeat this process for the entire placket.
Affix buttons to the front placket at intervals of 1 inch.
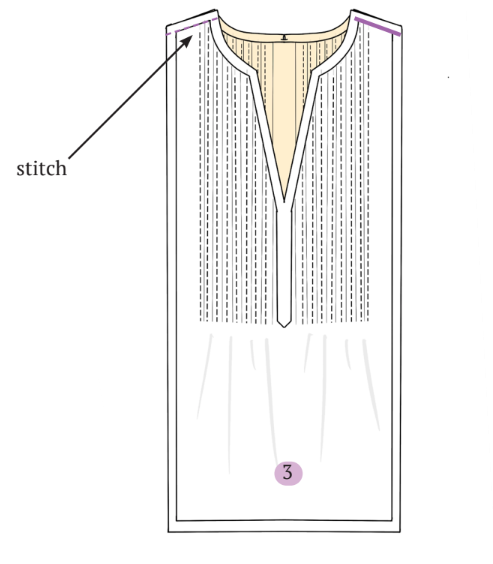
3. Join the shoulders by placing the back bodice on the front bodice with the right sides facing each other. Stitch along the seamline to secure them together.
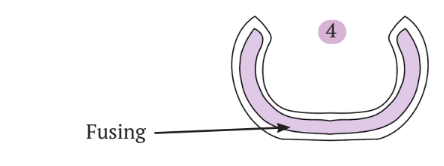
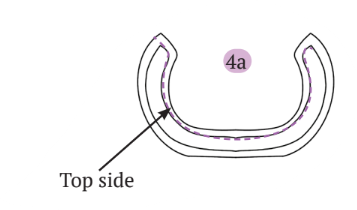
4. Prepare one of the collar pieces by cutting the fusible material following the same pattern as the collar, making sure to exclude any seam allowance. Place the fusing with the adhesive side against the wrong side of the fabric, align them together, and iron them thoroughly to fuse the material onto the collar.
Join the collar pieces by stitching them together on the top side. Align the collar pieces with their right sides facing each other, then sew along the top side of the collar seamline.
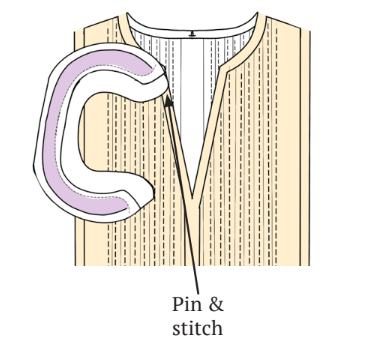
Attach the collar to the bodice by aligning the collar seam with the bodice neckline seam, ensuring the right sides are facing each other. Start stitching from the edge of the neckline, following the curved seamline, and make sure to connect the back notches together.
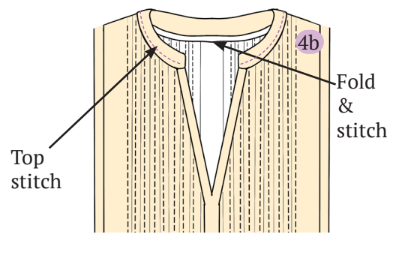
Turn the collar so that the facing is on the wrong side, and then meticulously iron it to achieve a smooth and polished finish.
Stitch the bottom edge of the collar to the wrong side of the neckline by folding the collar edges inside, pinning them in place, and then sewing on top of the collar.
Complete a top stitch around the collar edge, maintaining a distance of 1⁄4″ or 5mm from the edge.
5. Complete the sleeve bottom edges by folding them twice from the seam allowance, pinning the folded edges, and then topstitching them for a finished look.
Secure the sleeve onto the center front and back bodice by aligning and matching the notches together. Sew the sleeve onto the bodice by placing the sleeve on top of the bodice with the right sides facing each other. Stitch along the seamline.
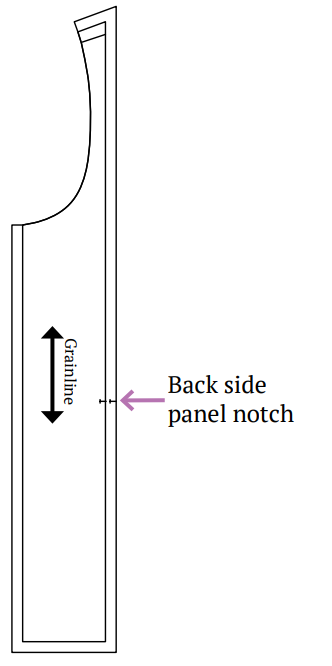
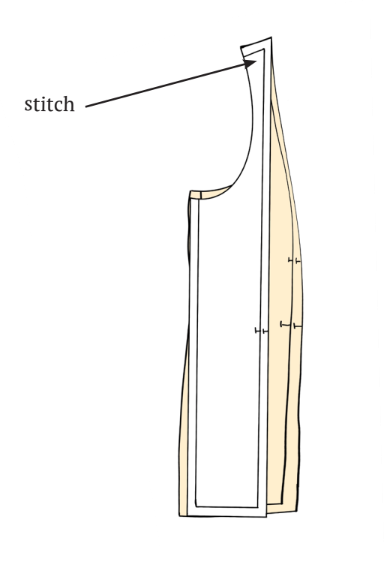
6. Stitch the shoulder of the front side piece and back side piece by placing them right sides together, then sew along the shoulder seamline.
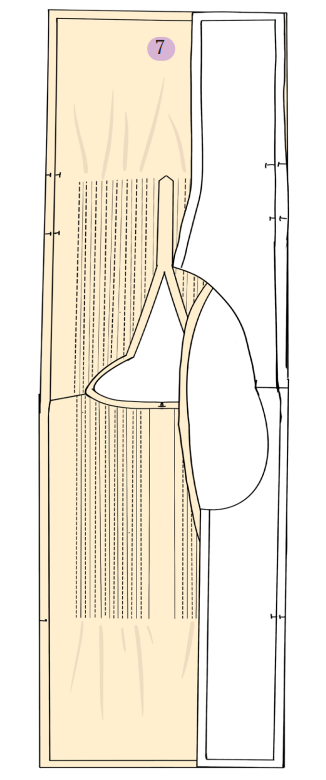
7. Connect the side bodice panel to the center bodice panel. Align the notches of the front side panel with the front center panel, and do the same for the back panels. Pin them together with right sides facing each other and stitch along the seamline. Repeat the same step for the other side panel.
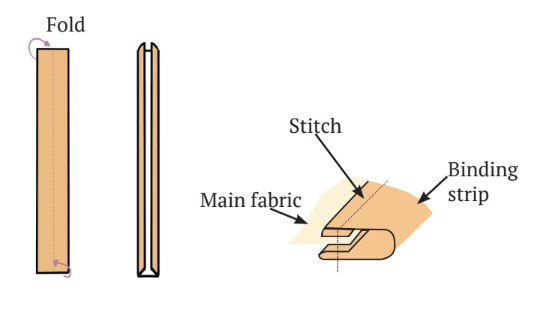
Bind the armhole using a binding strip. Position the binding strip on top of the armhole edge with right sides facing each other, matching the seam allowance. Pin them together and stitch along the seamline. Fold the remaining three sides of the binding strip towards the wrong side, iron them, and wrap the strip around the armhole edge. Top stitch along the binding strip to secure it in place.
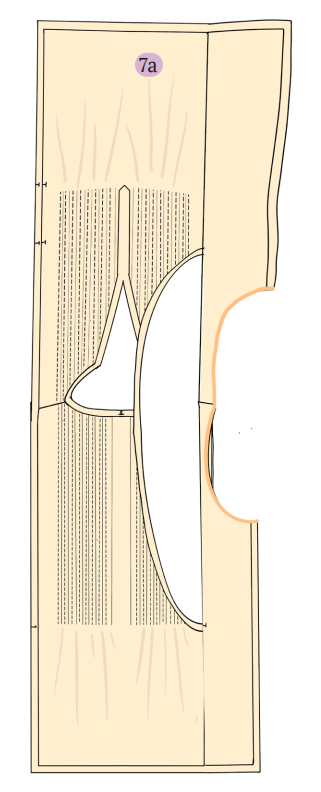
Tip: If you find yourself running short of binding strips, you can cut additional strips from the provided pattern.
8. Baste stitch around one bottom panel following the markings as indicated in the pattern.
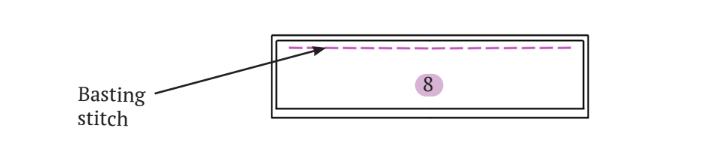
Pull one thread from the end of the stitch to create gathers on top. Adjust and even out the gathers so that the length matches the front bodice bottom length. Stitch on top to secure and lock the gathers in place. Repeat the same process for the back bottom panel.

Prepare the bottom frill panel by sewing the two panels together. Place one panel on top of the other with right sides facing each other and stitch on the right side of the panel.
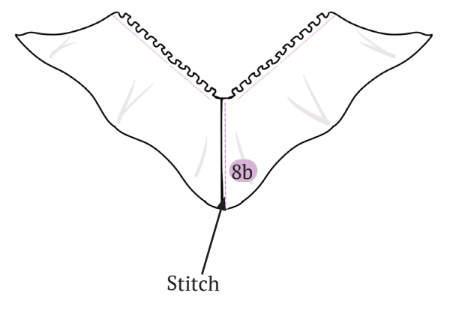
9. Sew the right side seam of the bodice panel by placing the right sides together. Ensure that you stitch along the right side seam.

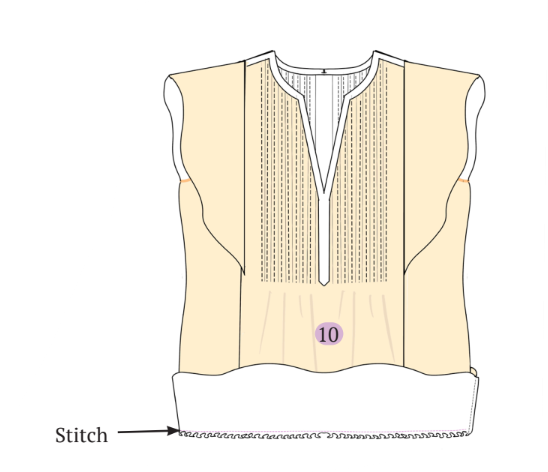
10. Attach the frill bottom to the bodice by placing the bottom frill panel on top of the bodice with right sides facing each other. Match the side seams together and pin them in place. Stitch along the seamline to secure the frill bottom to the bodice.
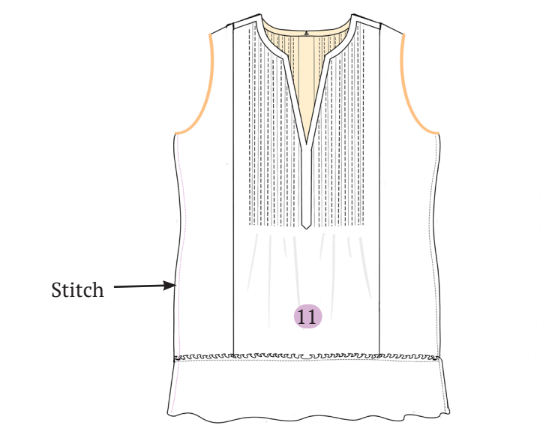
11. Complete the remaining side seam by placing the bodice with right sides together and stitching along the seamline.
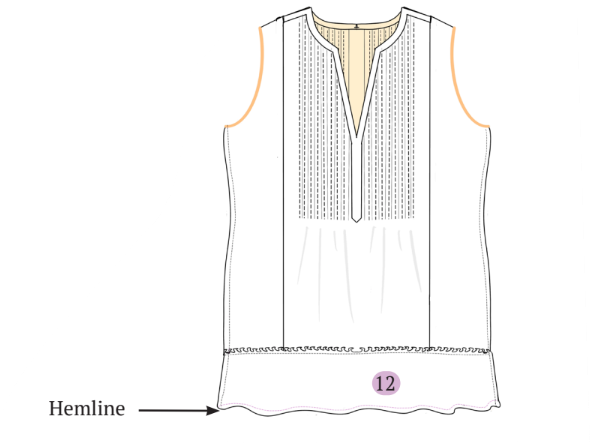
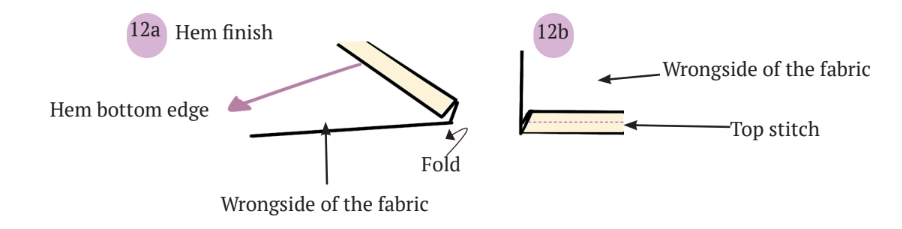
12. Complete the hem by folding it towards the wrong side of the fabric. Begin folding from the seamline, ensuring the edges are tucked inside the fold. Pin it in place and top stitch along the edge of the hemline.
Summary
A flutter sleeves dress suits various body types and can be effortlessly styled for both casual and formal occasions throughout the year. Pair it with a scarf, jacket, and booties for a stylish fall look, or accessorize with tights and a vibrant wool coat during the winter. Trust me, this dress is a must-make – it’s truly THE BEST!
Check out some final images of this adorable dress created with the Winslet’s EUPHORIA Flutter Sleeve Dress Pattern:
Love building your wardrobe – check more sewing projects here!
Join the Winslet sewing community by sharing your masterpiece with the hashtag #madewithwinslets!


