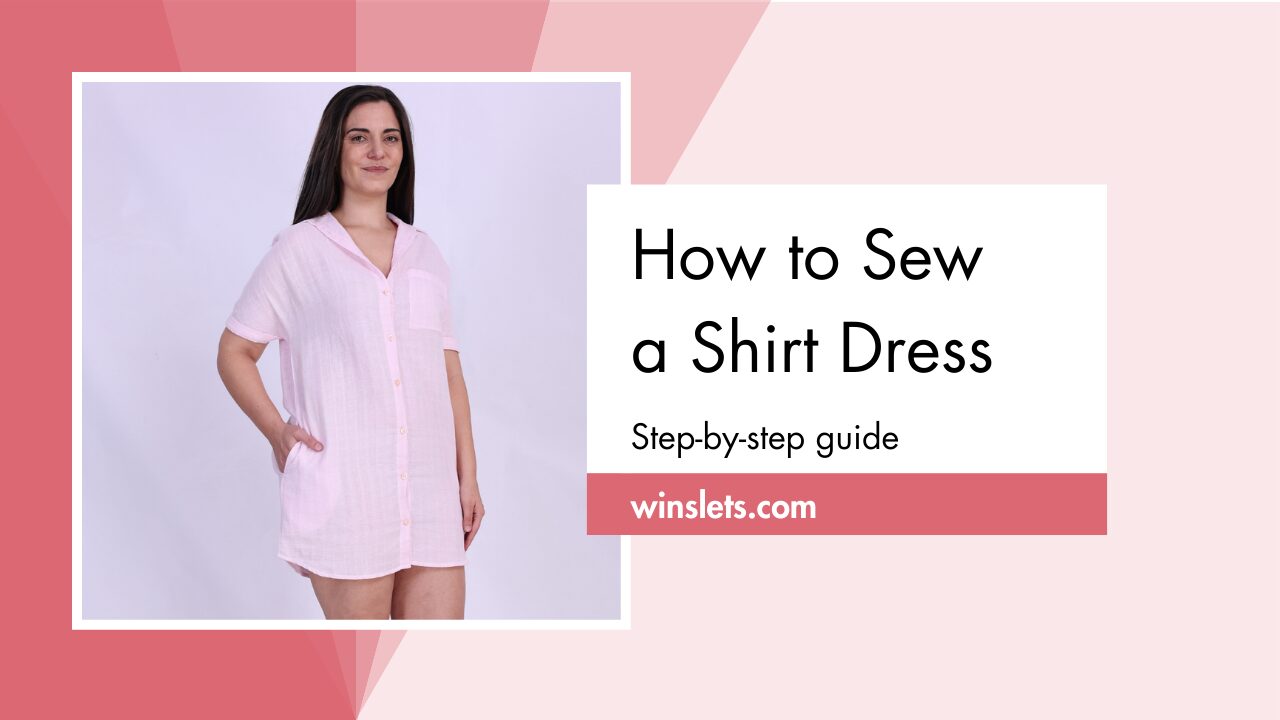
How to Sew a Shirt Dress?
Have you wondered how to sew a shirt dress?
I LOVE dresses! And the shirt dress is such a cute and fun dress! Ideal for a night out (with a belt to style it) or just kicking back around the house.
I used the Winslet’s CLAIRE Shirt Dress Pattern, and an incredibly comfy shirt fabric for this.
You can also use this pattern to cut out the different fabric parts and scale this shirt dress to fit your length choice. So let’s begin!
What sewing supplies do you need to sew a shirt dress?
The basic supplies you need to sew a shirt dress are Sewing Pattern (I used Winslet’s CLAIRE Shirt Dress Pattern in this example), Sewing Machine, Tape Measure, Chalk, Shears, Pins, Iron, Needles, Thread (preferably 3-ply polyester), Thread Cutter, Buttons, and Buttonhole Presser Foot.
Fabric Recommendation
There isn’t much fabric needed for this quick and simple sewing project. Your best bet can be light-weight fabrics, such as cotton, rayon, chambray, silk, or linen.
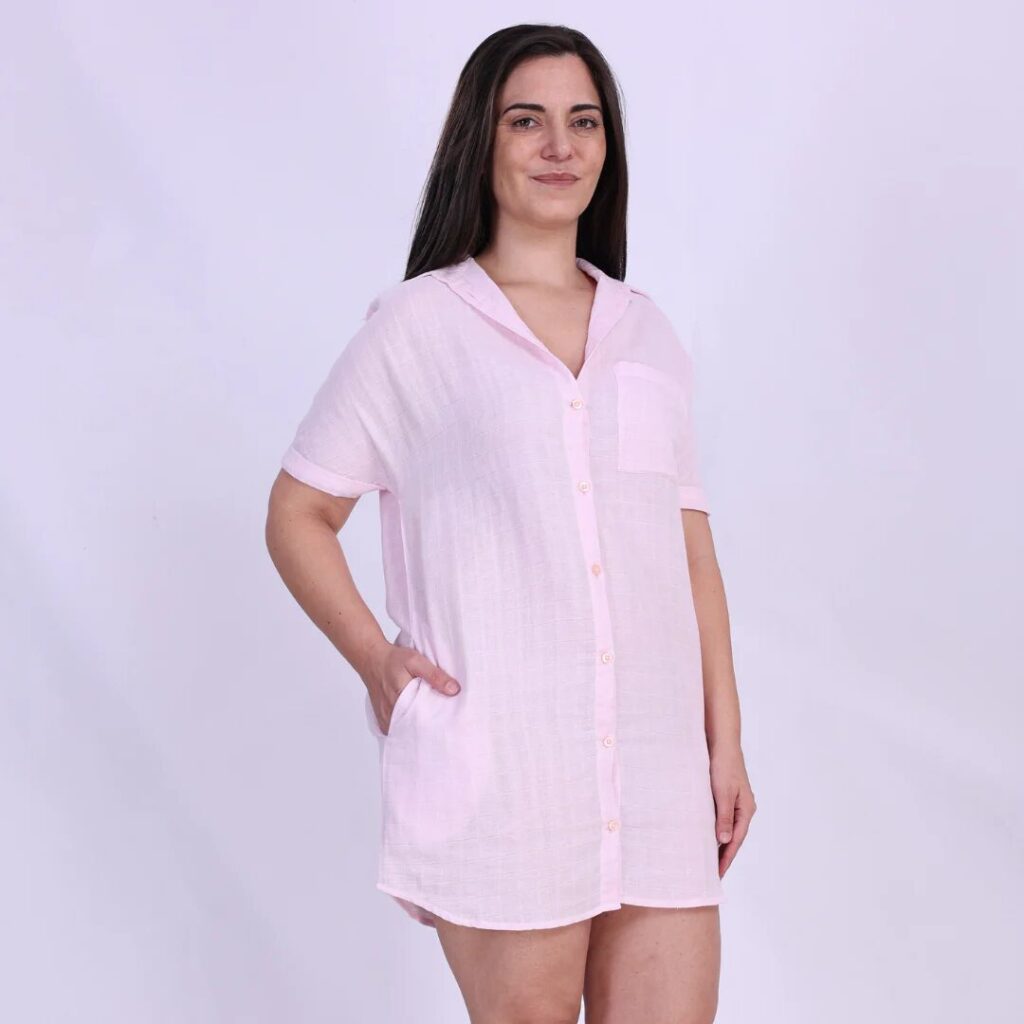
The model above features a shirt dress made with the Winslet’s CLAIRE Shirt Dress Pattern. The fabric used is a double cloth seersucker cotton that boasts qualities like being super light-weight, comfort, breathability, durability, and versatility. Ideal for warmer weather, its deliberate puckering often features checkered or striped patterns.
Size Charts
The shirt dress sewing pattern measurements for sizes (XS, S, M, L, XL, 2XL, or 3XL) are detailed below. Choose a size that corresponds most closely to your body measurements.
Measure the largest areas for the chest and hips, and for the waist, measure at its narrowest part just above the belly button.
It’s worth noting that if your exact measurements are not listed in the table, you may want to consider ordering a size larger.
The size chart includes measurements in both inches and centimeters for your reference.
Body Measurements
| XS (inches) | XS (cm) | S (inches) | S (cm) | M (inches) | M (cm) | L (inches) | L (cm) | XL (inches) | XL (cm) | 2XL (inches) | 2XL (cm) | 3XL (inches) | 3XL (cm) | |
| Bust | 32 | 81.3 | 34 | 86.4 | 36 | 91.4 | 38 | 96.5 | 40 | 101.6 | 42 | 106.7 | 44 | 111.8 |
| Waist | 26 | 66.0 | 28 | 71.1 | 30 | 76.2 | 32 | 81.3 | 34 | 86.4 | 36 | 91.4 | 38 | 96.5 |
Final Garment Measurements
| XS (inches) | XS (cm) | S (inches) | S (cm) | M (inches) | M (cm) | L (inches) | L (cm) | XL (inches) | XL (cm) | 2XL (inches) | 2XL (cm) | 3XL (inches) | 3XL (cm) | |
| Bust | 38.8 | 98.55 | 41.8 | 106.17 | 43.6 | 110.74 | 45.8 | 116.33 | 47.4 | 120.39 | 49.4 | 125.47 | 51.6 | 131.06 |
| Full Length | 34 | 86.36 | 34.5 | 87.63 | 35 | 88.9 | 35.3 | 89.66 | 35.7 | 90.67 | 36 | 91.44 | 36.5 | 92.71 |
| Sleeve Length | 9 | 22.86 | 9.4 | 23.87 | 9.9 | 25.14 | 10.3 | 26.16 | 11.1 | 28.19 | 11.3 | 28.7 | 11.7 | 29.71 |
Fabric Yield
| Width of the Fabric | XS (yards) | XS (meters) | S (yards) | S (meters) | M (yards) | M (meters) | L (yards) | L (meters) | XL (yards) | XL (meters) | 2XL (yards) | 2XL (meters) | 3XL (yards) | 3XL (meters) |
| 45” | 1.60 | 1.46 | 1.88 | 1.72 | 2.21 | 2.02 | 2.54 | 2.32 | 2.92 | 2.67 | 3.36 | 3.07 | 3.86 | 3.53 |
| 60” | 1.21 | 1.10 | 1.42 | 1.30 | 1.67 | 1.53 | 1.92 | 1.76 | 2.21 | 2.02 | 2.54 | 2.33 | 2.92 | 2.67 |
Steps To Follow For Sewing a Shirt Dress
Let’s dive into the steps for sewing your very own unique shirt dress:
Pattern Marking and Inventory
Once you have printed and assembled your pattern, you will cut:
A. Front – cut x2 fabric
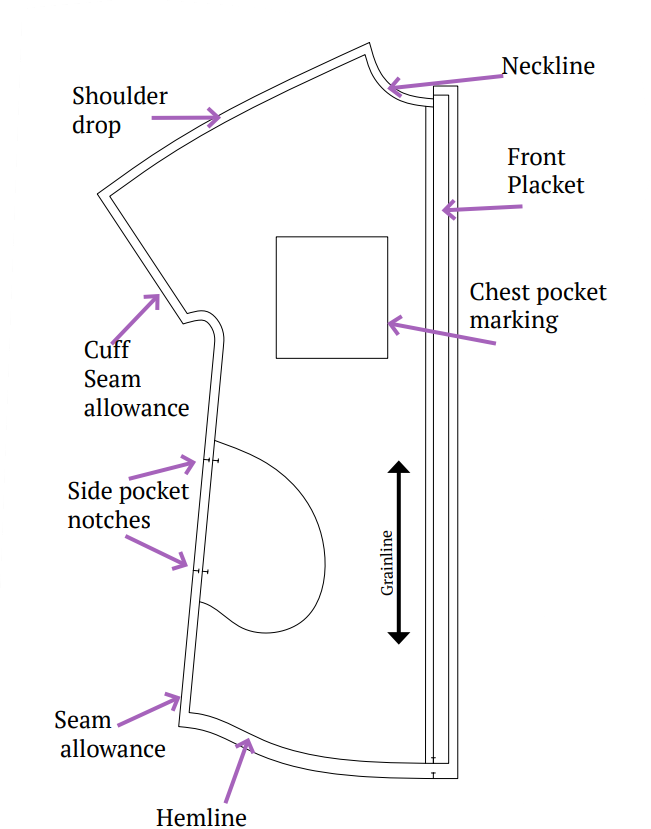
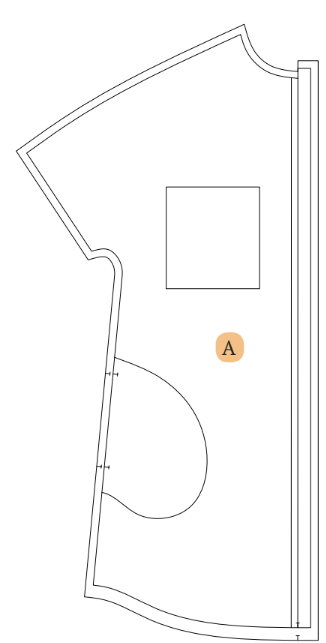
Identify and mark the front pattern on your fabric.
Cut two pieces, ensuring precision.
B. Back – cut x1 fabric
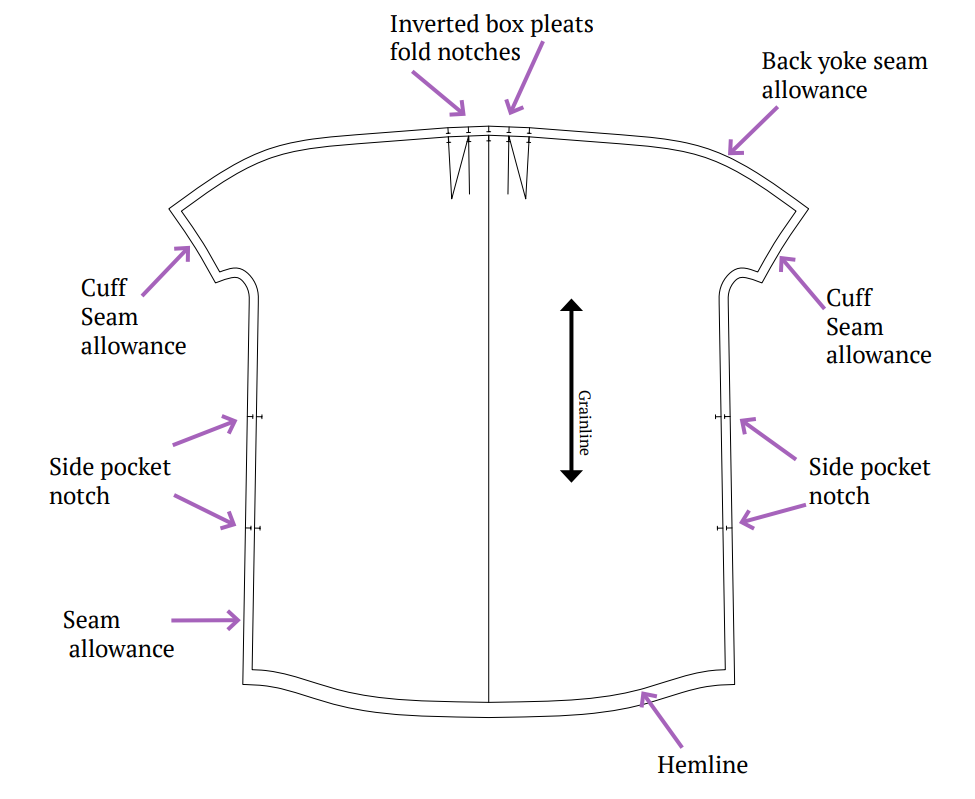
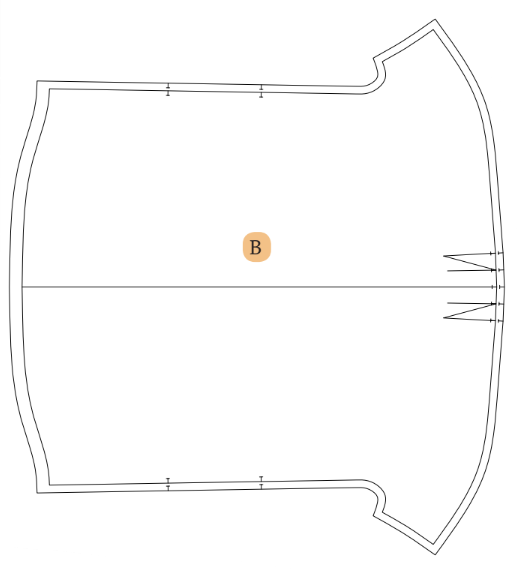
Locate and mark the back pattern on the fabric.
Cut a single piece as per the pattern.
C. Back Yoke – cut x1 fabric
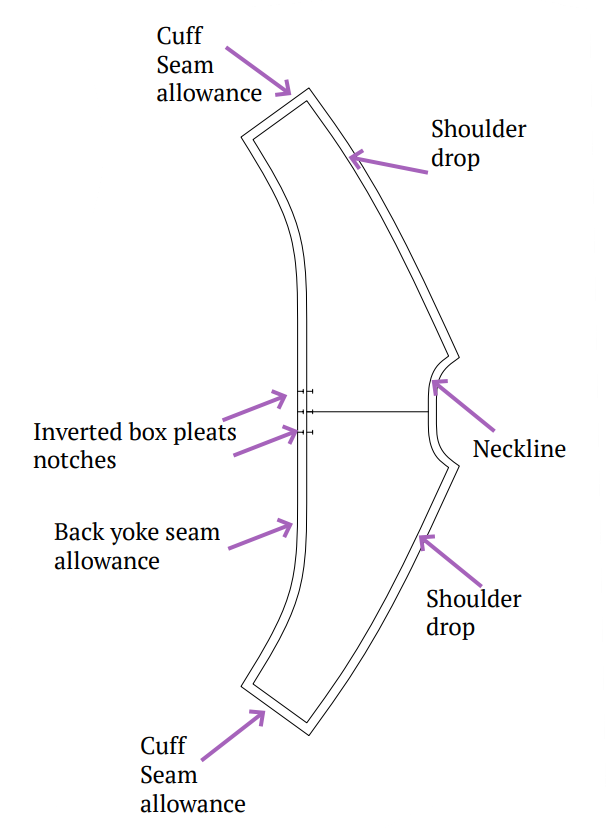
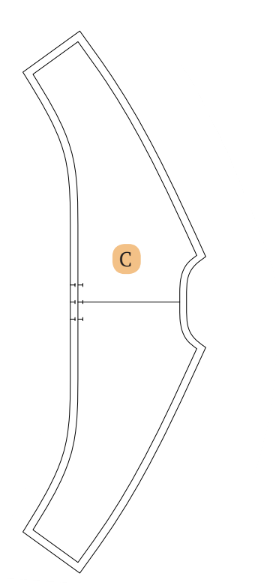
Identify the back yoke pattern and mark it.
Cut one piece from the fabric.
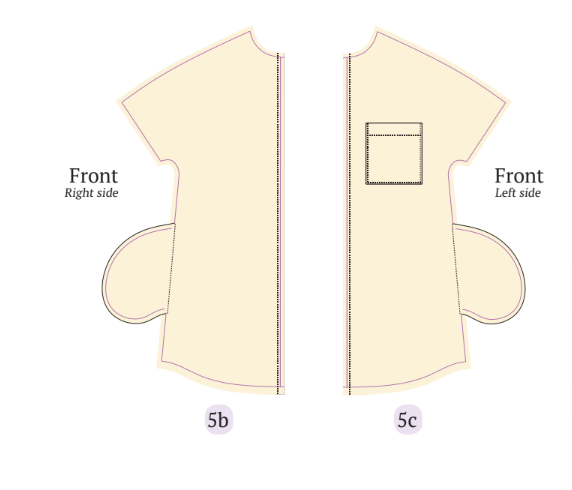
D. Chest Pocket – cut x1 fabric
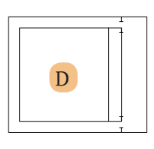
Mark the chest pocket pattern.
Cut one piece of fabric for the chest pocket.
E. Side Pocket – cut x4 fabric
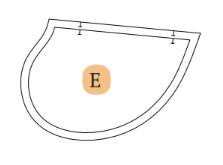
Mark and identify the side pocket pattern.
Cut four pieces of fabric for side pockets.
F. Cuff – cut x2 fabric
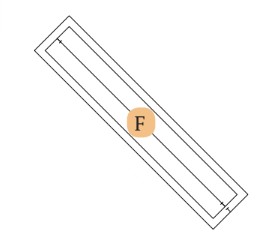
Locate the cuff pattern and mark it.
Cut two pieces of fabric for cuffs.
G. Collar – cut x2 fabric
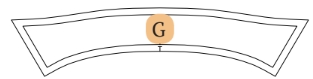
Identify the collar pattern and mark it.
Cut two pieces of fabric for the collar.
H. Collar Band – cut x2 fabric
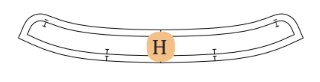
Mark the collar band pattern.
Cut two pieces of fabric for the collar band.
Cutting Layout
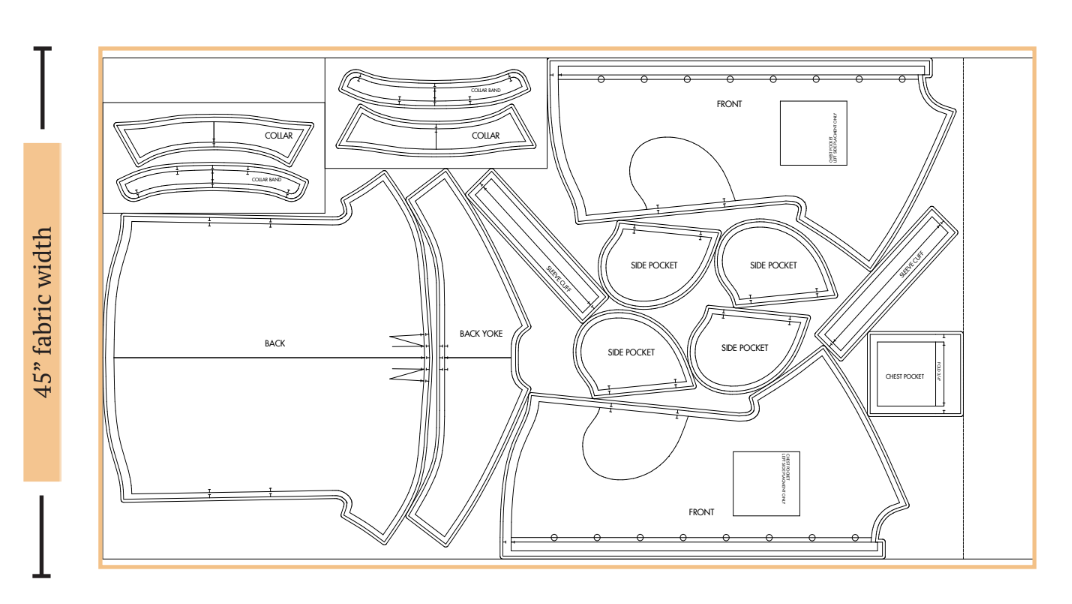
- Ensure the correct pattern layout for on-grain cutting.
- Use pins to secure patterns and cut shapes accurately.
- Pay attention to nondirectional layouts.
- If working with fabric with nap or prints, consider purchasing extra length.
Sewing Steps
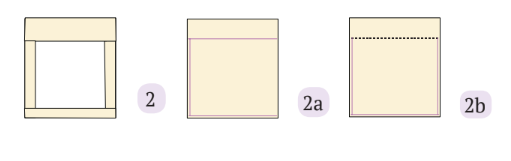
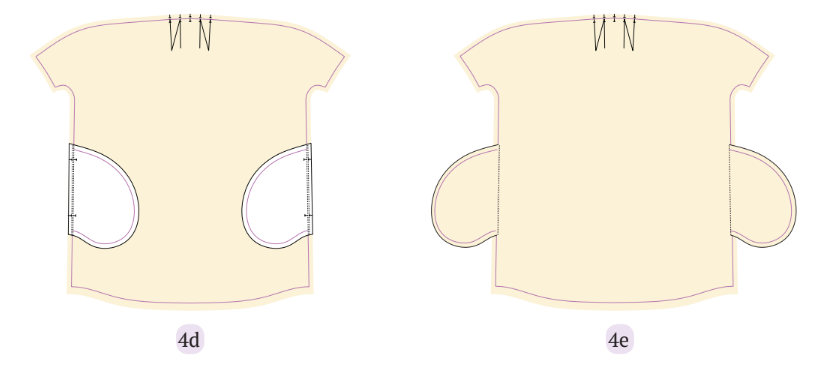
Step 1: Fold Chest Pocket Seam Allowance
Use an iron to create a neat crease along the chest pocket seam allowance.
Step 2: Sew Chest Pocket Top
Fold the top of the chest pocket at ¾” inches on the wrong side.
Sew to secure the fold.
Step 3: Attach Chest Pocket
Place the chest pocket on the marked spot on the front fabric.
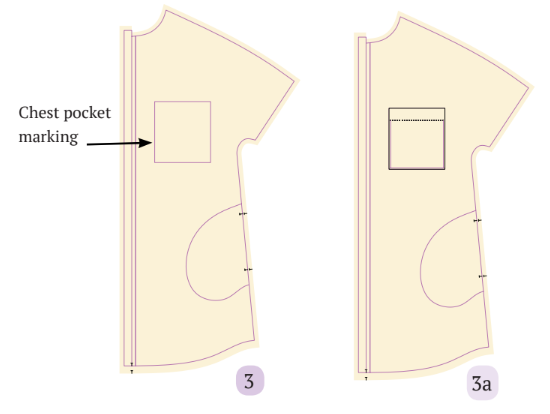
Sew from one end to the other, leaving the pocket opening unsewn.
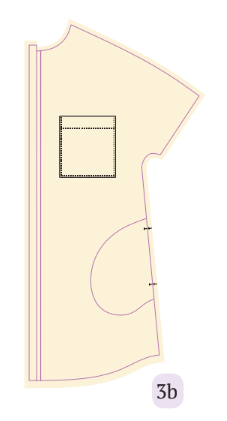
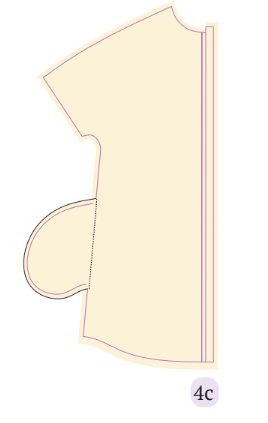
Step 4: Side Seam Pockets
Align side pockets at the given notches, right-on-right.
Sew on the seam line.
Turn the fabric wrong-on-wrong and secure the pocket by sewing the side pocket and front piece seam allowance together at the edge of the side seams line.
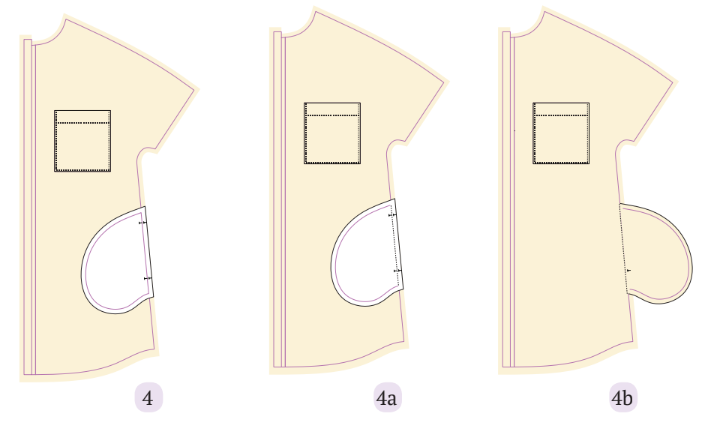
Repeat for the other three side seam pockets.
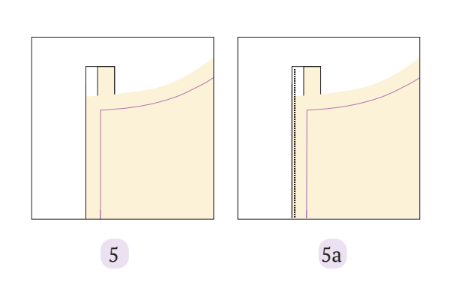
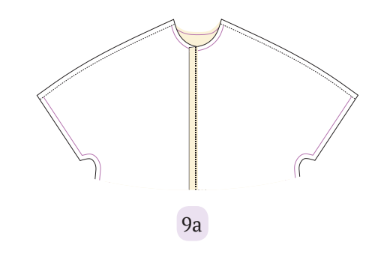
Step 5: Fold Placket Seam Allowance
Fold the placket seam allowance, and subsequently, fold along the placket’s folding line towards the wrong side of the front piece.
Step 6: Create Box Pleat
Join the two notches from both sides to the middle notch.
Pin and sew on the seam line to create an inverted box pleat.

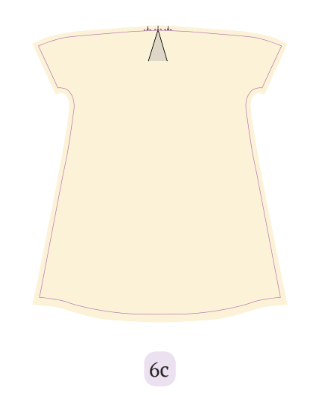
Tip: Ensure the seam line lengths for both the yoke and back are the same after creating the pleat.
Step 7: Attach Back Yoke
Place the back yoke on the back piece, right sides together.
Pin at the seam allowance and sew both pieces together.
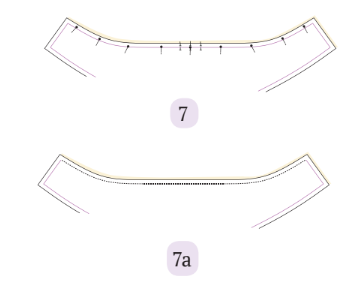
Flatten the seam allowances with an iron and proceed to sew along the edge of the yoke to firmly secure the yoke and back pieces together.
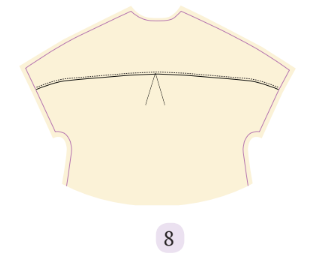
Step 8: Join Front and Back Bodice
Place one front and back facing right-on-right.
Sew the shoulders together.
Repeat this step for the other front piece.
Step 9: Sleeve Cuff
Match the sleeve cuff with the edges of the shirt dress’s sleeve hem, ensuring the right sides are facing each other.
Stitch them together along the designated seam line.
Turn the fabric, fold the seam allowance to complete the edge, and form a fold at the provided notch to conceal the wrong side of the sleeve cuff.
Sew the sleeve to close the cuff.
Repeat this process for the other side.
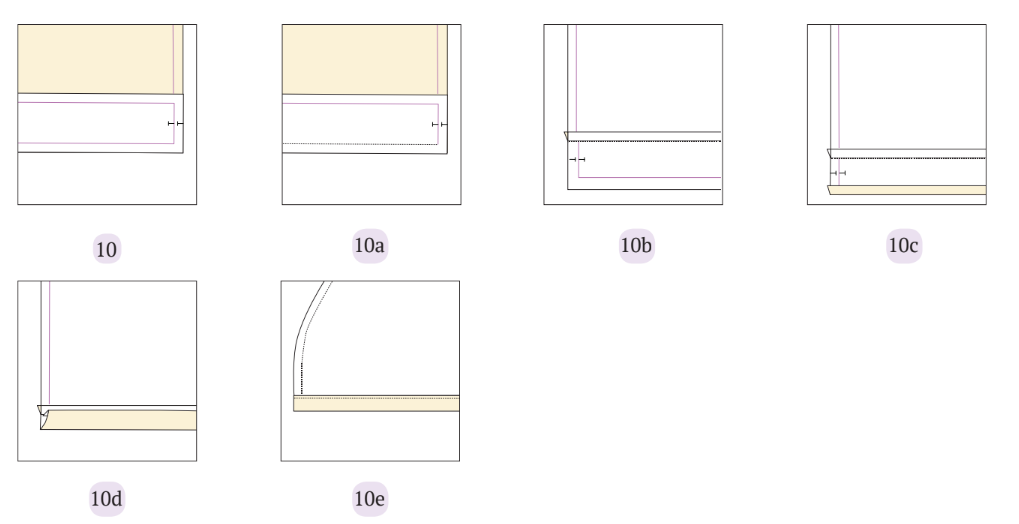
Step 10: Collar Assembly
Stitch both collar pieces together with their right sides facing, commencing from one corner of the collar band seam allowance and continuing to the opposite side corner of the seam allowance for the collar band.
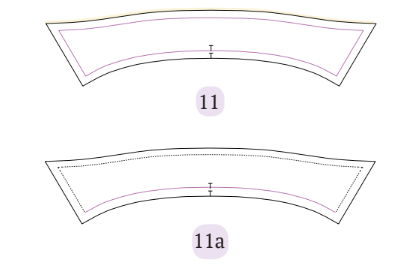
Trim the corners of the collar.
Invert it, ensuring that the wrong sides are facing each other.
Employ a pencil or a pointed tool to shape the corners of the collar for a clean and well-defined appearance.
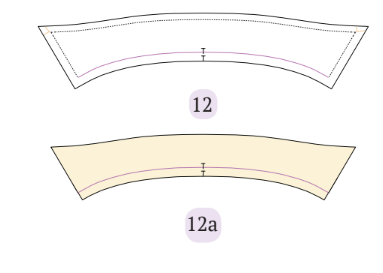
Step 11: Collar Band Preparation
Select one collar band piece, fold the neckline, and press it on the wrong side.
Utilize basting stitches to secure it in position.
Step 12: Complete Collar Assembly
Position both collar band pieces with their right sides together, sandwiching the collar in between them.
Stitch them together, closing both collar band pieces along the seam.
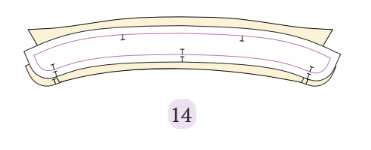

Turn the collar band inside out, then press it along the stitch line to create a well-defined and stable collar shape.
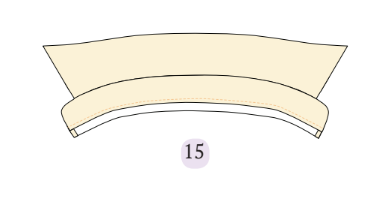
Step 13: Attach Collar to the Dress
Position the longer collar band on the neckline of the bodice, ensuring that the right sides are facing each other.
Secure them in place by using pins.
Stitch along the seam line, leaving the other collar band piece unsewn for the time being.
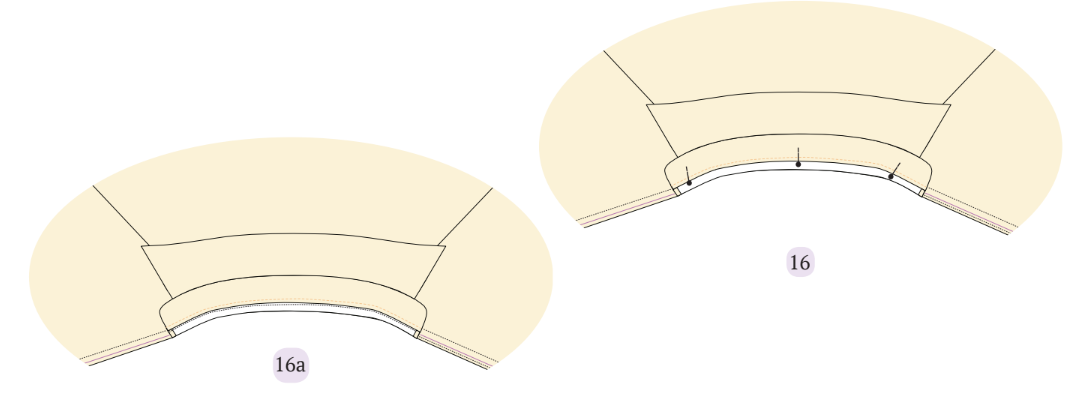
Step 14: Finish Collar Seam
Gently fold the seam allowances inward, enveloping the top collar band.
If necessary, use pins to secure the folded seam allowances, then proceed to sew them together to achieve a polished and finished appearance.
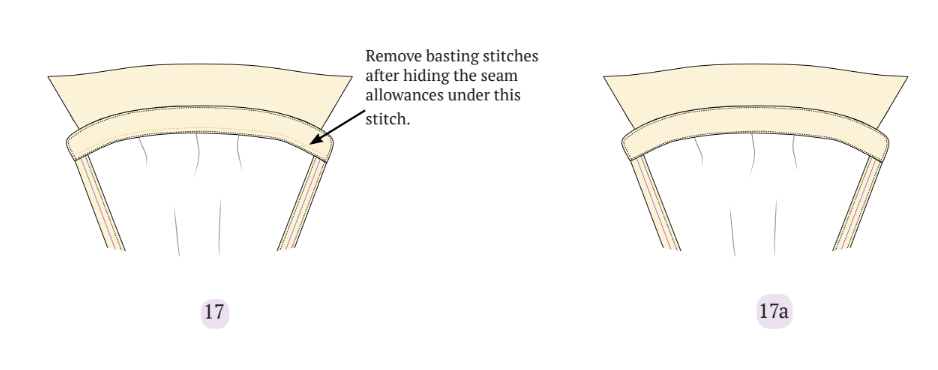
Step 15: Final Assembly
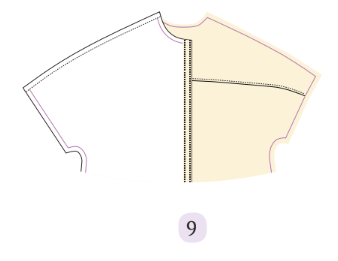
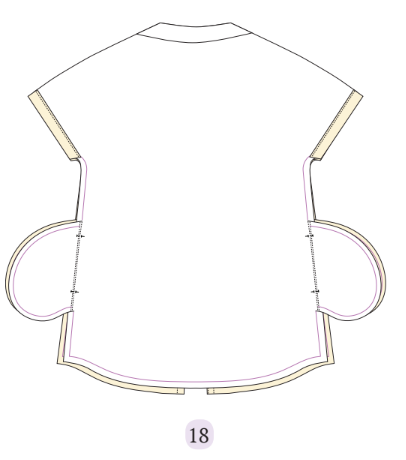
Position one front piece and one back piece with their right sides facing each other.
Secure them in place with pins.
Commence sewing from the sleeve end, extending to the pocket notch and following the curve of the pocket, then continue stitching down to the hem.
Duplicate this process for the other front piece.

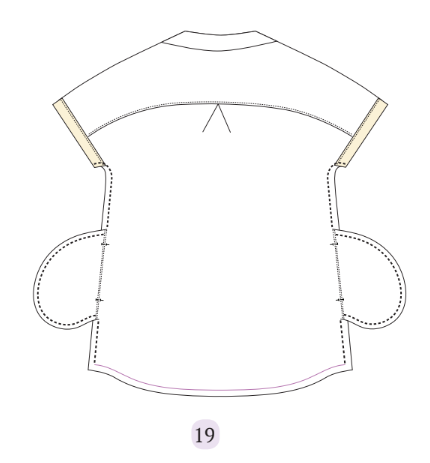
Step 16: Hem Finish
Fold the seam allowance at the hem twice, ensuring both folds are of the same width.
Press the folded hem with an iron to set it in place, and then secure it by pinning.
Stitch the hem from the front side of the fabric, ensuring a neat and secure finish.
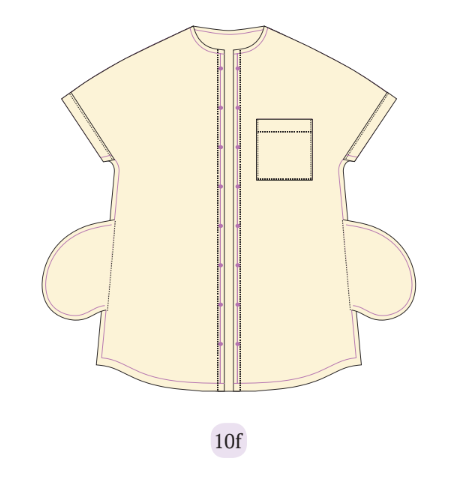
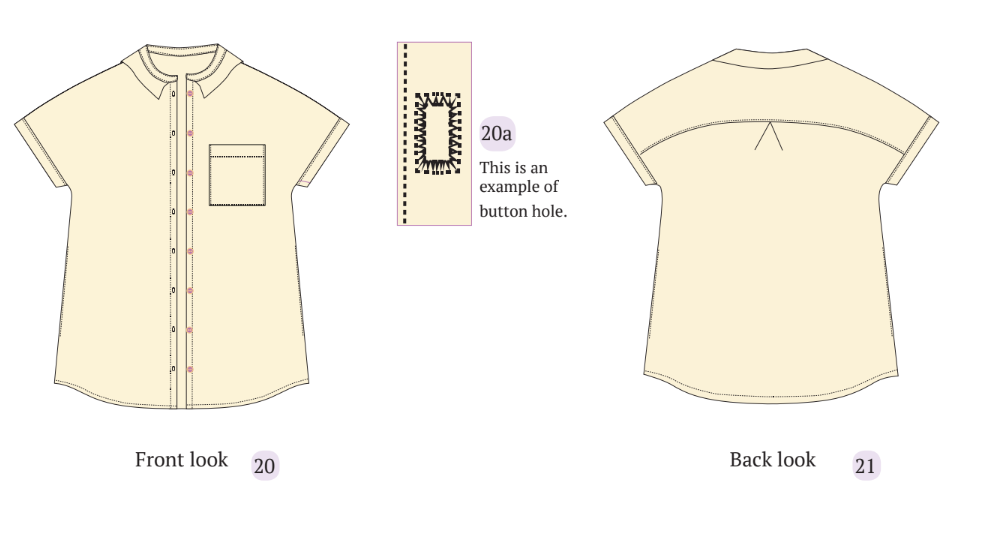
Step 17: Buttonhole and Buttons
Attach a button presser foot to your sewing machine and generate a buttonhole at the designated marking.
Attach all the buttons on the left side, following the provided markings, using your sewing machine or hand-sewing them securely in place.
Summary
And that’s it! Now you know how to make a shirt dress. This will be your go-to summertime outfit because it’s so adorable and playful. To be prepared for the warmer months, make a few of them in a variety of fabrics and patterns.
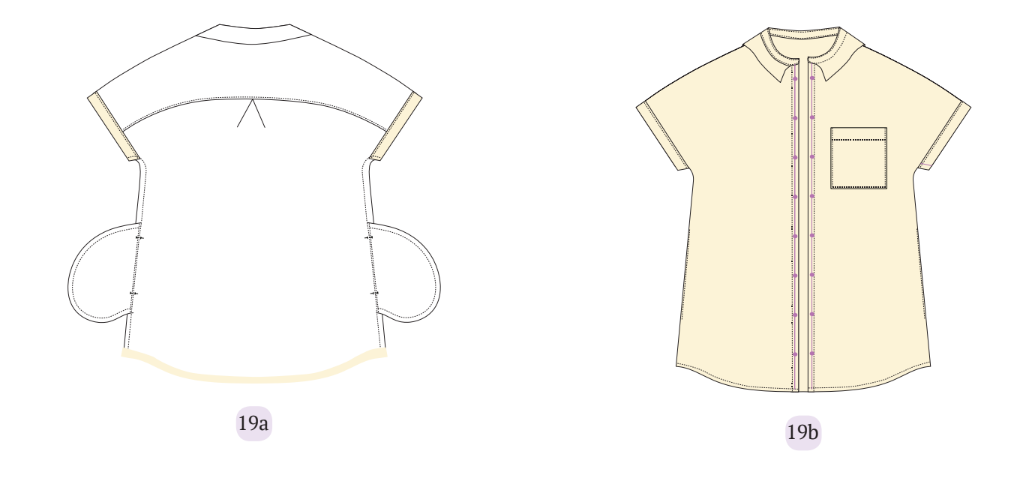
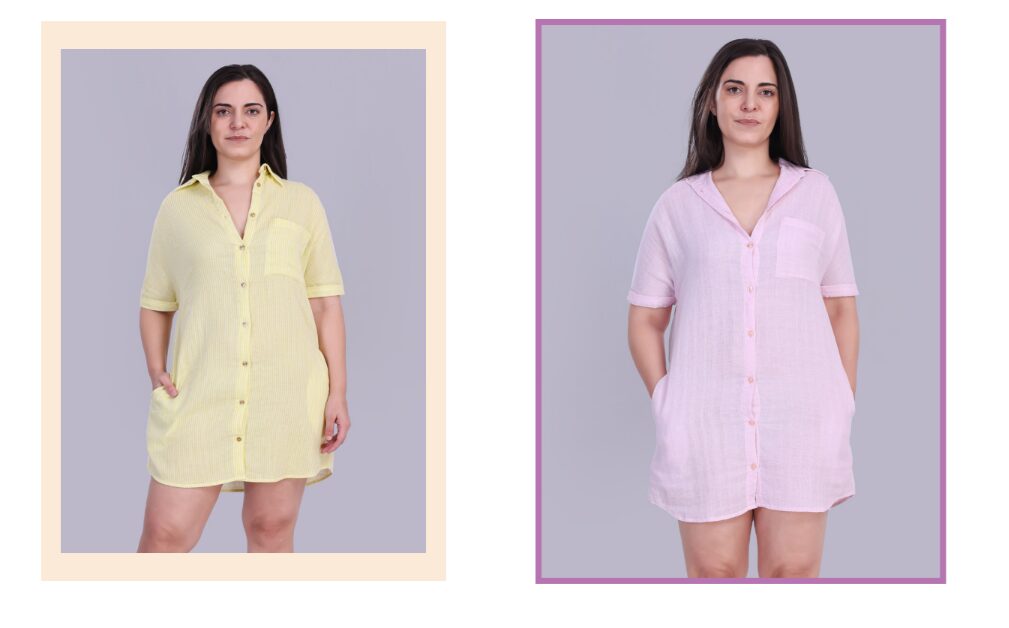
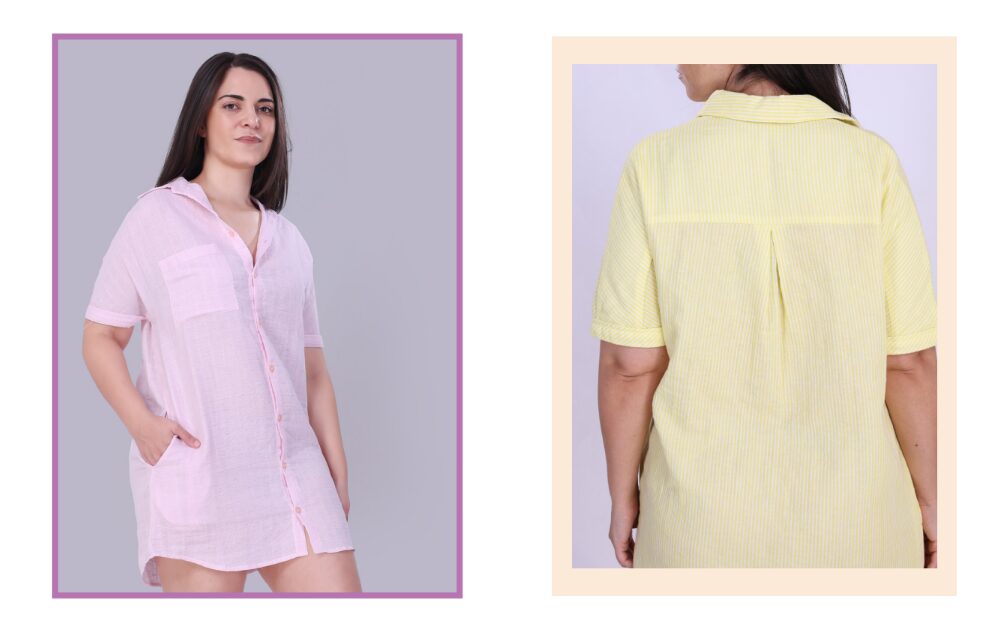
Check out some final images of this adorable shirt dress created with the Winslet’s CLAIRE Shirt Dress Pattern:
Make sure to share the Winslet’s CLAIRE Shirt Dress Pattern with your friends on social media or pin it to your preferred Pinterest board if you enjoyed learning how to sew a shirt dress.
If you choose to DIY this easy sewing project, be sure to snap a photo and post us on social media afterwards! We love seeing what types of colors and fabrics people choose!
Join the Winslet sewing community by sharing your masterpiece with the hashtag #madewithwinslets!


