How to Sew a Skater Skirt?
Have you wondered how to sew a skater skirt? Skater skirts are flared skirts inspired by figure skaters. Comfortable and easy to move in, they’re perfect for various occasions, from casual outings to semi-formal events.
I’ve used Winslet’s POPPY Skater Skirt Pattern for creating my skater skirt. From selecting the perfect fabric to mastering essential sewing techniques, this tutorial will provide you with all the necessary instructions and tips to bring your skater skirt vision to life.
So, grab your materials and let’s start sewing this super easy garment.
What supplies do you need to sew a skater skirt?
The basic supplies that you’ll need to sew a skater skirt are a Sewing Pattern (I used Winslet’s POPPY Skater Skirt Pattern for this project but you can find more skirt patterns here), Sewing Machine, Tape Measure, Chalk, Shears, Pins, Iron, Needles, Thread (preferably 3-ply polyester), Thread Cutter, Zipper (8 inch), and Fusible Interfacing.
Fabric Recommendation
Consider using light to medium weight fabric, such as 100% cotton, cotton blend, cotton twill, silk blend, crepe, georgette, and viscose for the skater skirt. Light to medium weight fabrics are perfect for sewing skater skirts as they drape elegantly, maintain the skirt’s flared silhouette, and offer comfort and ease of movement.

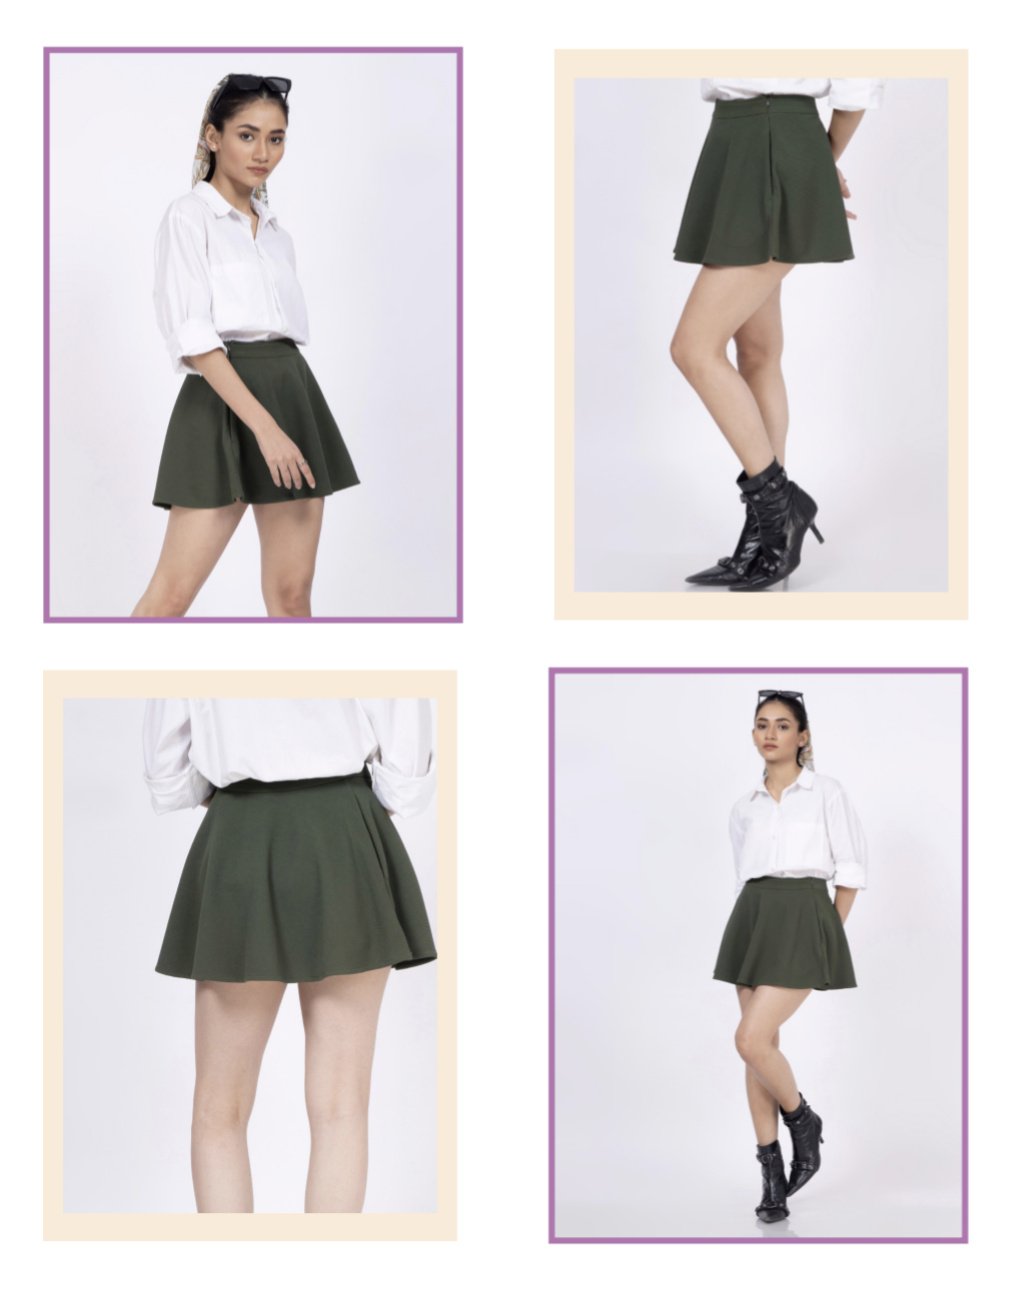
The model above is wearing a skater skirt made from Winslet’s POPPY Skater Skirt Pattern. The skirt is made from 100% polyester waffle knit fabric, highly recommended for its breathability, durability, moisture-wicking properties, machine washability in cold water with low-heat tumble drying, resistance to creases, and ease of ironing.
Size Charts
The skater skirt sewing pattern measurements for sizes (XS, S, M, L, XL, 2XL, or 3XL) are detailed below. Choose a size that corresponds most closely to your body measurements.
It’s worth noting that if your exact measurements are not listed in the table, you may want to consider ordering a size larger.
The size chart includes measurements in both inches and centimeters for your reference.
Body Measurements
| XS (inches) | XS (cm) | S (inches) | S (cm) | M (inches) | M (cm) | L (inches) | L (cm) | XL (inches) | XL (cm) | 2XL (inches) | 2XL (cm) | 3XL (inches) | 3XL (cm) | |
| Bust | 32 | 81.3 | 34 | 86.4 | 36 | 91.4 | 38 | 96.5 | 40 | 101.6 | 42 | 106.7 | 44 | 111.8 |
| Waist | 26 | 66.0 | 28 | 71.1 | 30 | 76.2 | 32 | 81.3 | 34 | 86.4 | 36 | 91.4 | 38 | 96.5 |
| Hip | 34 | 86.4 | 36 | 91.4 | 38 | 96.5 | 40 | 101.6 | 42 | 106.7 | 44 | 111.8 | 46 | 116.8 |
Final Garment Measurements
| XS (inches) | XS (cm) | S (inches) | S (cm) | M (inches) | M (cm) | L (inches) | L (cm) | XL (inches) | XL (cm) | 2XL (inches) | 2XL (cm) | 3XL (inches) | 3XL (cm) | |
| Waist Round | 26 | 66.04 | 28 | 71.12 | 30 | 76.2 | 32 | 81.28 | 34 | 86.36 | 36 | 91.44 | 38 | 96.52 |
| Full Length (with waistband) | 13.75 | 34.9 | 14.25 | 36.2 | 14.75 | 37.5 | 15.25 | 38.74 | 15.75 | 40 | 16.25 | 41.28 | 16.75 | 42.55 |
Yardage Chart
| Width of the Fabric | XS (yards) | XS (meters) | S (yards) | S (meters) | M (yards) | M (meters) | L (yards) | L (meters) | XL (yards) | XL (meters) | 2XL (yards) | 2XL (meters) | 3XL (yards) | 3XL (meters) |
| 45” | 0.99 | 0.90 | 1.66 | 1.06 | 1.34 | 1.22 | 1.54 | 1.41 | 1.77 | 1.62 | 2.04 | 1.86 | 2.34 | 2.14 |
| 60” | 0.76 | 0.70 | 0.90 | 0.82 | 1.03 | 0.94 | 1.18 | 1.08 | 1.36 | 1.25 | 1.57 | 1.43 | 1.80 | 1.65 |
Steps To Follow For Sewing a Skater Skirt
The Winslet’s POPPY Skater Skirt Pattern is suitable for printing on both A4 and A0 size paper:
- Print at home: A4 Pattern
- Print at a copy shop: A0 Pattern
Let’s dive into the steps for sewing your very own unique skater skirt:
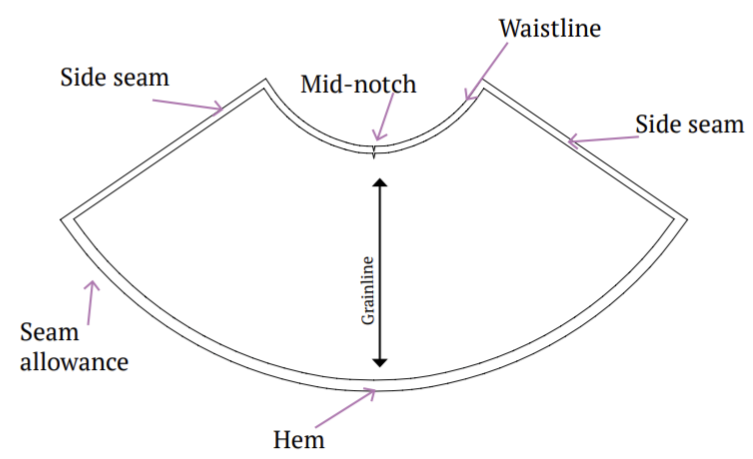
Pattern Marking and Inventory
The fabric needs to be cut into following pieces:
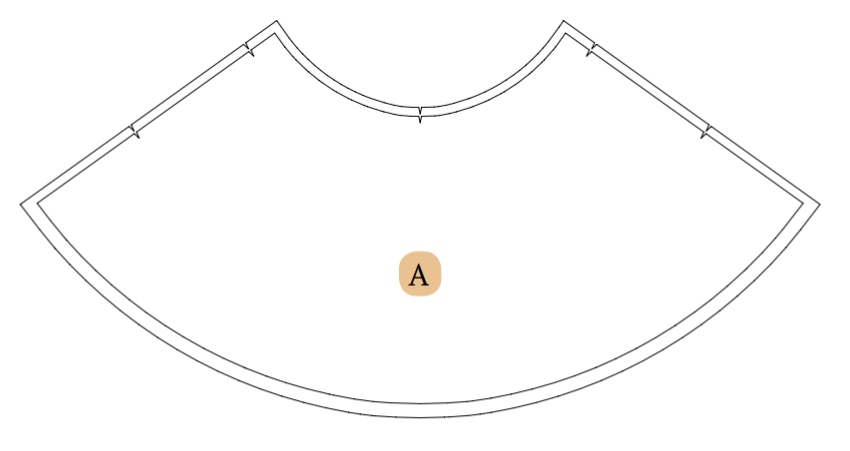
A. Front – cut x1 fabric

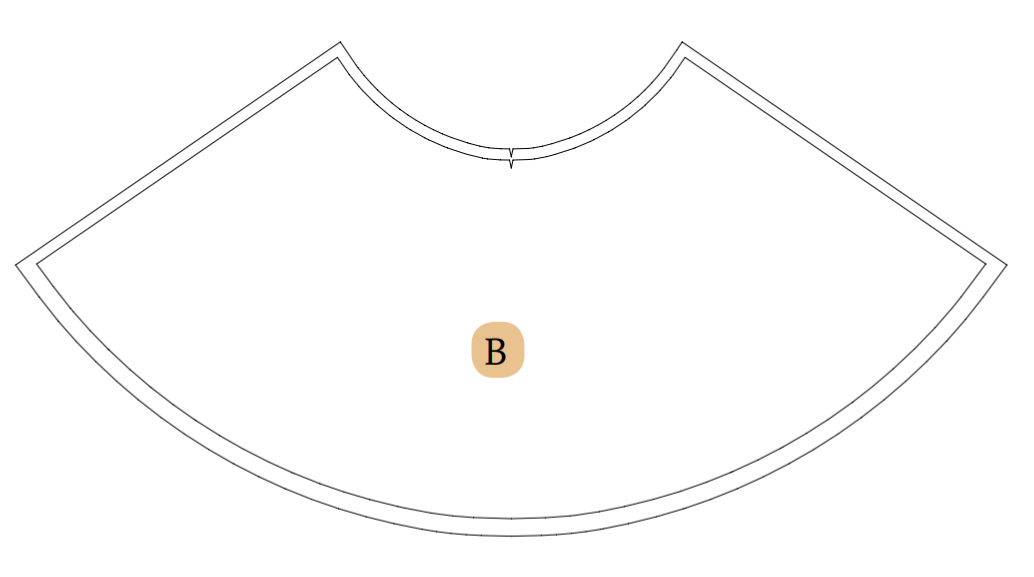
B. Back – cut x1 fabric
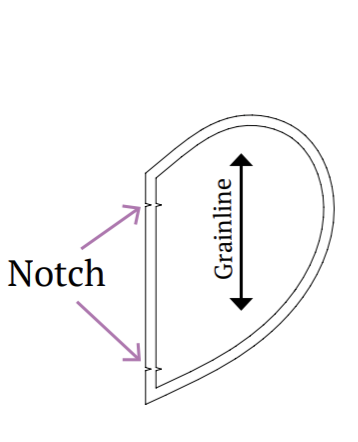
C. Side Pocket – cut x4 fabric

D. Front Waistband – cut x2 fabric
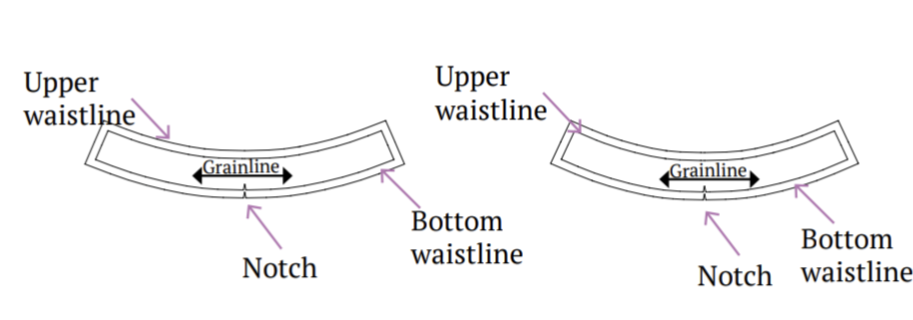
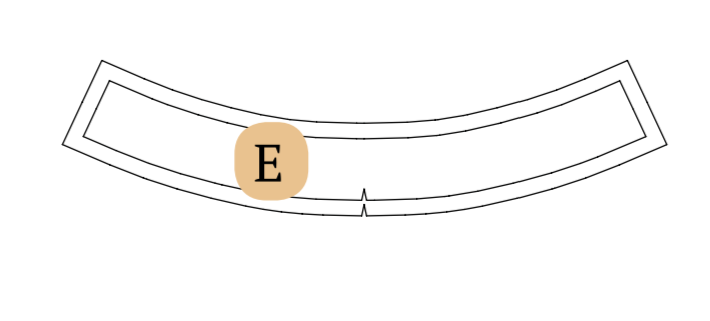
E. Back Waistband- cut x2 fabric
Cutting Layout
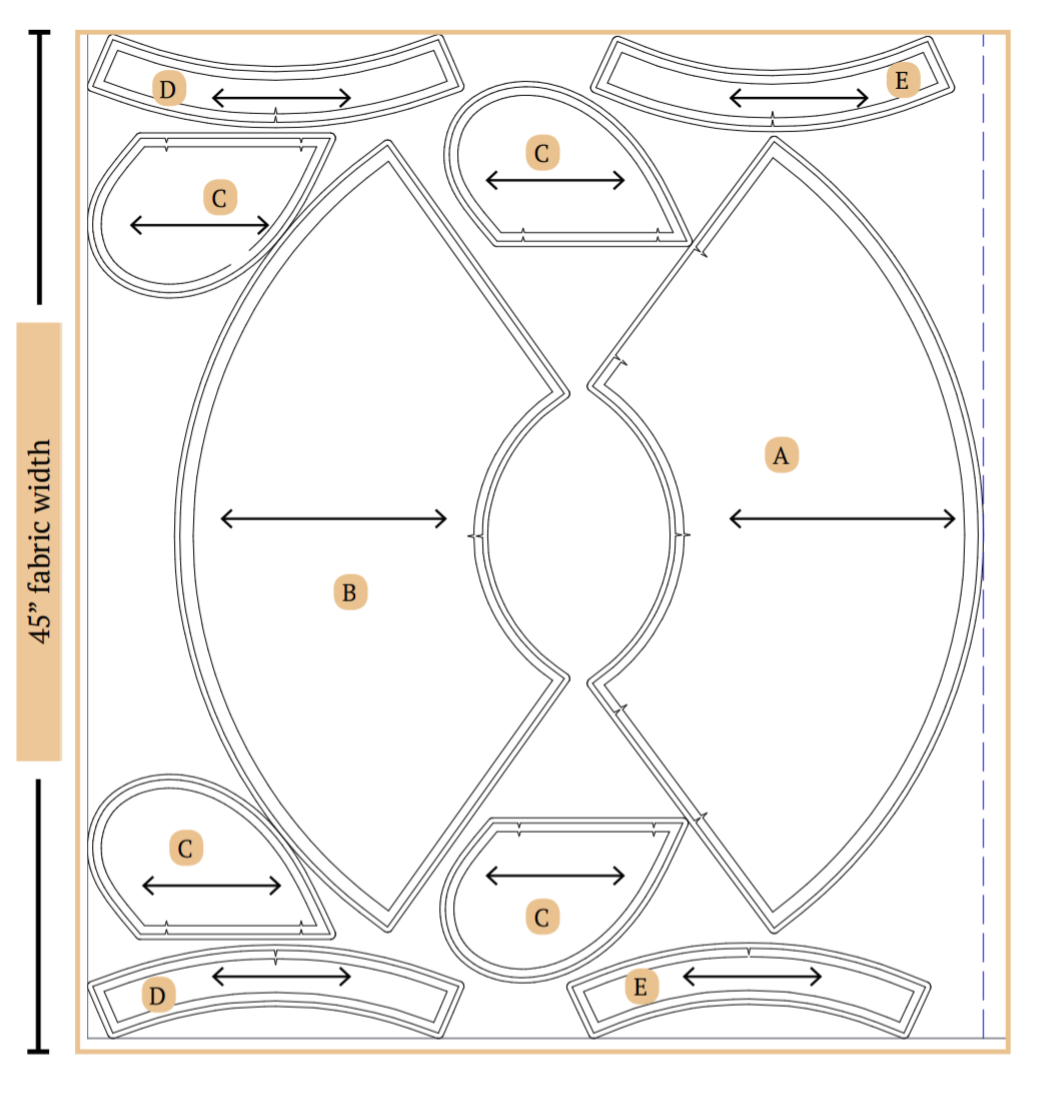
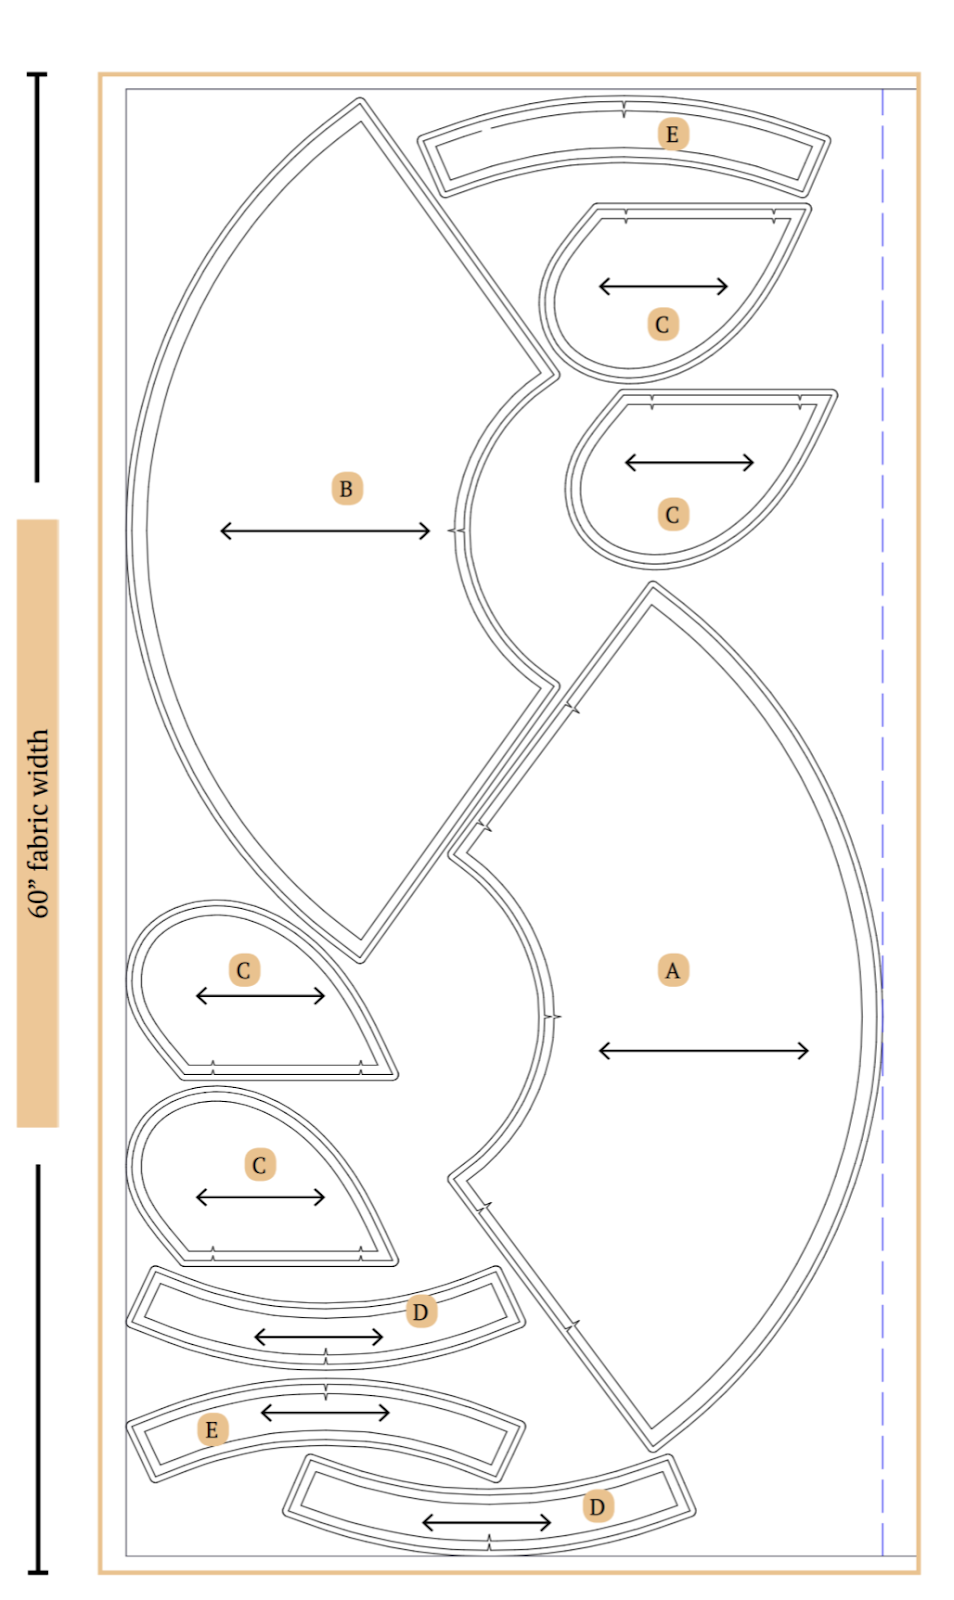
- Small size has been used for representation of this cutting layout.
- Ensure the pattern layout is on-grain for fabric alignment.
- Use pins to secure fabric, aiding accurate cutting.
- These pattern layouts are non-directional.
- If using fabric with nap or prints, purchase additional length.
Fabric Preparation and Cutting
- Arrange pattern pieces as shown in the above cutting diagram, ensuring the grainline arrow aligns with the selvage.
- Trace and cut fabric pieces using fabric shears, removing any markings.
- Transfer pattern markings to the wrong side of the fabric, including circles, buttonholes, and fold lines, using a marking pen or chalk.
- Mark the center front for fold pieces to aid in accurate alignment.
Sewing Steps
Step 1: How to Sew a Pocket onto a Skirt
1. Positioning the Pocket: Place the pocket piece onto the front of the skirt, making sure the right sides are together and match the pocket openings. Sew from one notch to the other, and clip the inside corner of the pocket.
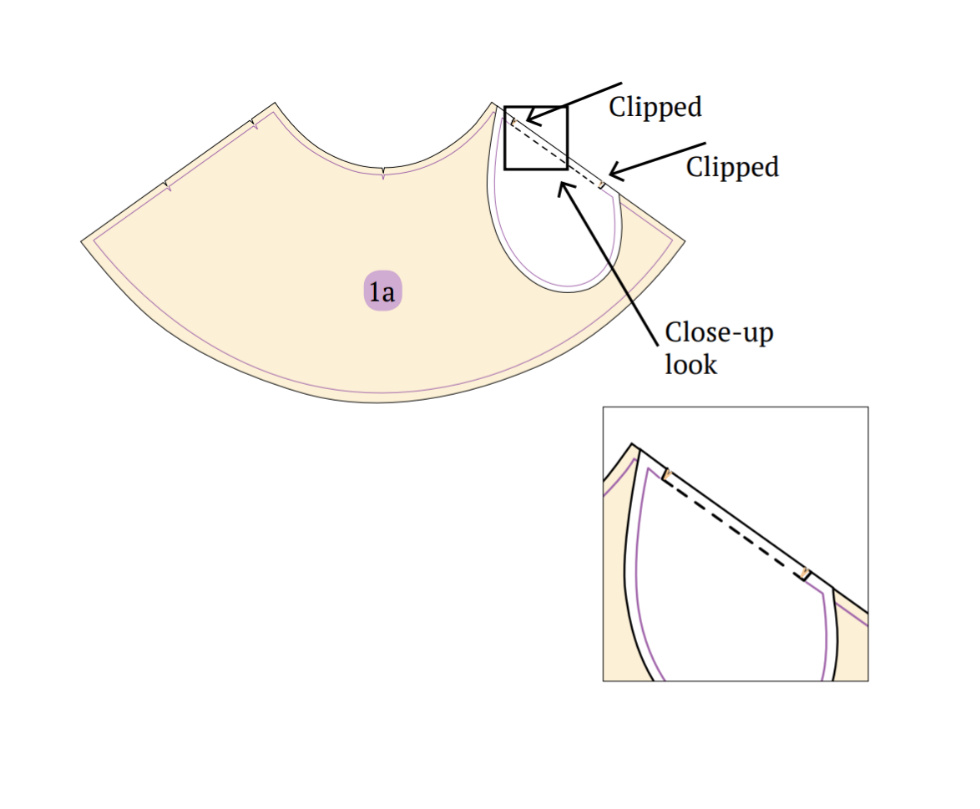
2. Folding and Pressing: Fold the pocket piece along the stitch line to the inside of the skirt front fabric and press it to create a neat crease.
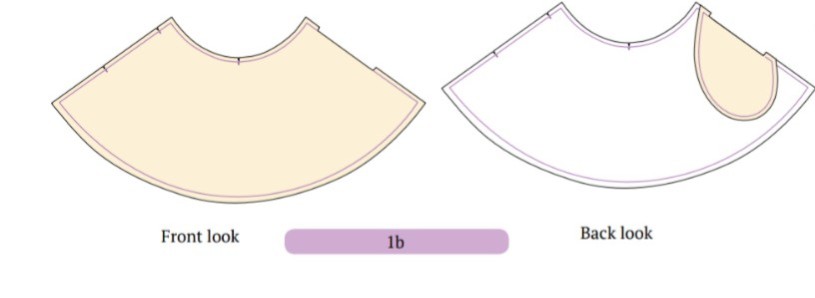
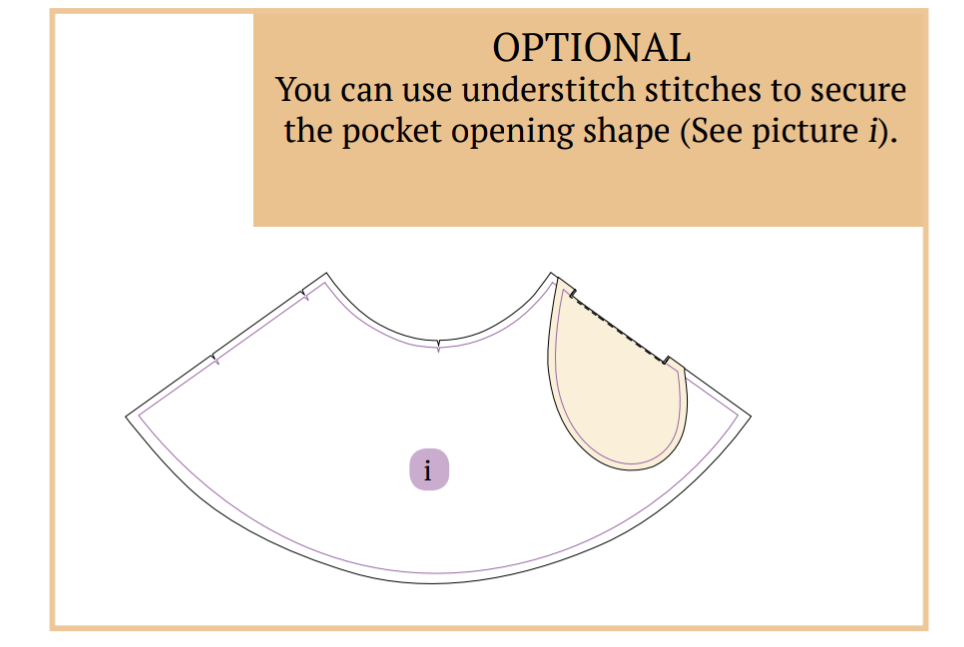
3. Adding the Second Piece: Place the second pocket piece onto the attached pocket piece on the skirt.
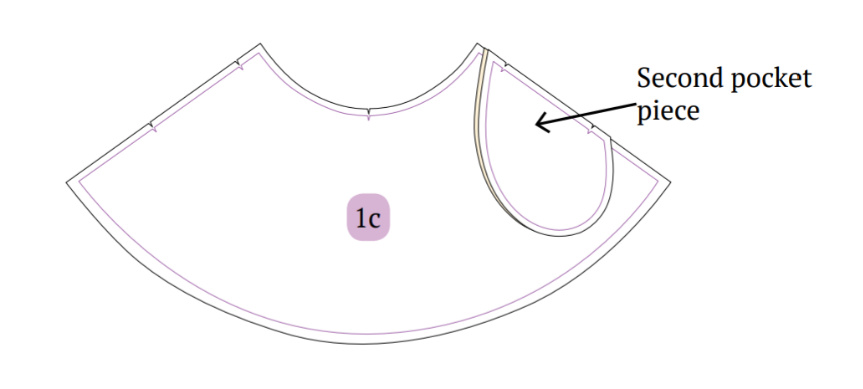
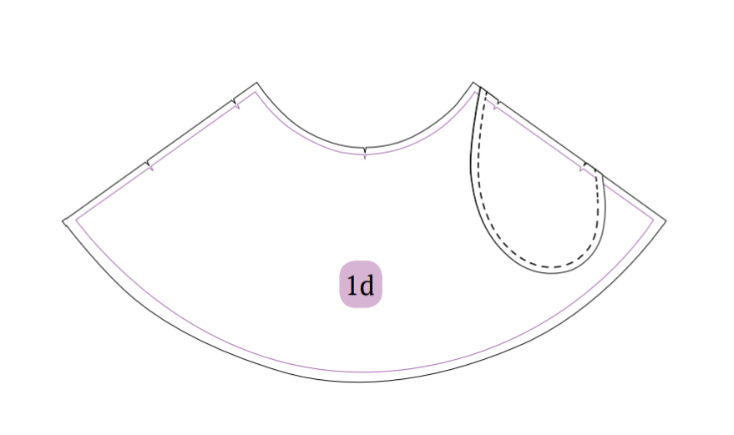
4. Sewing the Curve: Sew along the curved line to join the pieces together.
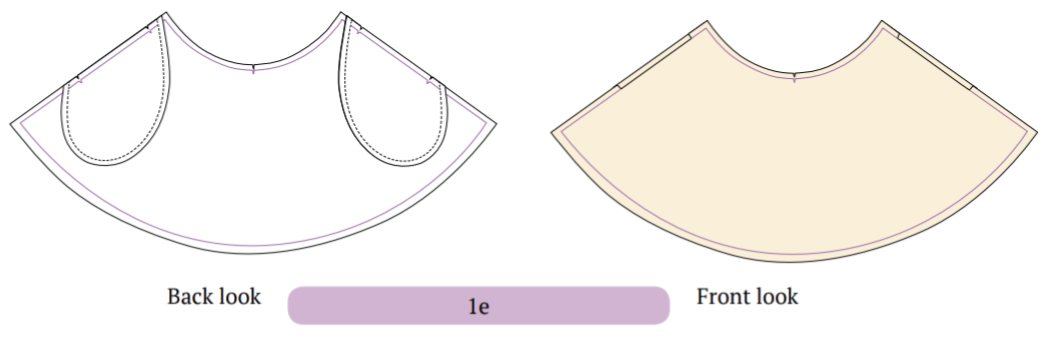
5. Repeat for the Other Side: Repeat the same process for the pocket on the other side of the skirt.
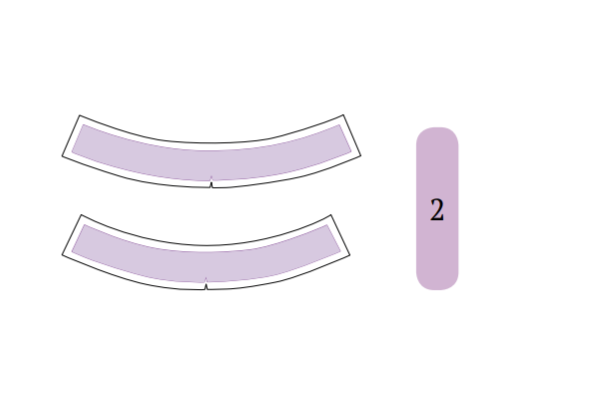
Step 2: Applying Interfacing to the Waistband
1. Positioning the Interfacing: Put the interfacing fabric onto the inside (wrong side) of both the front and back parts of the waistband.
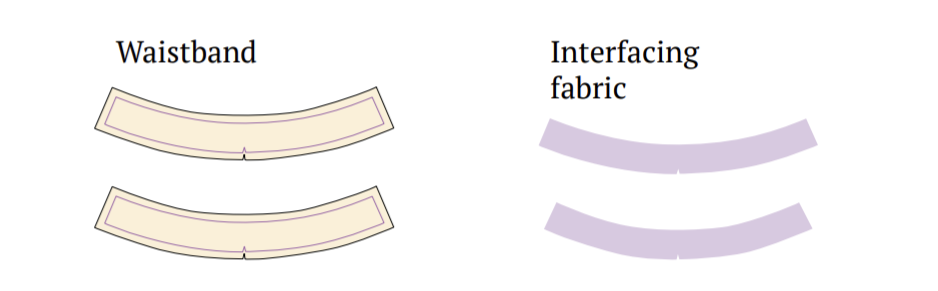
2. Pressing to Stick Together: Use an iron to press the interfacing and the waistband fabric together, making sure they stick firmly.
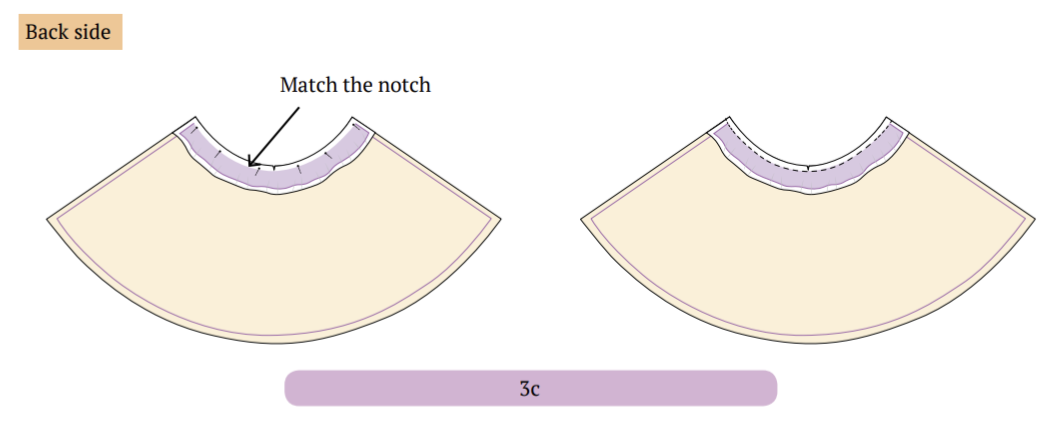
Step 3: Attaching the Waistband
1. Positioning the Waistband: Place the waistband onto the waistline of the skirt, ensuring that the right sides are facing each other.
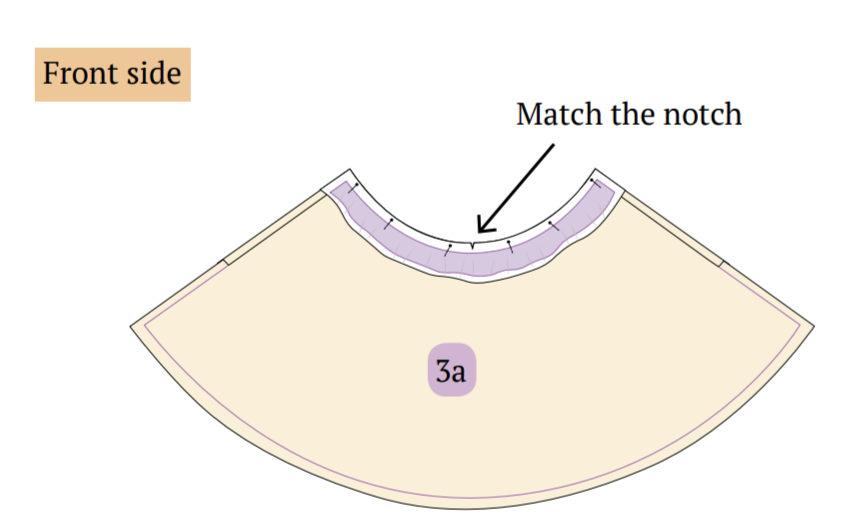
2. Sewing: Stitch the waistband and the skirt together.
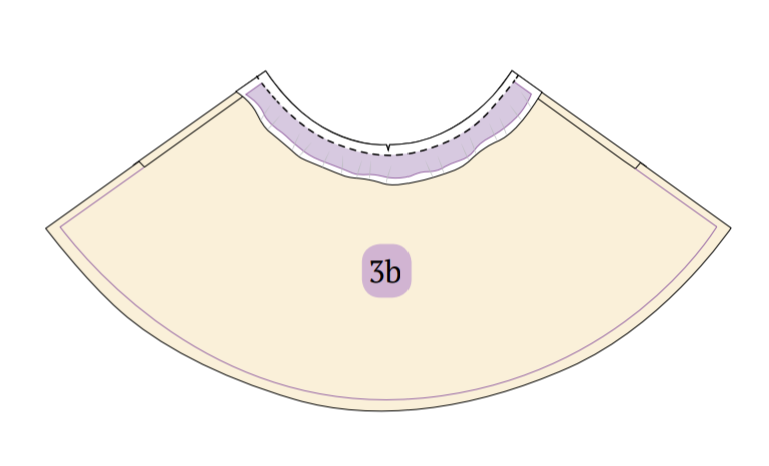
3. Repeat for the Back: Follow the same steps for attaching the back waistband to the back part of the skirt.
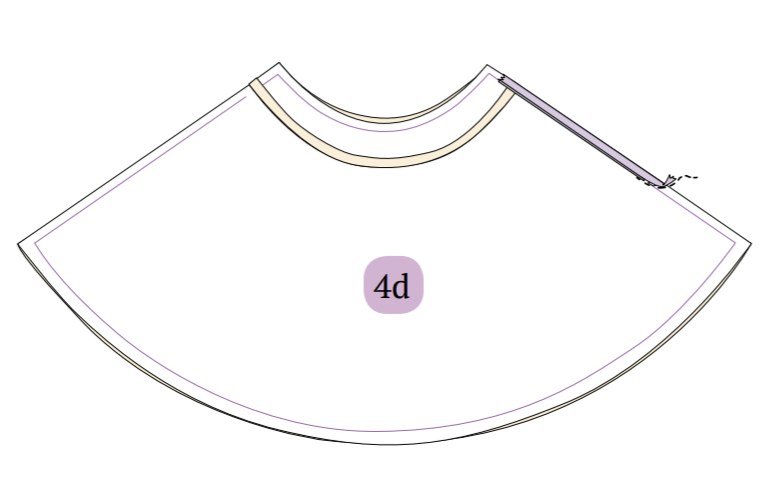
Step 4: Adding the Zipper
1. Placing the Zipper: Put the right side of the zipper (8 inches long) onto the right side of the skirt. Use pins or basting stitches to hold them together.
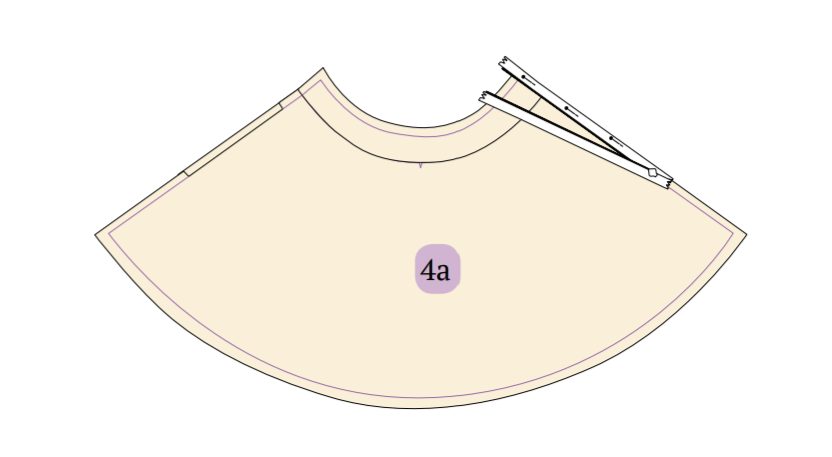
2. Sewing the Zipper Teeth: Stitch along the dent between the zipper teeth and the zipper tape.
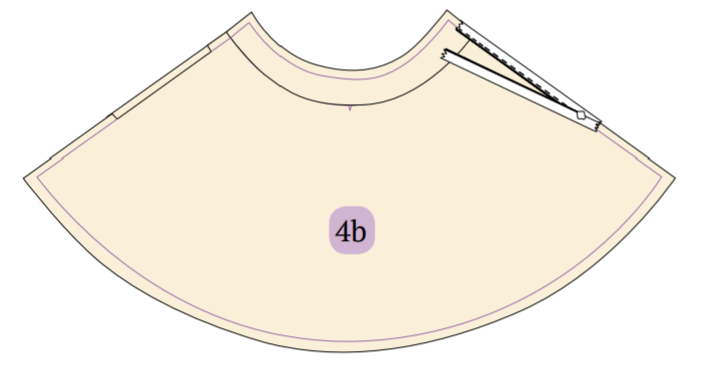
3. Repeat for the Other Side: Repeat the same process for the other side of the zipper tape, placing it on the right side of the back part of the skirt.
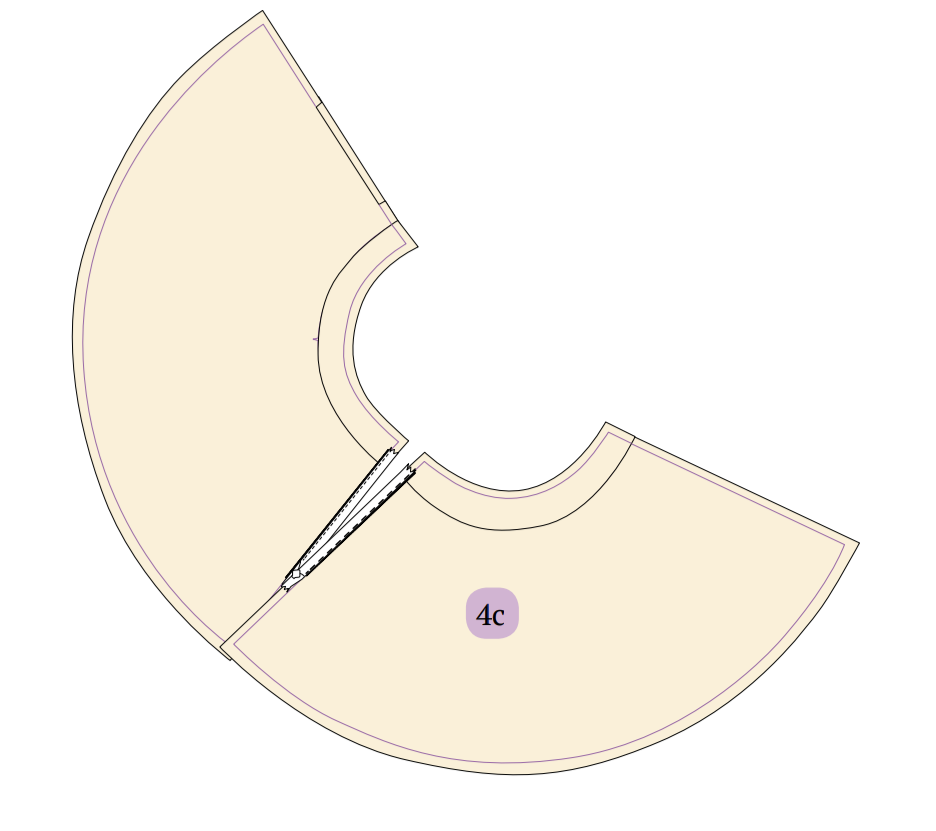
4. Closing and Sewing: Turn the skirt inside out and close the zipper. Sew along the side seam, starting about 1-2 cm above the zipper notch and ending at the zipper notch. Pivot your fabric to sew horizontally across the bottom of the zipper tape, securing it in place with a few stitches back and forth to ensure it’s firmly anchored.
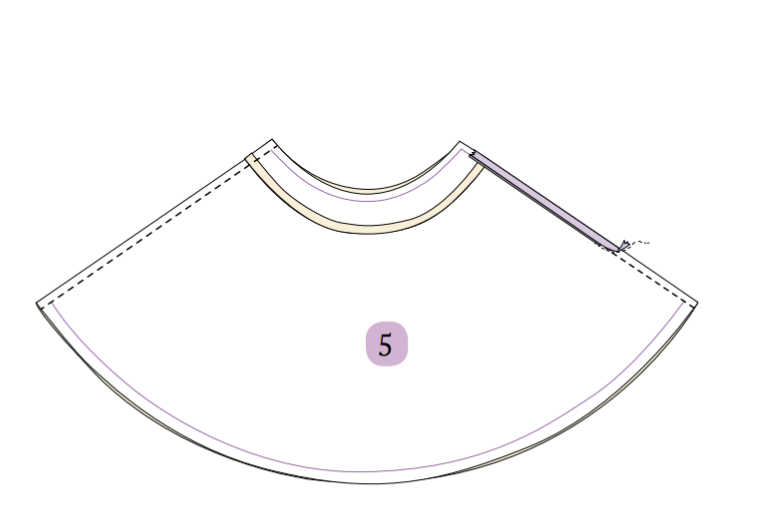
Step 5: Sewing the Side Seams
1. Aligning the Skirt Panels: Place the back and front skirt pieces together with their right sides facing each other.
2. Starting the Seam: Begin sewing the side seams from the left side of the skirt, starting at the end of the zipper.
3. Sewing: Stitch along the side seams to join the front and back panels together.
Step 6: Completing the Waistband
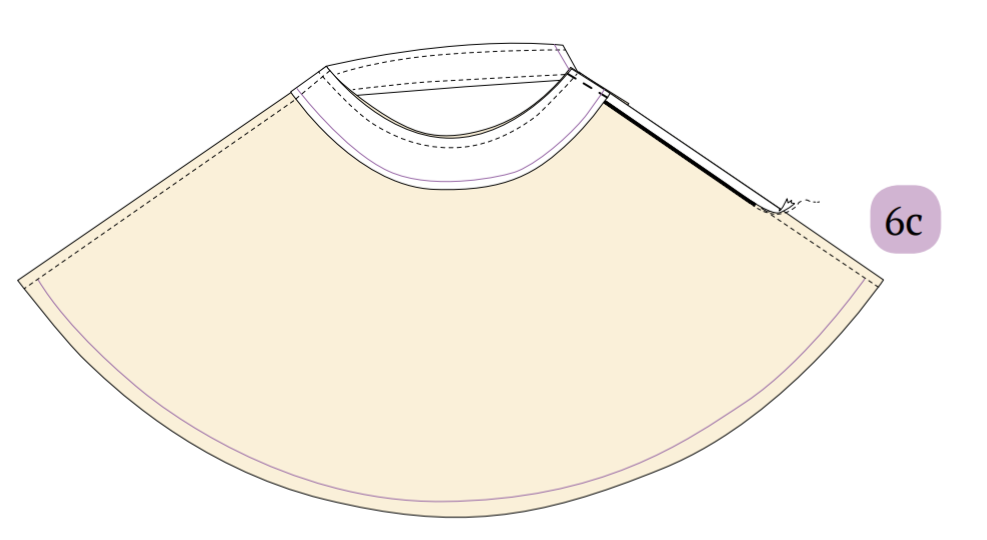
1. Joining Waistband Pieces: Place the other front and back waistband pieces together with their right sides facing, and sew one side together.
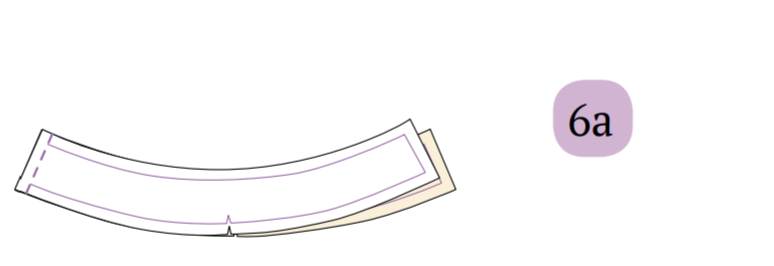
2. Attaching the Waistband to the Skirt: Place and pin the waistband onto the waistband already attached to the skirt, ensuring the right sides are together. Make sure the zipper tape is pulled out to the right side. Sew along the upper waistline.
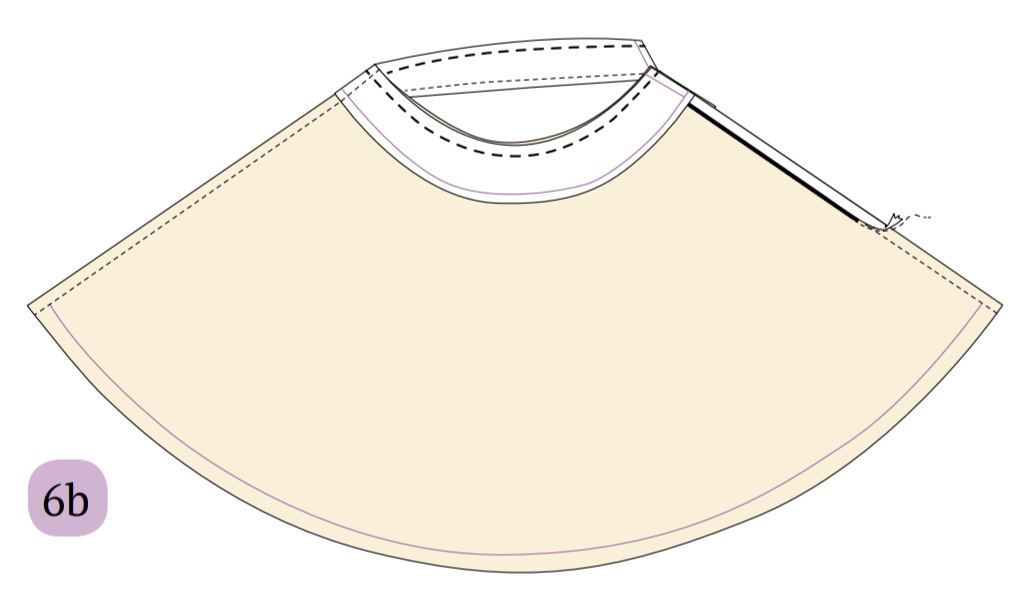
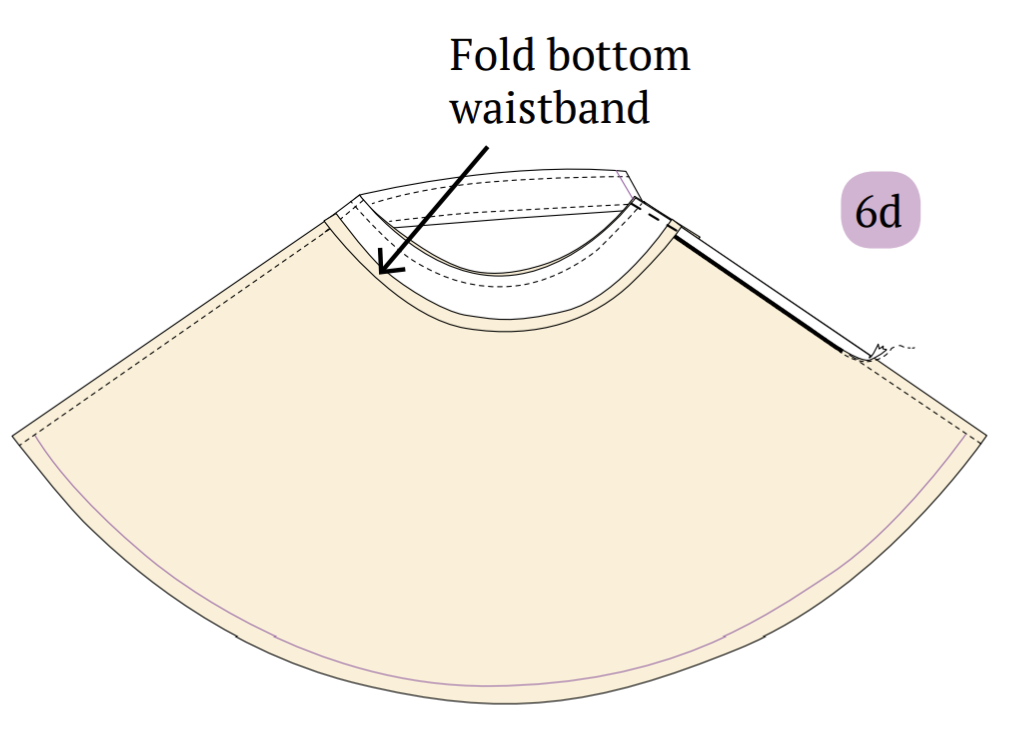
3. Finishing the Waistband Seam: Fold the seam allowance of the bottom waistline of the waistband to the inside and press it down. Carefully sew the side of the waistband along the edge of the zipper teeth.
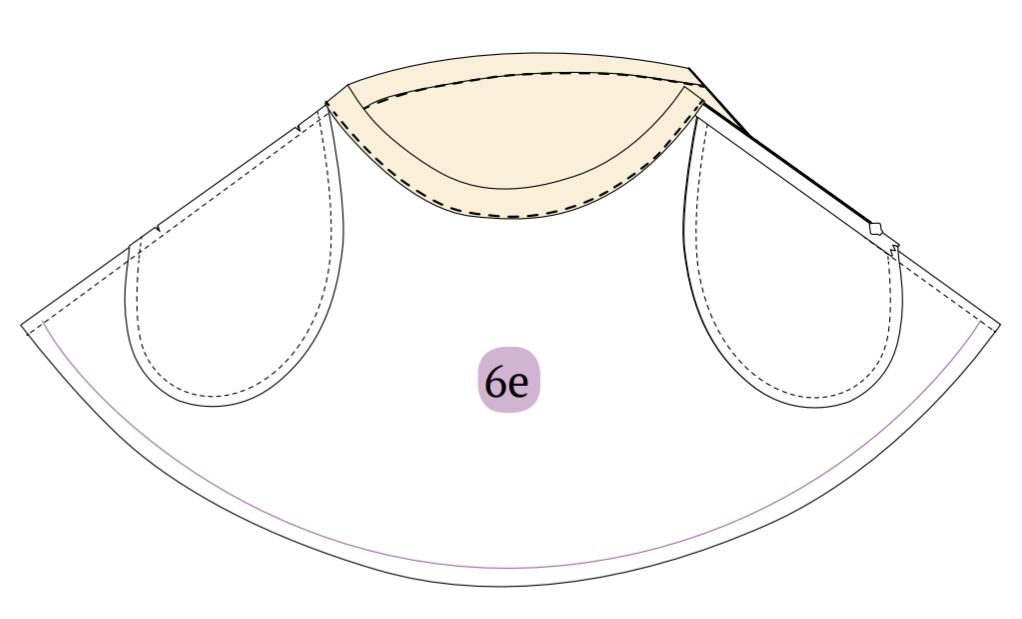
4. Turning the Waistband: Turn the waistband so that the right side of the fabric faces outwards. Poke the stitched corner of the waistband for a sharper shape. Then, turn the garment inside out.
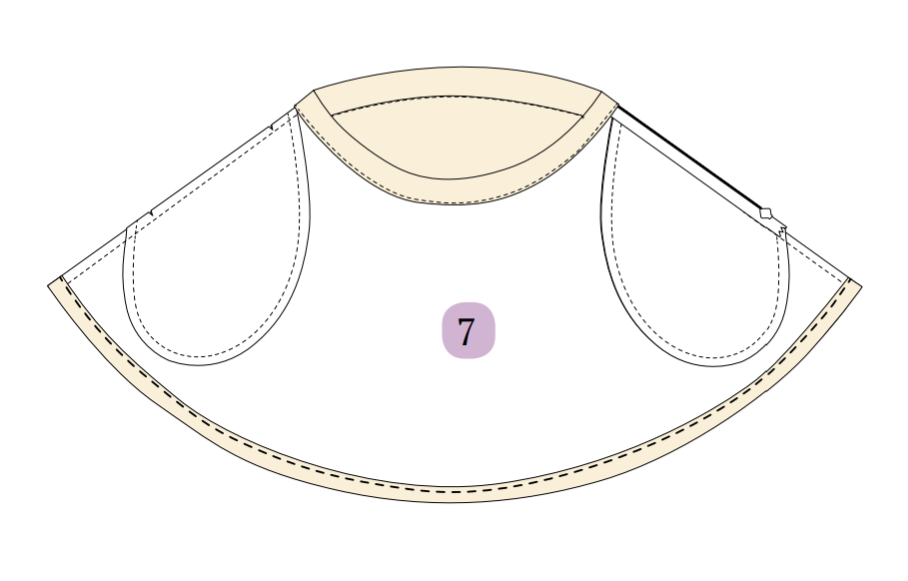
5. Closing the Waistband: To close the waistband, pin and sew along the bottom waistline of the waistband and the skirt waistline.
Step 7: Hemming the Skirt
1. Folding the Hem: Fold the bottom edge of the skirt to create the hem.
2. Sewing Around the Hem: Sew all around the hem, starting from one side seam and continuing until you reach the starting point again, completing the hem.
Summary
And that’s it! I think this project is highly fulfilling as you can pair the skirt with a blouse or crop top for a chic look, making them a staple in any wardrobe for fashion and comfort alike.
Check out some final images of this adorable skater skirt created with the Winslet’s POPPY Skater Skirt Pattern:
Will you be making this skirt or any other sewing project for yourself? How did it turn out? Let me know in the comments below!
Join the Winslet’s sewing community by sharing your masterpiece with the hashtag #madewithwinslets!


Worth noting that you don’t *need* a sewing machine to do this project (or any other project, really). Hand sewing is still an option.
Hi Jerry,
ABsolutely 🙂 I prefer sewing machines for the quality, finishing and most importantly time efficiency.
-Katie