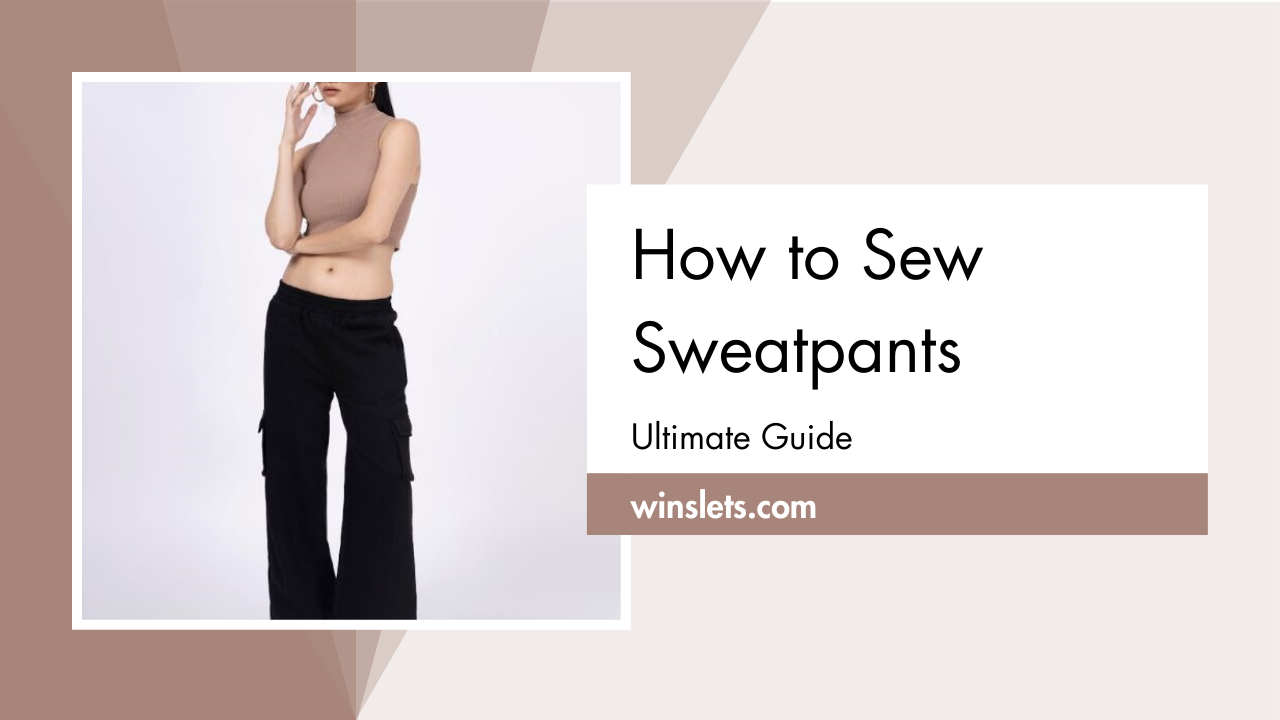
How to Sew Sweatpants?
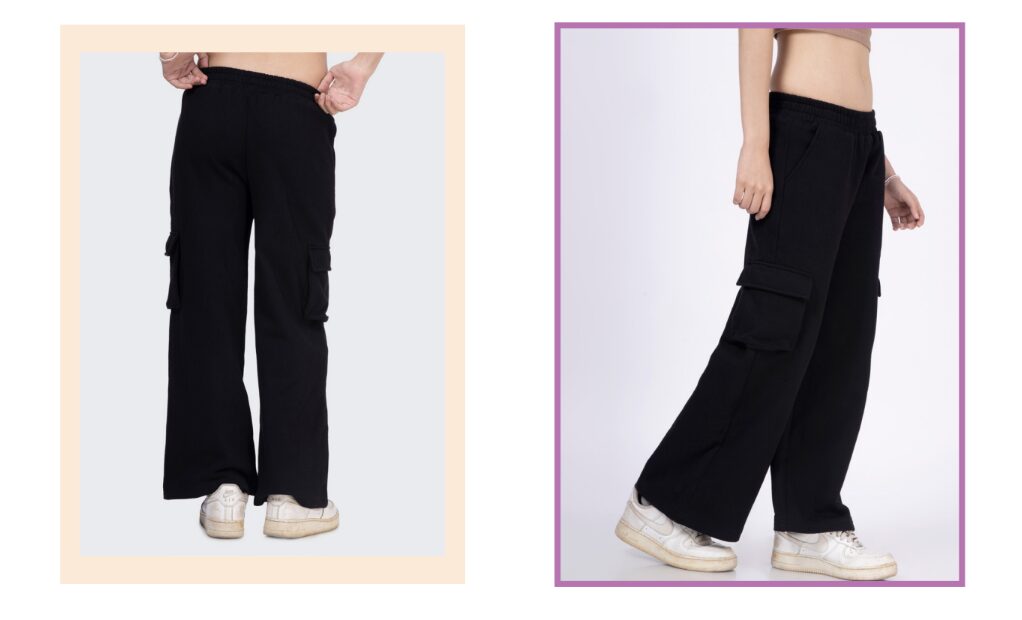
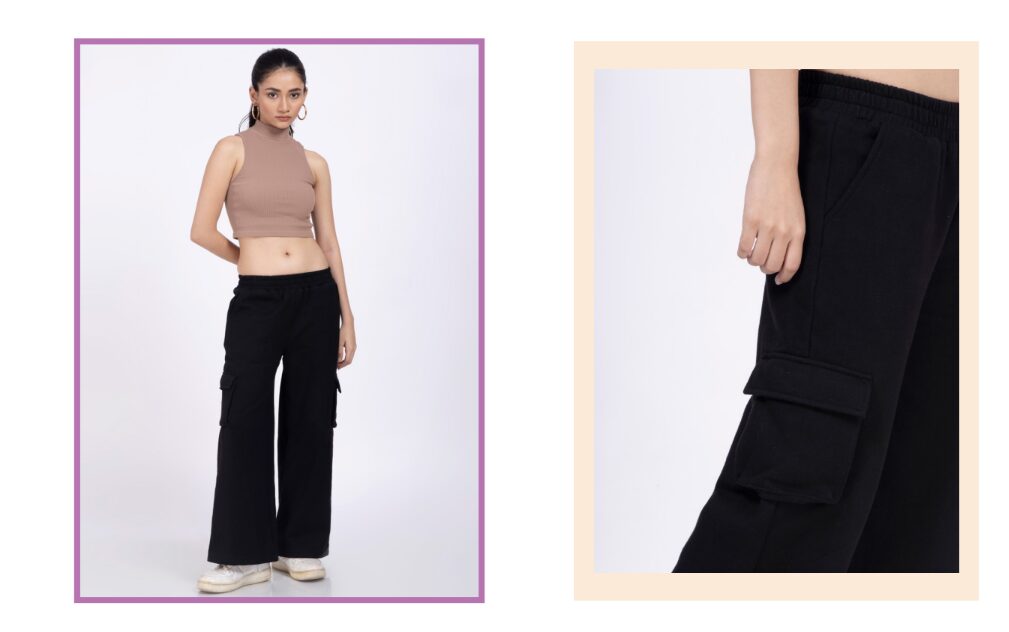
Can’t sew sweatpants yet? No problem! I just made one using the Winslet’s MADDIE Y2K Sweatpants Pattern. They can be paired with crop tops or fitted tees to balance the relaxed silhouette of the pants. Perfect for casual outings, these sweatpants also work well with sneakers for a complete Y2K vibe.
So, join me in this sewing adventure to craft your own pair of sweatpants!
What sewing supplies do you need to sew sweatpants?
The basic supplies you need to sew sweatpants are Sewing Pattern (I used Winslet’s MADDIE Y2K Sweatpants Pattern in this example), Sewing Machine, Tape Measure, Chalk, Shears, Pins, Iron, Needles, Thread (preferably 3-ply polyester), a Thread Cutter, Elastic Band, and a Fusible Interfacing.
Fabric Recommendation
I used soft fleece for this project. If you’re new to sewing, making comfy sweatpants from fleece is a good starting point. Fleece proves simpler to handle than alternative knitted fabrics, avoiding issues like curling edges or getting caught in the sewing machine’s throat plate, common challenges for beginners working with other knits.
You can also try light to medium-weight fabrics like cotton, polyester, poly-cotton blends, jersey, rayon, terry, or wool for the main part of your pants.

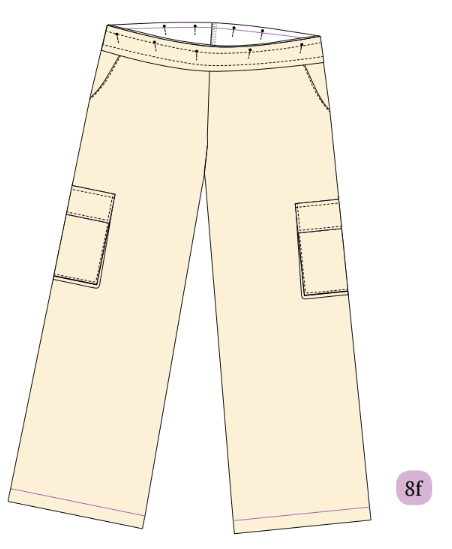
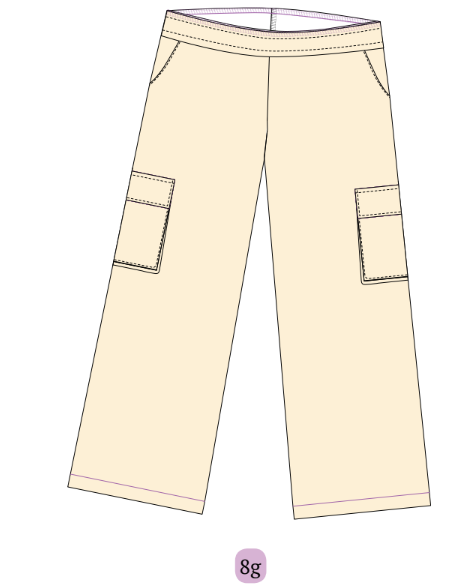
The model above features a sweatpant made with the Winslet’s MADDIE Y2K Sweatpants Pattern. The fabric used is fleece—a recommended fabric for its breathability, durability, moisture-wicking, deep pile texture, no fraying, warmth when wet, and lighter than wool, with minimal shrinkage.
Size Charts
The sweatpants sewing pattern measurements for sizes (XS, S, M, L, XL, 2XL, or 3XL) are detailed below. Choose a size that corresponds most closely to your body measurements.
It’s worth noting that if your exact measurements are not listed in the table, you may want to consider ordering a size larger.
The size chart includes measurements in both inches and centimeters for your reference.
Body Measurements
| XS (inches) | XS (cm) | S (inches) | S (cm) | M (inches) | M (cm) | L (inches) | L (cm) | XL (inches) | XL (cm) | 2XL (inches) | 2XL (cm) | 3XL (inches) | 3XL (cm) | |
| Bust | 32 | 81.3 | 34 | 86.4 | 36 | 91.4 | 38 | 96.5 | 40 | 101.6 | 42 | 106.7 | 44 | 111.8 |
| Waist | 26 | 66.0 | 28 | 71.1 | 30 | 76.2 | 32 | 81.3 | 34 | 86.4 | 36 | 91.4 | 38 | 96.5 |
Final Garment Measurements
| XS (inches) | XS (cm) | S (inches) | S (cm) | M (inches) | M (cm) | L (inches) | L (cm) | XL (inches) | XL (cm) | 2XL (inches) | 2XL (cm) | 3XL (inches) | 3XL (cm) | |
| Waist Round (Stretched) | 37 | 93.98 | 39 | 99.06 | 41 | 104.14 | 43 | 109.22 | 45 | 114.3 | 47 | 119.38 | 49 | 124.46 |
| Hip Round | 38 | 96.52 | 40 | 101.6 | 42 | 106.68 | 44 | 111.76 | 46 | 116.84 | 48 | 121.92 | 50 | 127 |
| Full Length (Without Belt) | 41 | 104.14 | 41.5 | 105.41 | 42 | 106.68 | 42.5 | 107.95 | 43 | 109.22 | 43.5 | 110.49 | 44 | 111.76 |
Fabric Yield
| Width of the Fabric | XS (yards) | XS (meters) | S (yards) | S (meters) | M (yards) | M (meters) | L (yards) | L (meters) | XL (yards) | XL (meters) | 2XL (yards) | 2XL (meters) | 3XL (yards) | 3XL (meters) |
| 45” | 1.83 | 1.67 | 2.15 | 1.96 | 2.53 | 2.31 | 2.91 | 2.66 | 3.34 | 3.06 | 3.84 | 3.52 | 4.42 | 4.04 |
| 60” | 1.23 | 1.12 | 1.44 | 1.32 | 1.70 | 1.55 | 1.95 | 1.79 | 2.25 | 2.05 | 2.58 | 2.36 | 2.97 | 2.72 |
Steps To Follow For Sewing Sweatpants
Let’s dive into the steps for sewing your very own unique sweatpants:
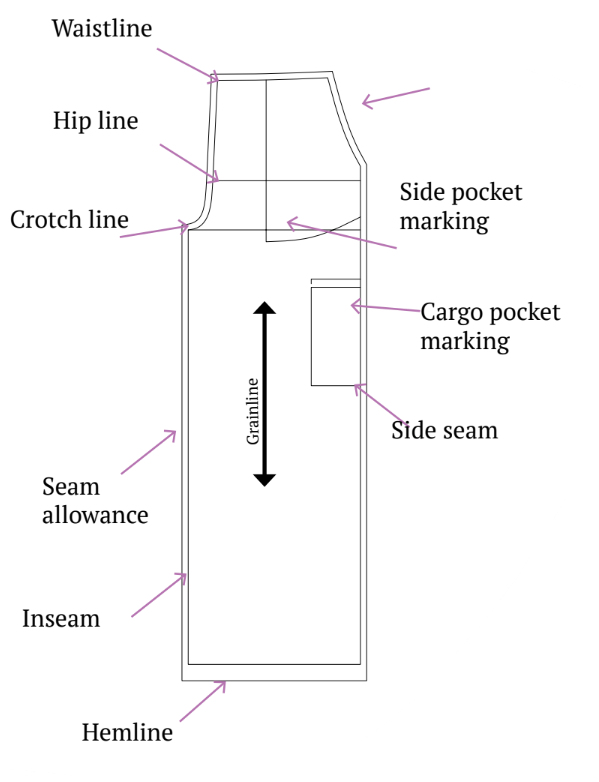
Pattern Marking and Inventory
The fabric needs to be cut into following pieces:
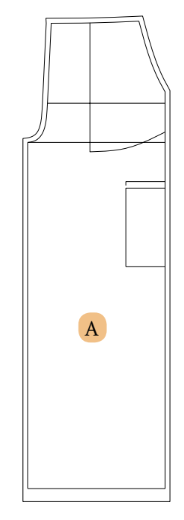
A. Front – cut x2 fabric
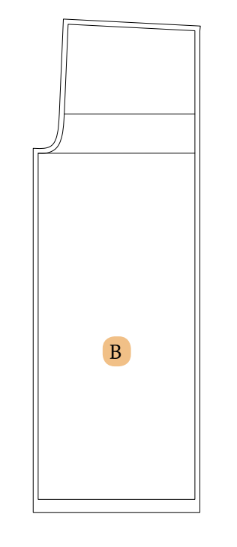
B. Back – cut x2 fabric
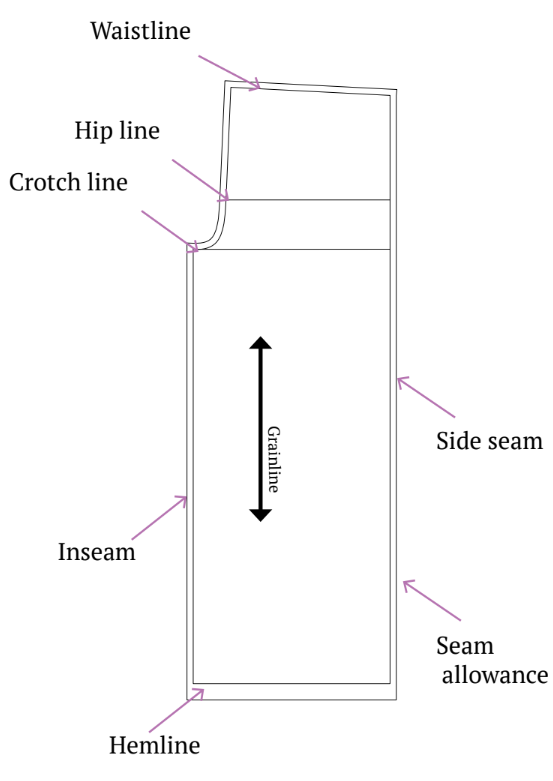
An inseam refers to the measurement from your crotch down to your ankle bone, essentially representing the length of your inner leg.
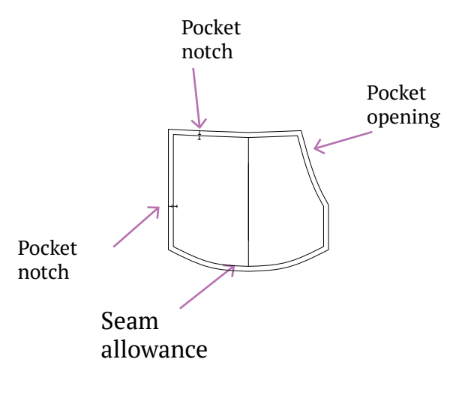
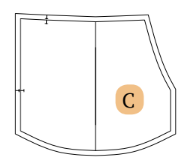
C. Pocket – cut x2 fabric
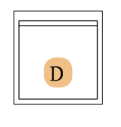
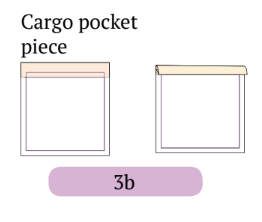
D. Cargo Pocket – cut x2 fabric
E. Cargo Pocket Side Strip – cut x2 fabric

F. Cargo Pocket Flap – cut x2 fabric
G. Waist Belt – cut x1 fabric

Be sure to indicate all notches and design elements like darts and pleats on your fabric using the pattern pieces. When stitching the garment, carefully align the notches to ensure a proper match.
Cutting Layout
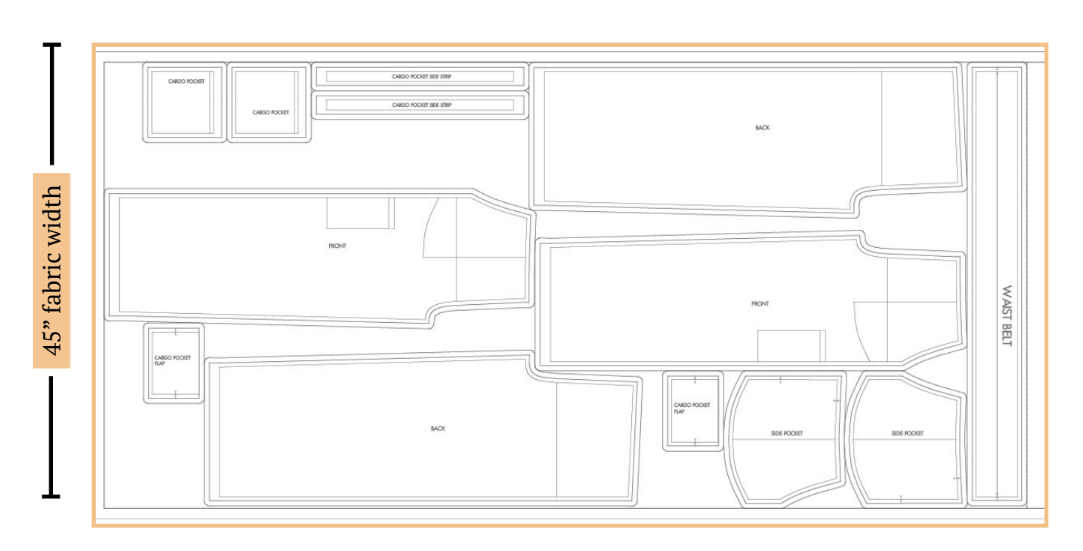
- Ensure the pattern layout is on-grain for fabric alignment.
- Use pins to secure fabric, aiding accurate cutting.
- If using fabric with nap or prints, purchase additional length.
Sewing Steps
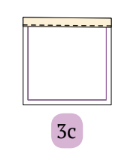
Step 1: Attaching Pockets to Front Legs
1. Place the left pocket piece with its right side facing the left front leg’s pocket opening marking.
Pin them together.
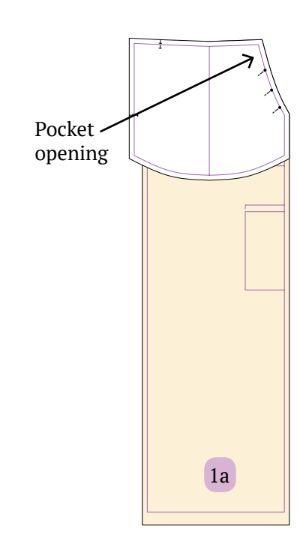
2. Sew along the opening line.
3. After sewing, spread the pocket and leg open.
Next, understitch the pocket.
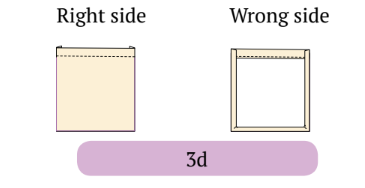
4. Turn the wrong side facing and press down the pocket and front leg together.
Sew along the edge of the opening.
5. Fold the pocket facing its right side together and secure them with pins.
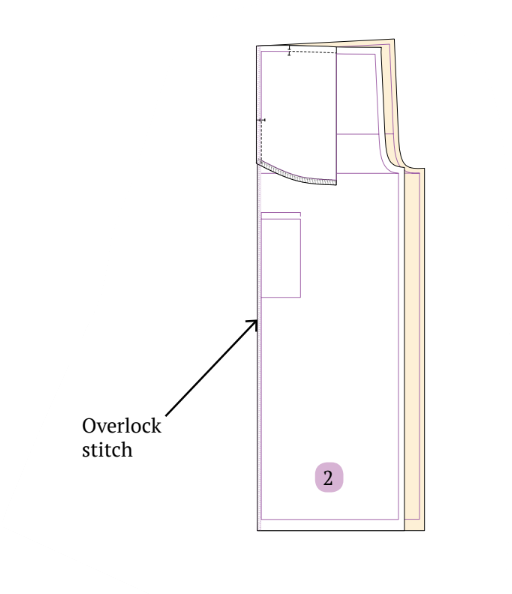
Use an overlock stitch to finish the pocket end.
6. Sew a few stitches to secure both sides of the pocket opening until reaching the given notches.
Repeat the same process to attach the pocket to the other side of the leg piece.
Step 2: Joining Front and Back Pieces
Place the front and back pieces together with their right sides facing each other.
Sew the side seam to connect them.
Step 3: Attaching Cargo Pocket
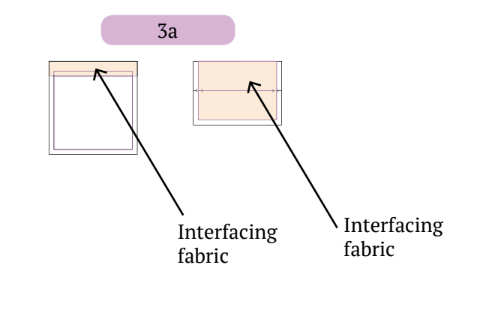
1. Cut a cargo pocket flap from fusible interfacing fabric without seam allowance.
Also, cut the opening seam allowance of the cargo pocket piece.
Iron the adhesive part onto the wrong side of the pocket pieces.
2. Fold the opening of the cargo pocket piece twice.
3. Sew at the edge to finish it.
4. Fold and press the seam allowance of the pocket to the wrong side.
5. Take the cargo pocket strip, fold it from both sides (about 0.5 – 1 cm each), and press it down properly.
6. Place the cargo pocket on the strip and sew on the edges of the pocket, forming u-shaped stitches.
7. Spread open the front and back leg pieces.
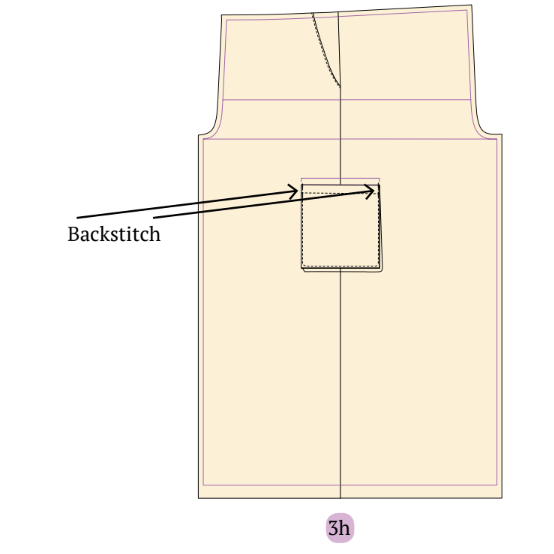
Position the cargo pocket with the strip sewn together on the cargo pocket marking, placing the unsewn side of the strip on the marking of the pocket.
Sew on the edges, forming u-shaped stitches.
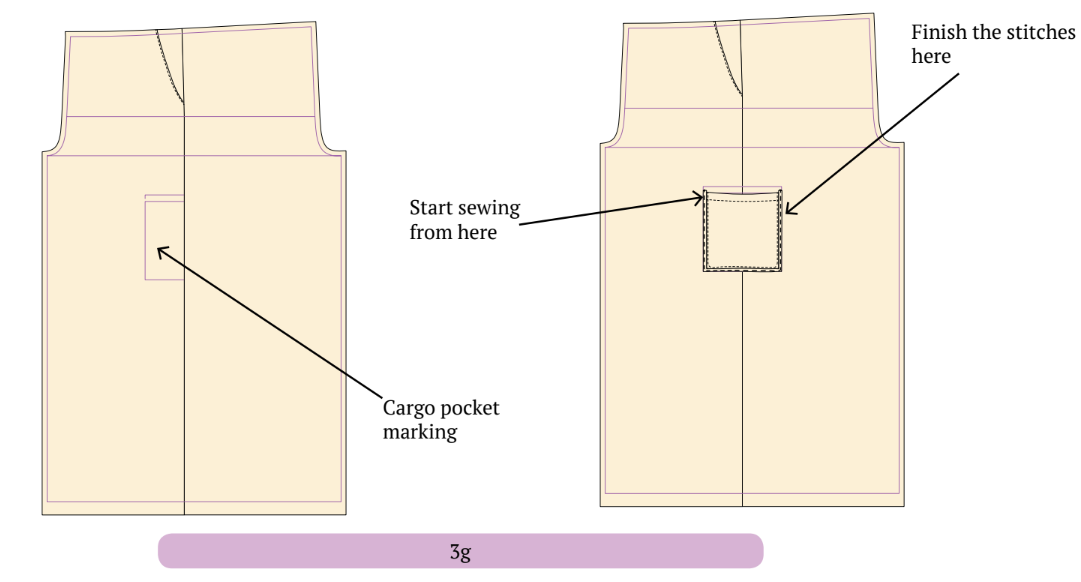
8. Lock both sides of the top opening with a few stitches.
Step 4: Attaching Cargo Pocket Flap
1. Fold the pocket flap to the wrong side.
Sew on both sides of the seam allowance.
Clip at the corner and turn the flap to face the right side.
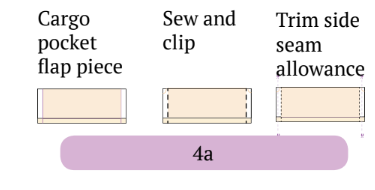
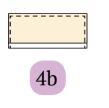
2. Sew on the edges of the flap, leaving the opening side.
3. Place it at the flap marking on the pocket and sew on the line.
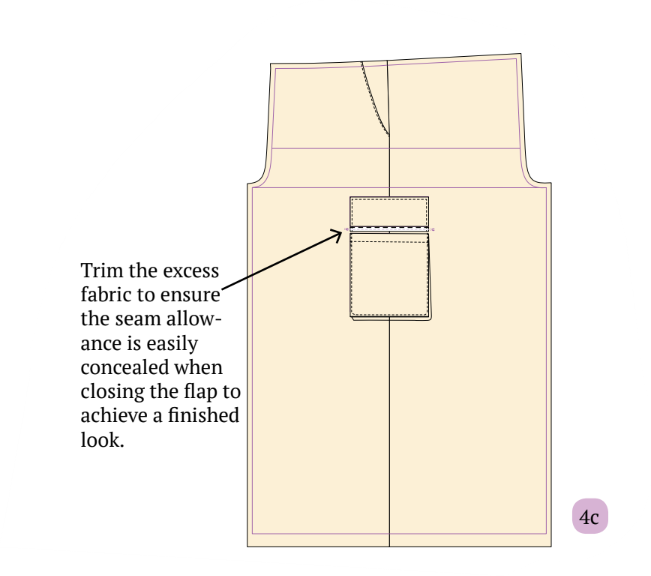
4. Trim the extra seam allowance, turn, and press it.
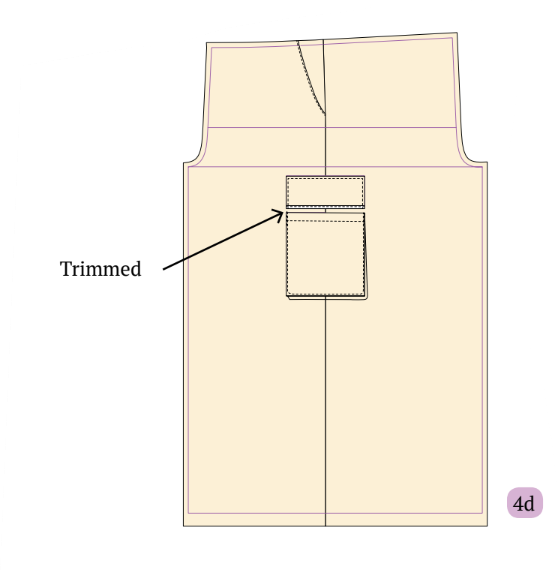
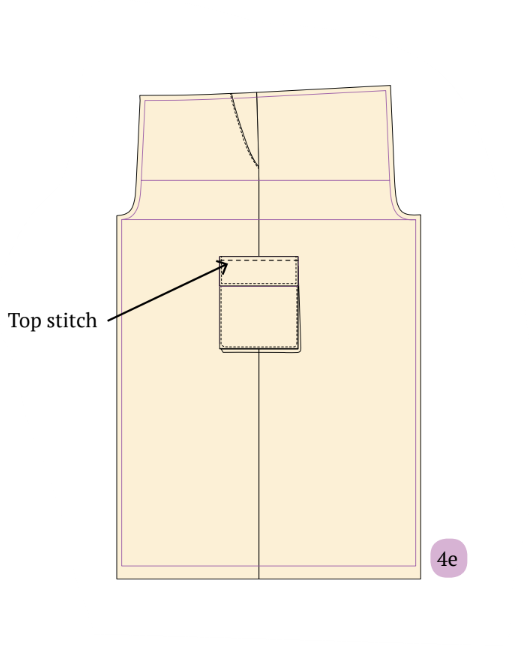
5. Sew on the edge of the flap (0.5 cm) to hide the trimmed seam allowance underneath.
Repeat the same process for the other side of the leg cargo pocket.
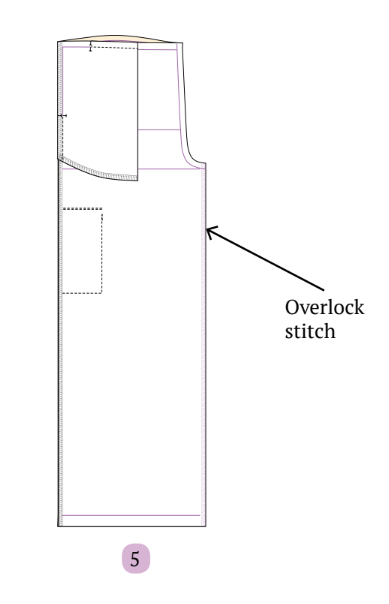
Step 5: Inseam Stitching for Leg Pieces
Place the front and back leg pieces together with their right sides facing each other.
Sew the inseam and repeat the same process for the other leg piece.
Step 6: Sewing the Crotch
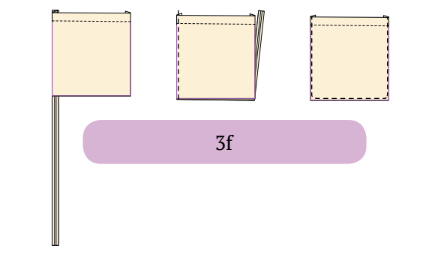
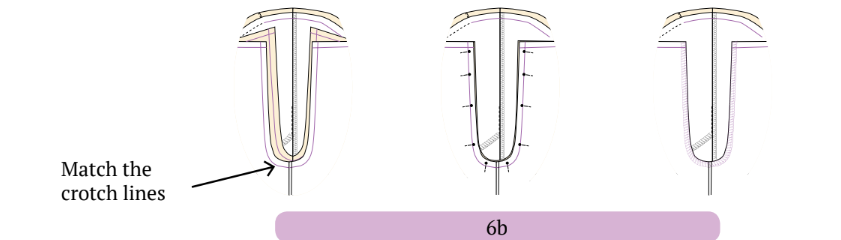
1. Identify the left (Figure i) and right (Figure ii) sides of the leg pieces.
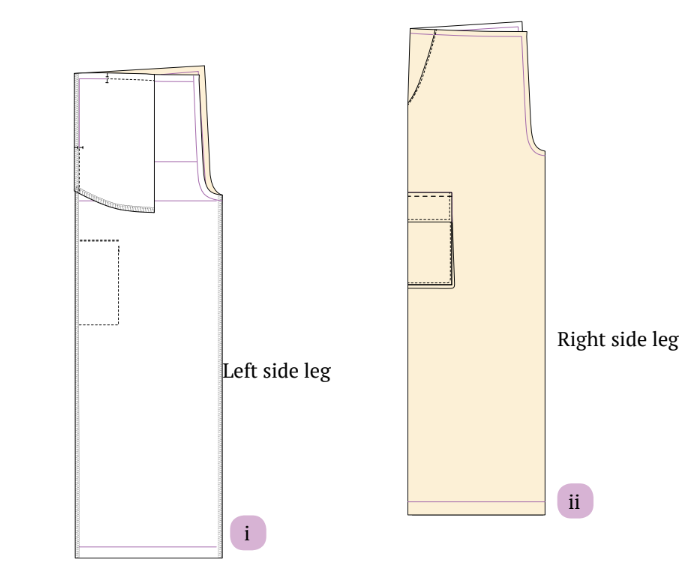
2. Place one leg into the other leg, ensuring their right sides are facing each other.
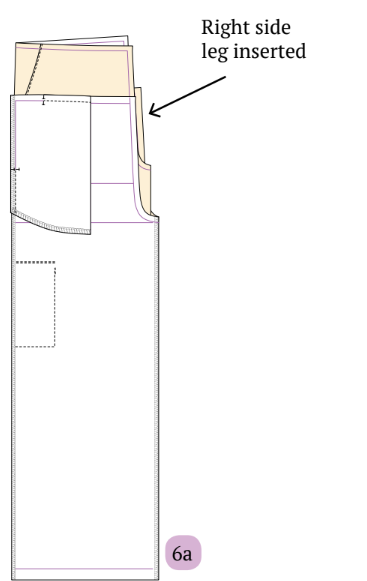
3. Align the crotch line with the waistline, pin it in place, and then sew the crotch.
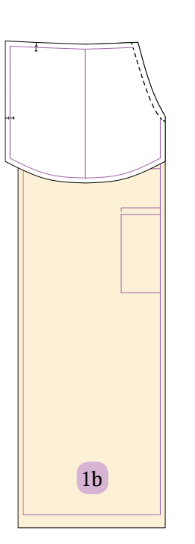
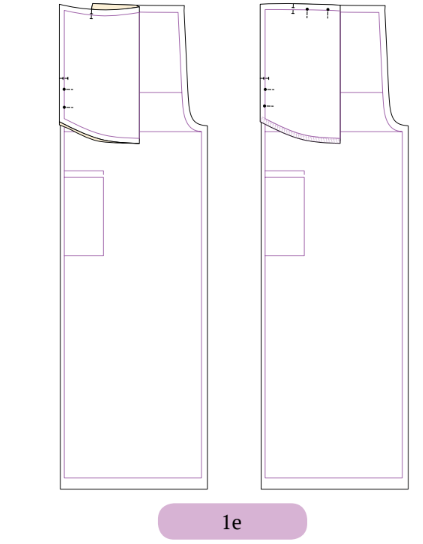
Step 7: Attaching Waistband
Place the waistband with its right sides together, press it, and sew on the seam allowance to close the waistband.
Step 8: Attaching Elastic Waistband
1. Prepare Elastic Band
Take an elastic band based on your waist size, reducing it by 2-4 inches for desired tightness (Width: 1.75 inches for all sizes).
Example: If your waist is 28 inches, use a 26-inch elastic band for a regular fit.

2. Attach Elastic Ends
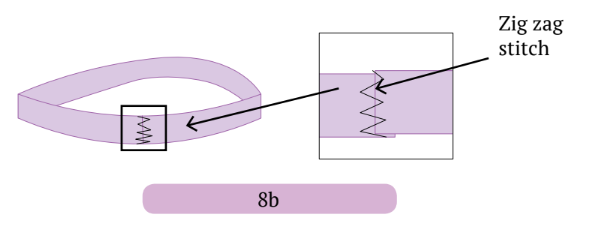
Option 1: Use a 1.5-inch muslin piece, pin it under the edges where the elastic joins, and sew with a zig-zag stitch.
Option 2: Add a 1 cm seam allowance to both sides of the elastic edges, place them together, and use a zig-zag stitch to conceal.
3. Position Elastic on Waistband
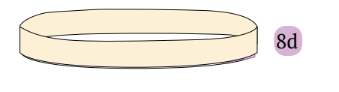
Place the elastic band on the wrong side of the waistband.
4. Fold with Elastic Inside
Fold the waistband, enclosing the elastic band inside.
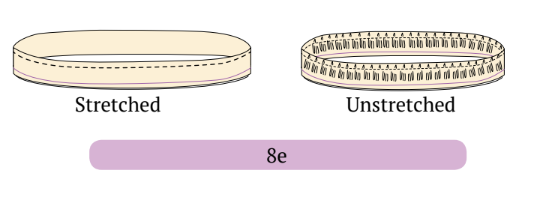
5. Sew First Line
Sew about 1 cm down from the waistband, stretching the elastic as needed for a snug fit.
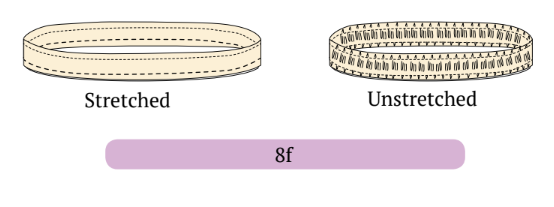
6. Sew Second Line
Sew another line about 2 cm below the first, maintaining elastic tension.
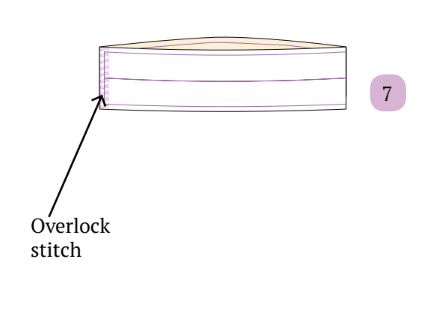
Place the waistband on the waistline of the pants. Pin them, aligning the seamline of the waistband at the center back of the pant.
7. Attach Waistband to Pants
Sew the waistline using an overlock stitch.
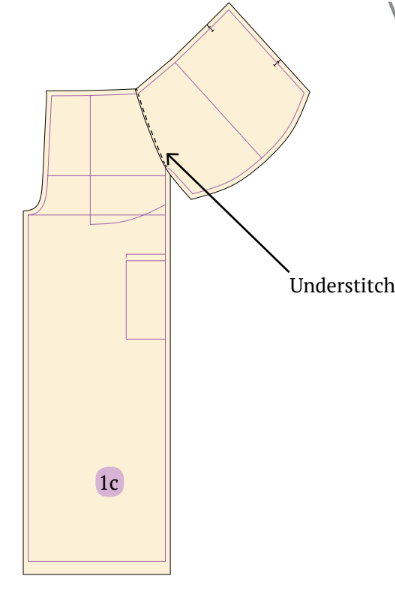
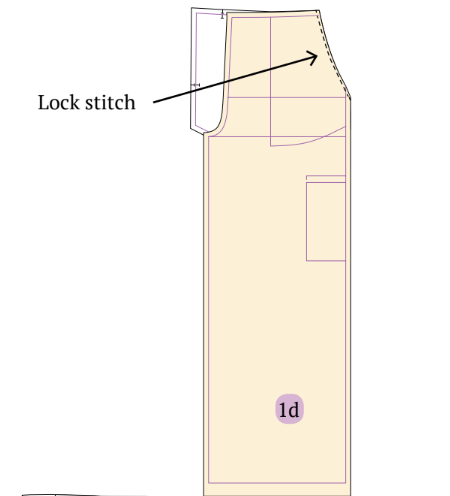
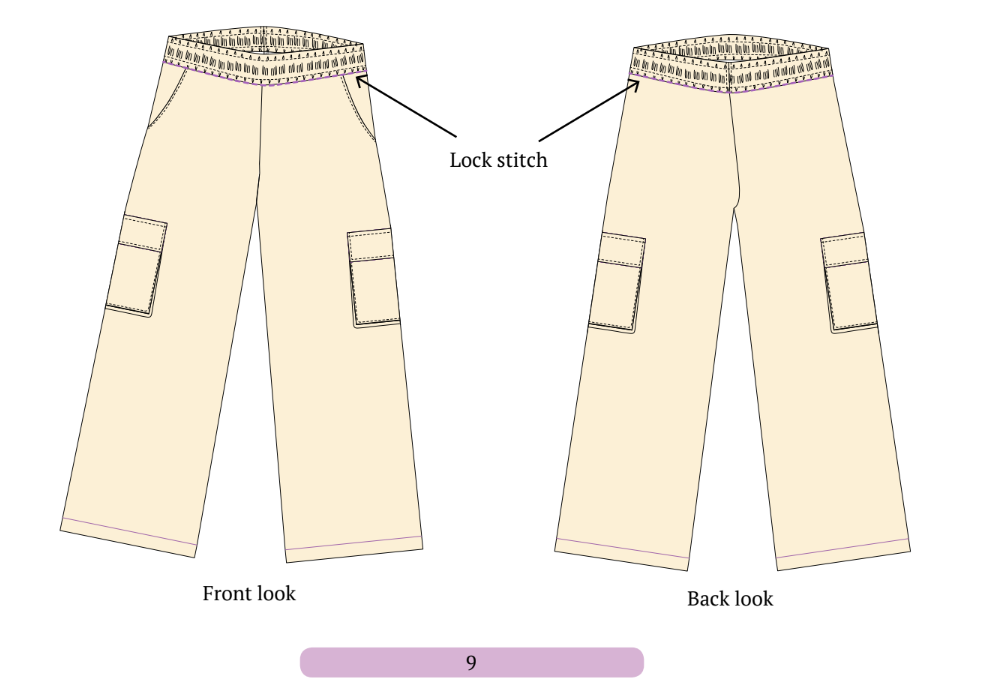
Step 9: Understitching the Waistband
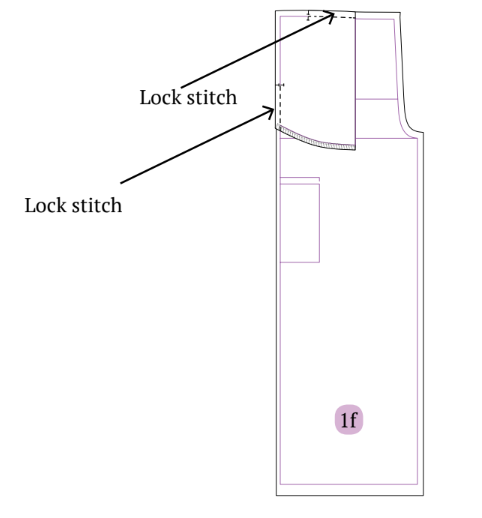
Sew between the waistband and waistline to understitch the seam allowance, securing it with a lock stitch (optional step).
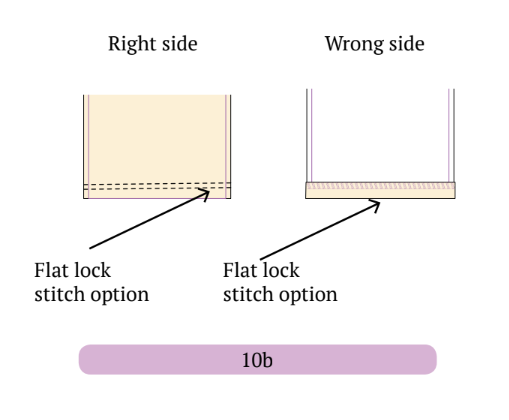
Step 10: Hemming
1. Fold the hem to the wrong side.

2. Sew around it.
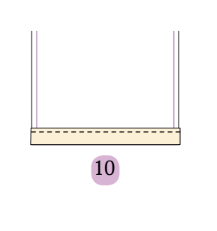
3. Alternatively, you have the option to use a flatlock stitch for the hem.
And that’s it! Your wide leg cargo pants are done and ready to be worn!
Summary
I was glad to find out that my sweatpants were super comfortable to wear and the fit was great. Whether you’re lounging at home or heading out, having comfortable clothing makes a big difference in your day, and these sweatpants did just that!
Check out some final images of this adorable sweatpants created with the Winslet’s MADDIE Y2K Sweatpants Pattern:
If you have any specific questions or if there’s anything else you’d like to know or share about the sweatpants, feel free to let me know or check my other projects!
If you liked learning how to make these sweatpants with the Winslet’s MADDIE Y2K Sweatpants Pattern, make sure to pin it to your favorite Pinterest board or share it with friends on social media.
Join the Winslet’s sewing community by sharing your masterpiece with the hashtag #madewithwinslets!


